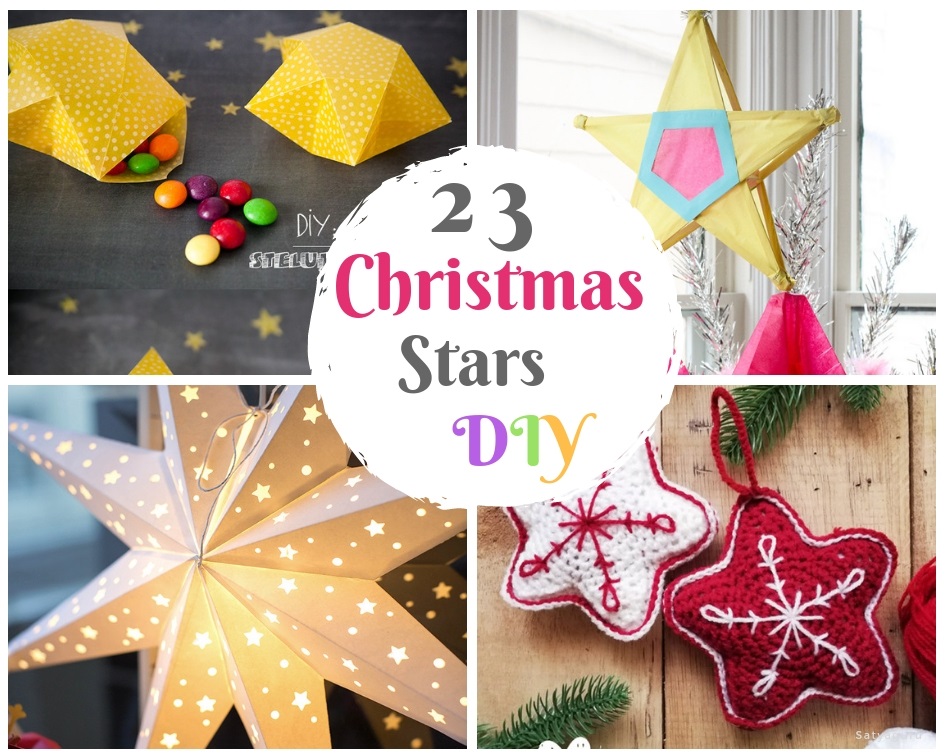
Whenever we think of a perfect Christmas decoration, some specific items instantly occur in our mind and Christmas stars are definitely the mentionable one among them. Christmas star is one of the imperative parts of Christmas ornamentation which is truly effortless to craft and takes very little time to make as well. Today we have emerged with some super easy projects of making Christmas stars with different types of objects. Let’s check out the making procedure below-
Updated
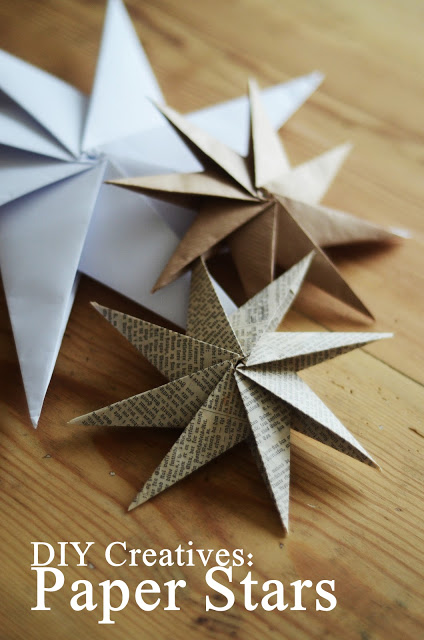
Christmas Paper Stars
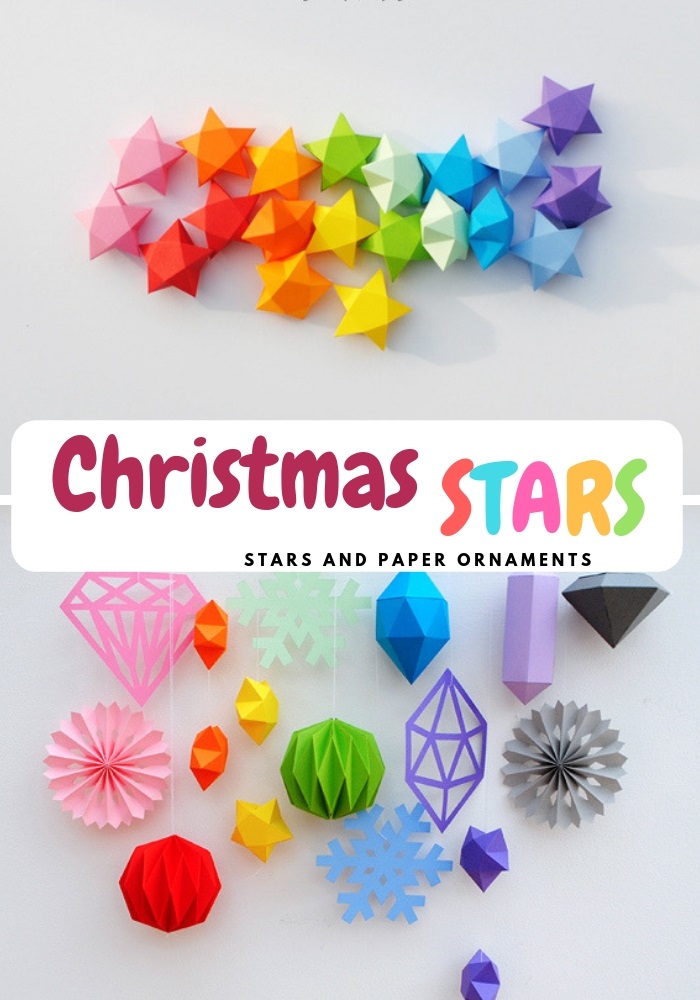
Christmas Paper Stars and Decor Ornaments
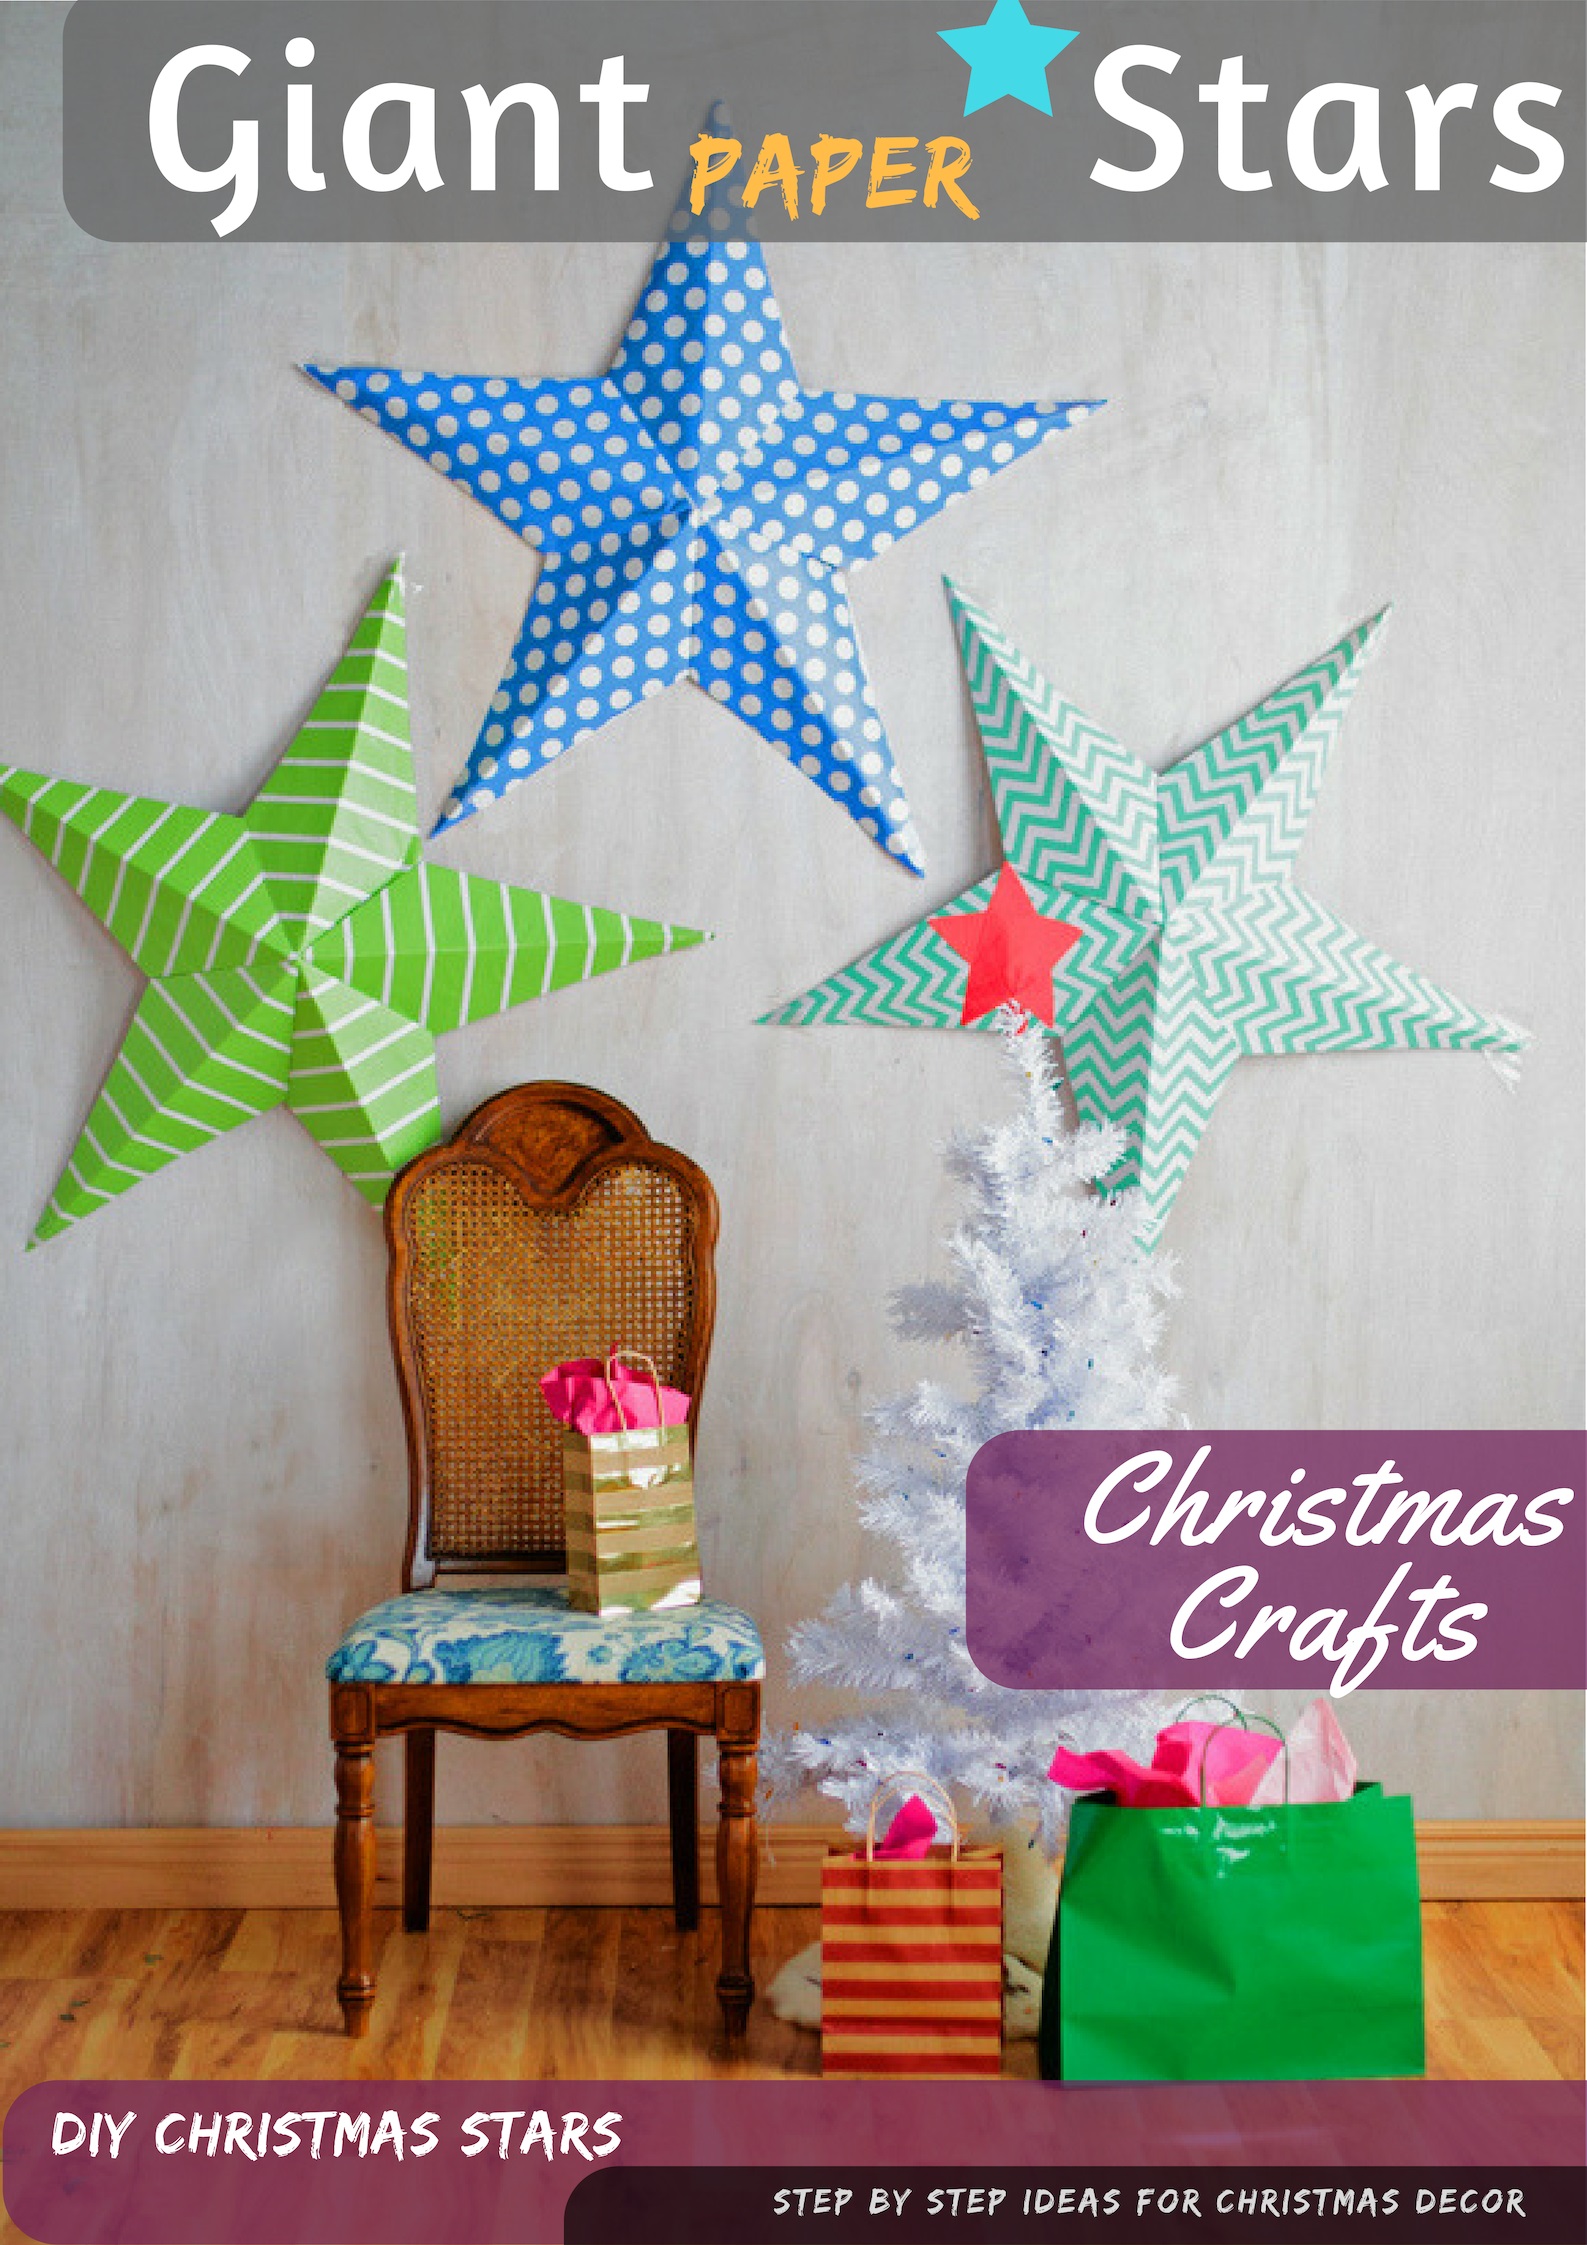
Giant Paper Decor Stars
Make a Filipino Christmas Star
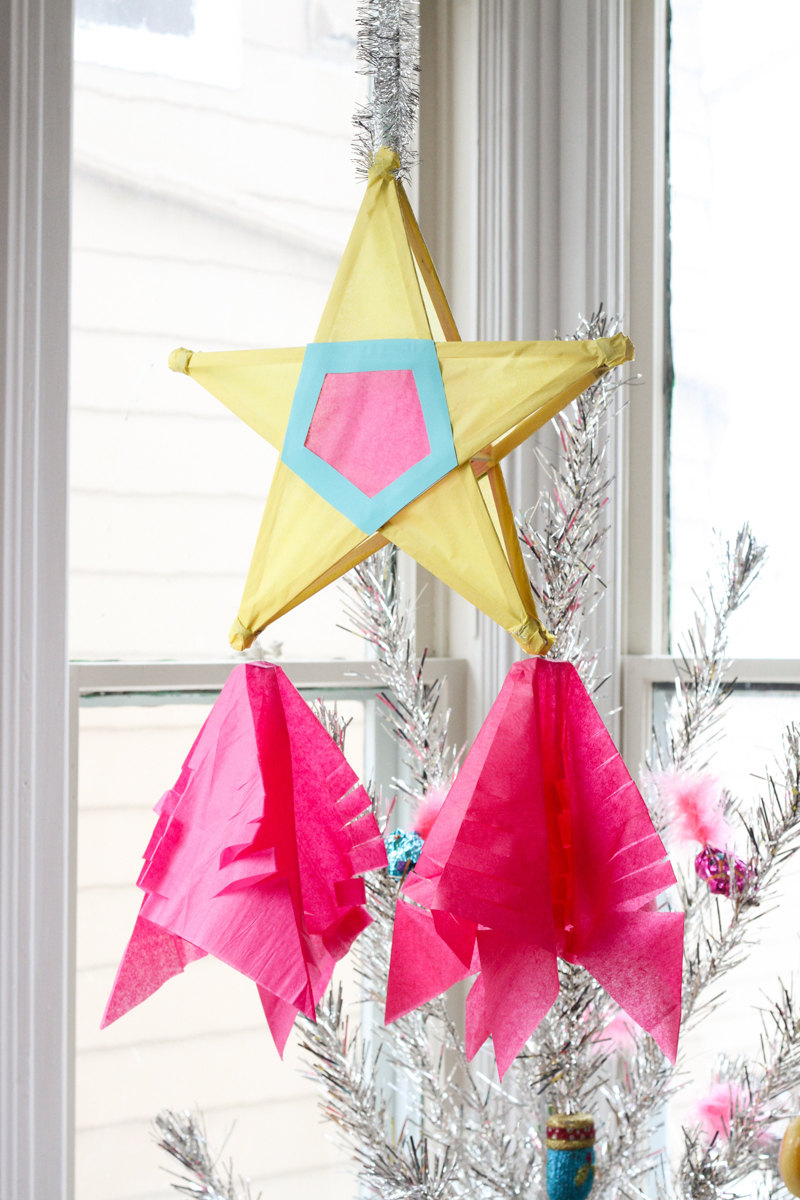
View idea
Paper Mache Foil Wrapped Christmas Ornament
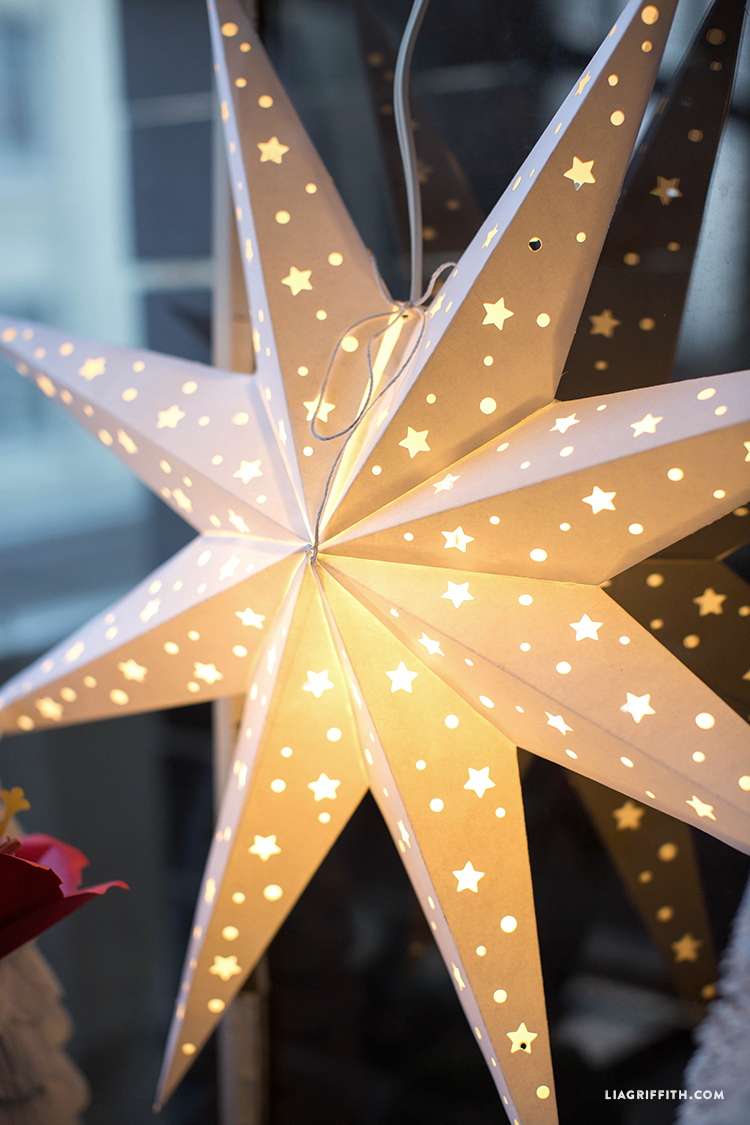
Christmas Star Lantern
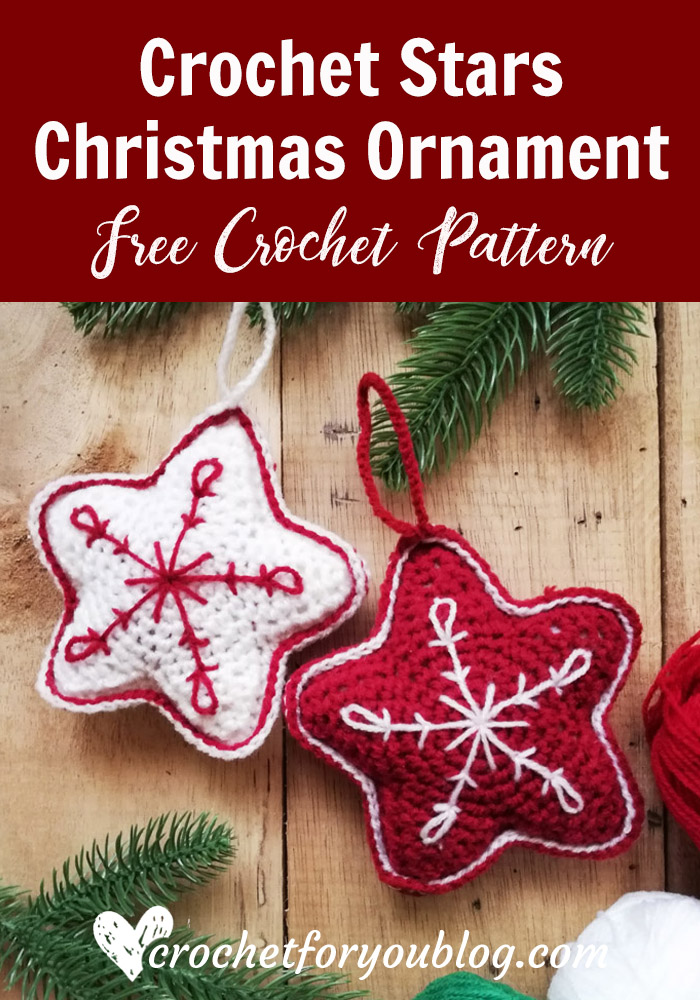
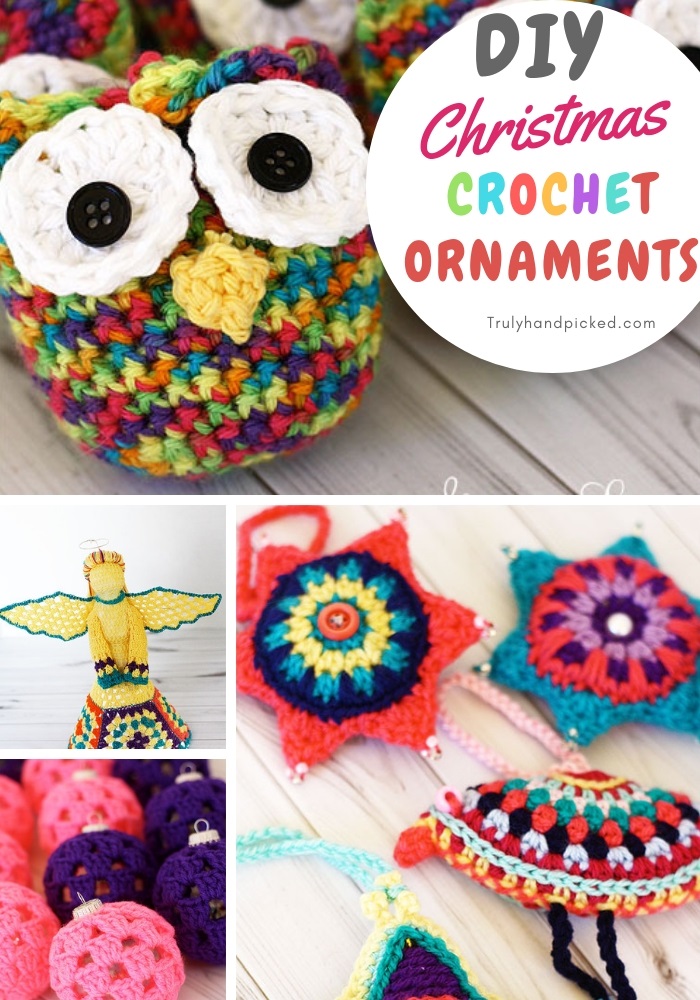
Crochet Christmas Stars
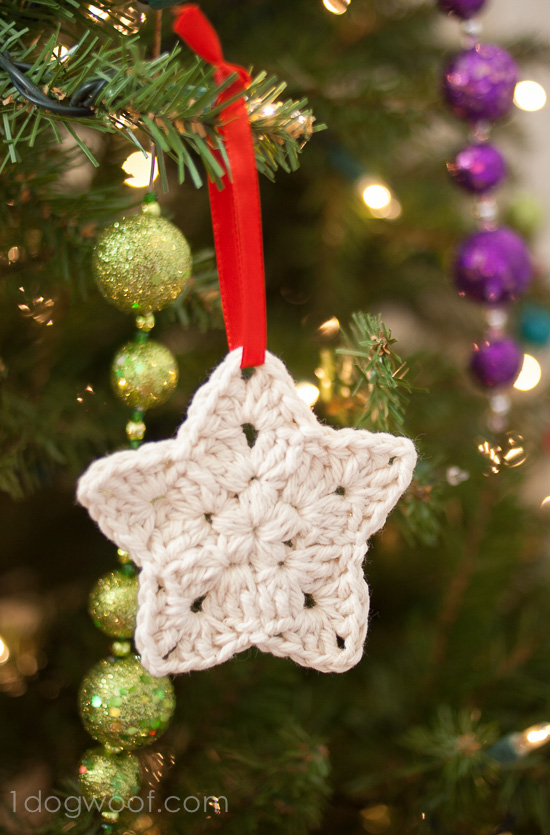
Free Pattern Crochet Christmas Stars
Window Side Paper Christmas Star Decor
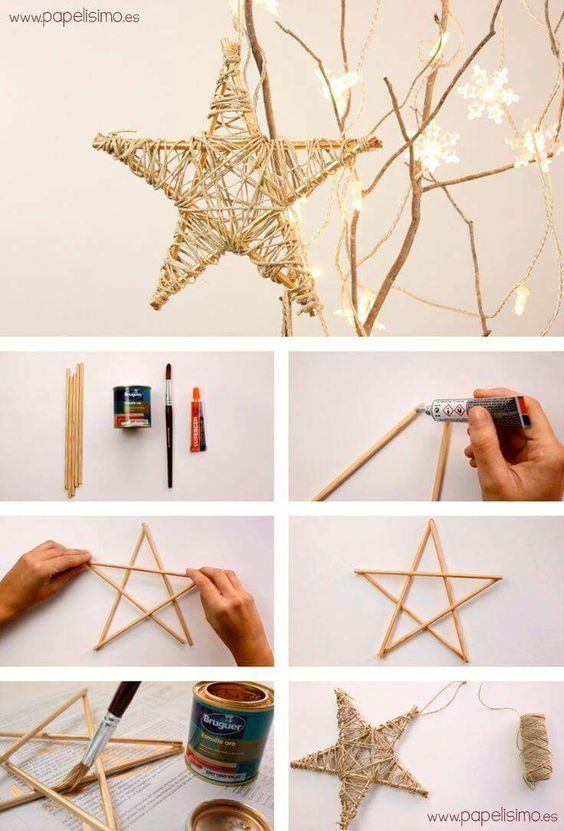
DIY Christmas Star Wood Sticks and Thread
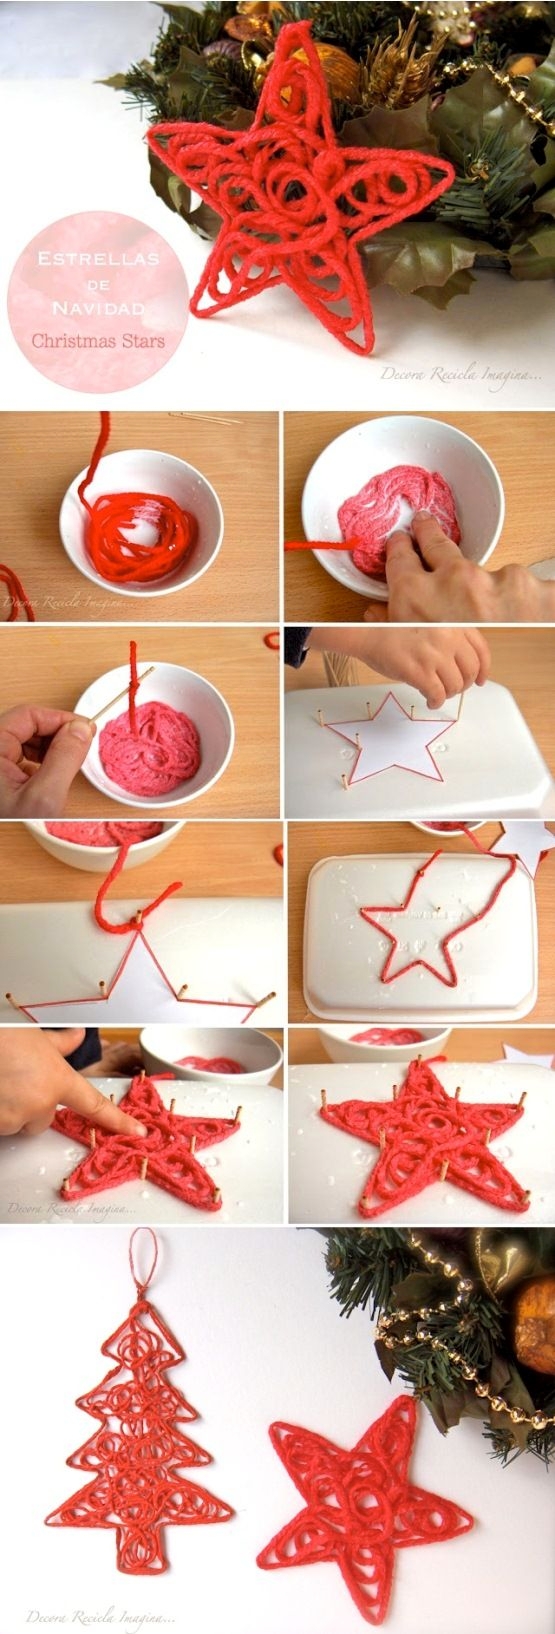
Christmas Tree Woolen Thread Star Ornaments
Christmas Tree Star Entryway Decor
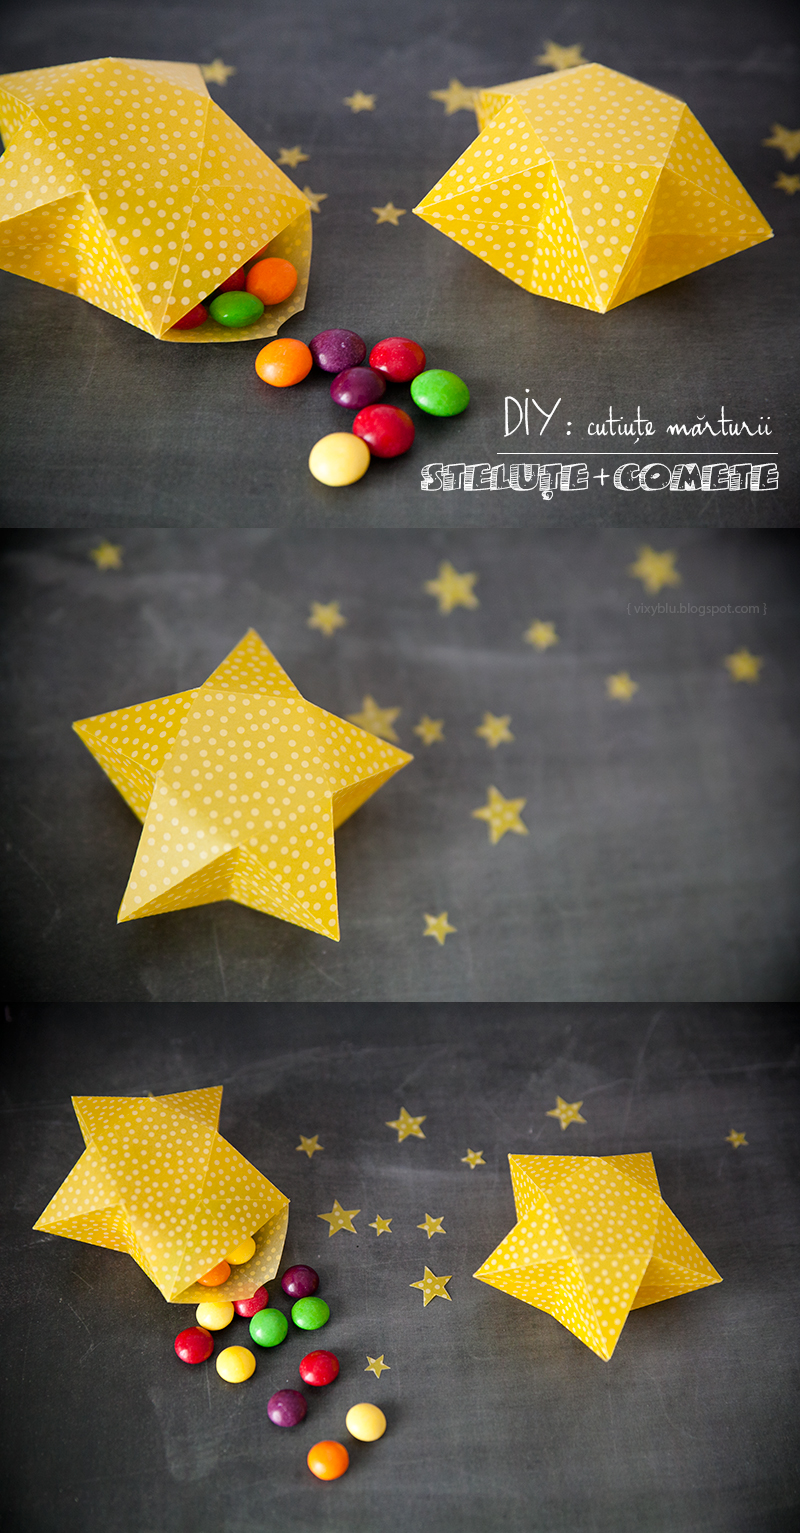
Christmas 3D Star Gift Packs / Favor Packs
Indoor Star Garland Lighting Ideas

Washi Tape Christmas Stars

Christmas Crochet Star Ornaments Free Pattern

DIY Crochet Stars and Tree Decor Ornaments
DIY paper Star Tutorial
DIY Paper Christmas Star Ornament
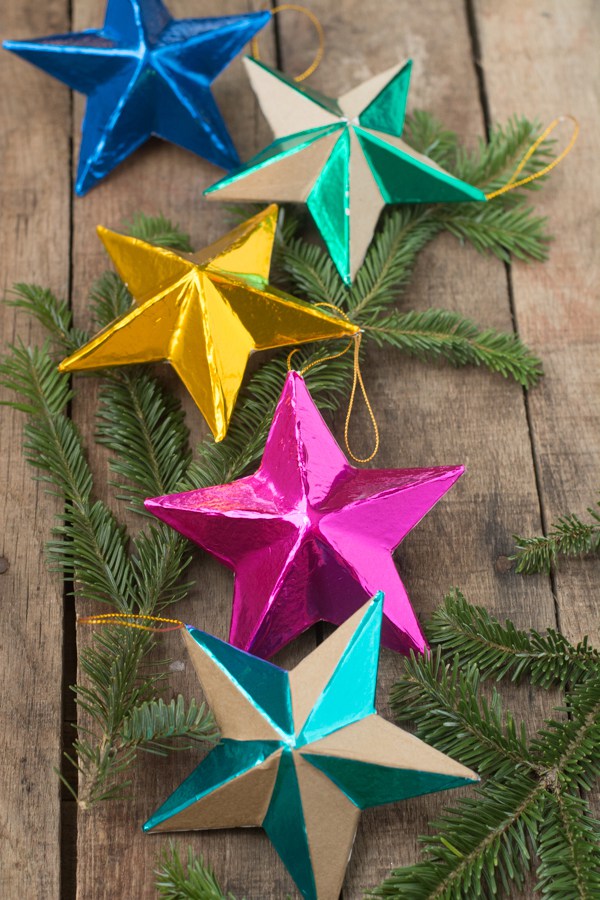
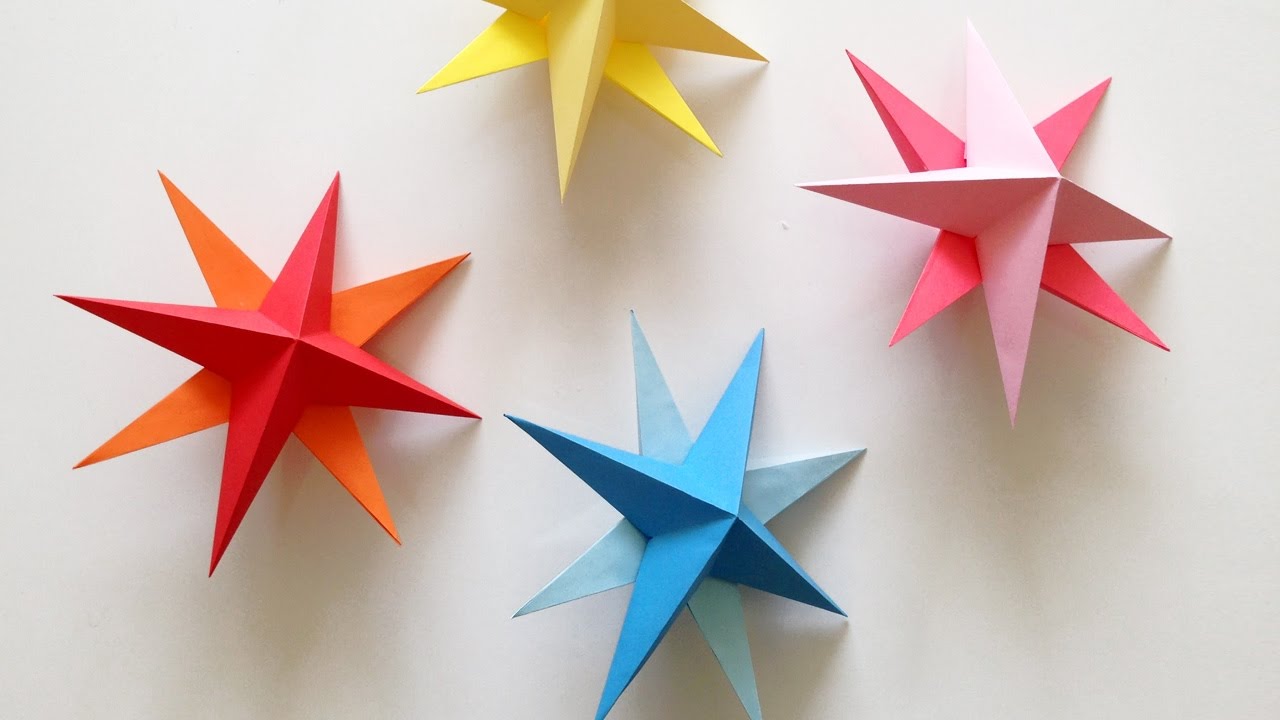
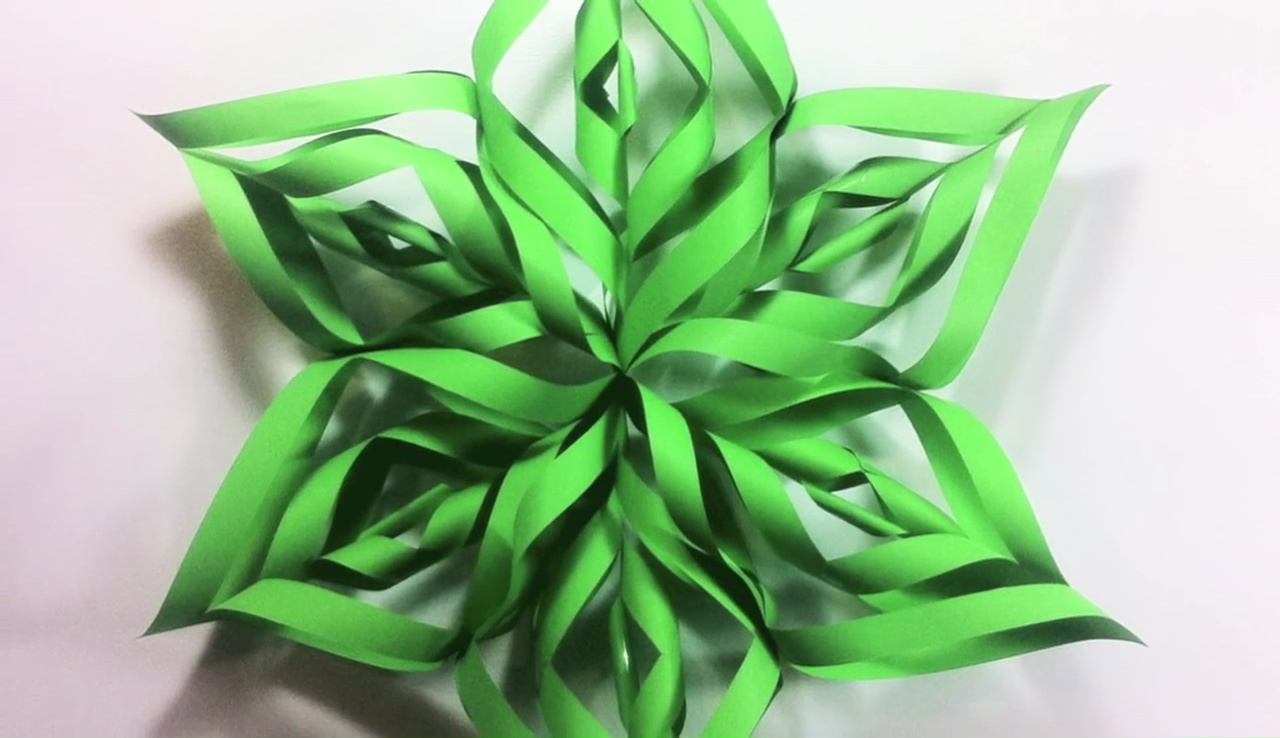
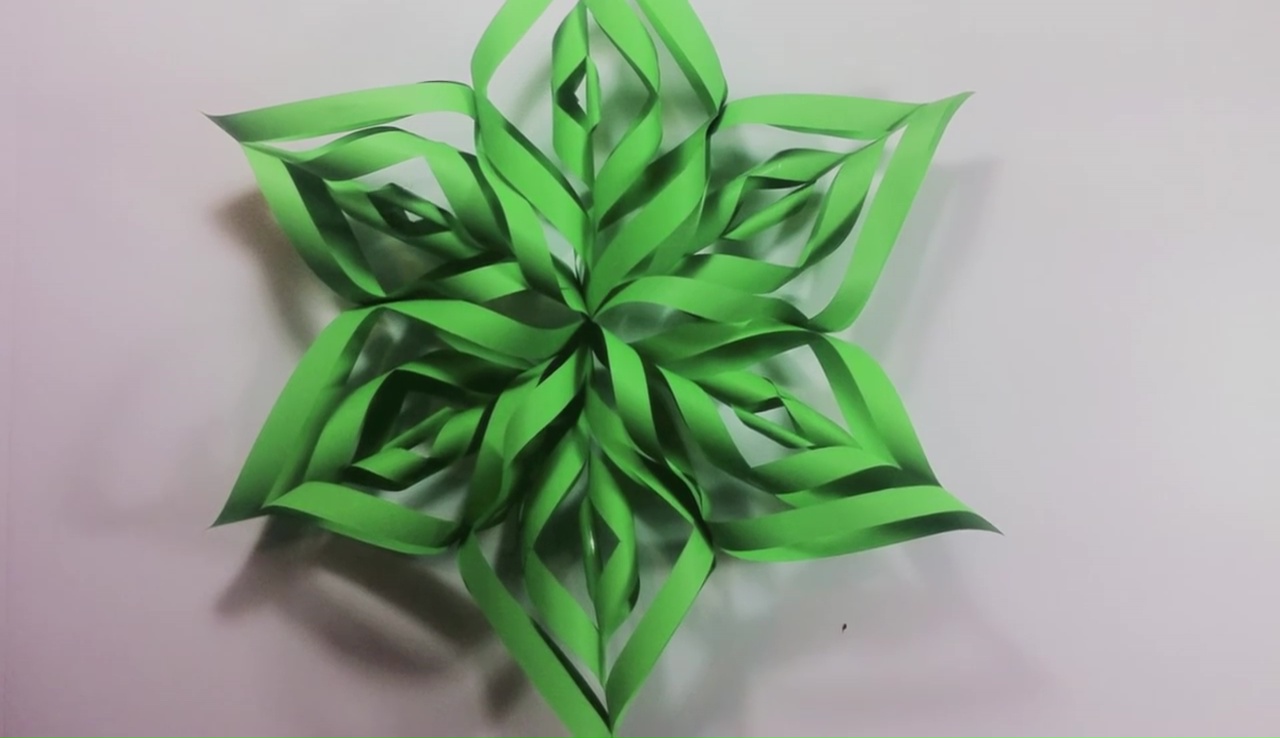
Christmas 3D Paper Stars:
Making 3D crafting for home decoration, especially during the carnivals is one common trend of this era. You can make several 3D crafting using paper as the main crafting component as Christmas ornaments like bells, wreaths, snowman, bunting, snowflakes, etc. and make a 3D paper star is the easiest one among them.
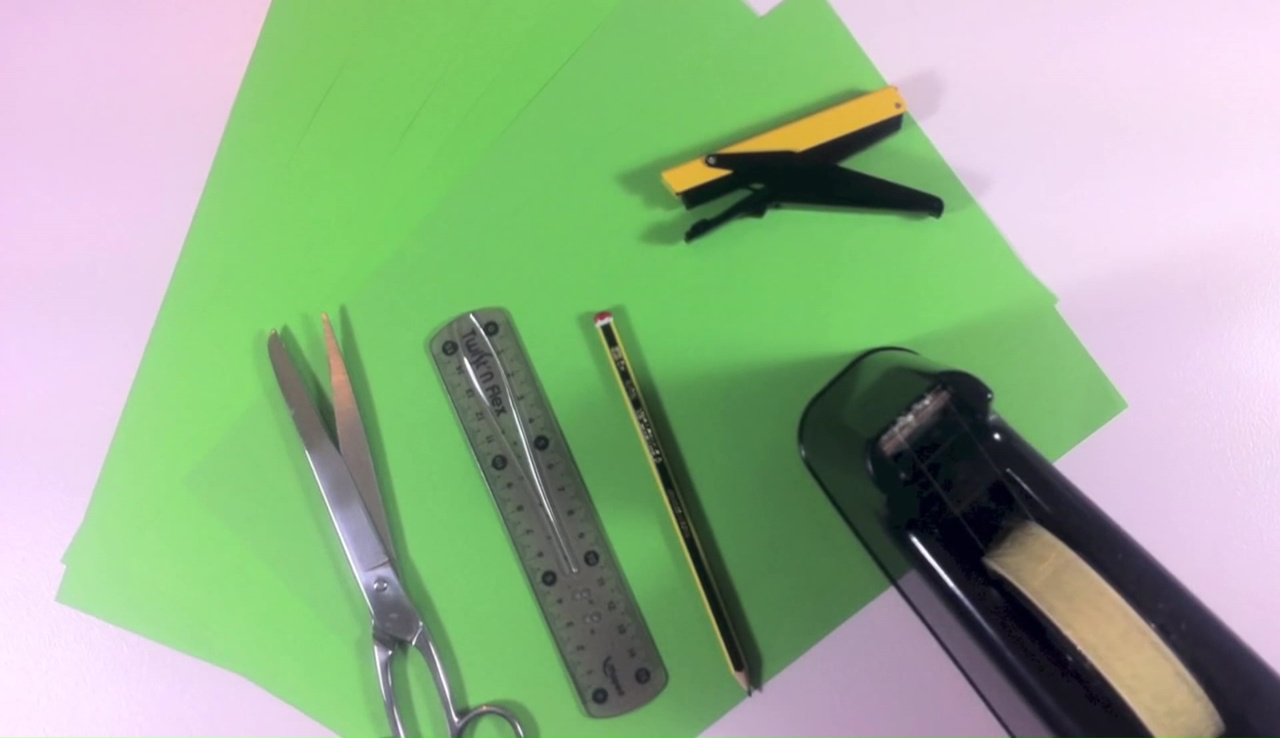
Materials Needed:
To make this you will need 6 pieces of paper in the same colors with the measurement of 21×29.7 size in dimension, pencil, ruler, scissors, stapler, and adhesive tape.


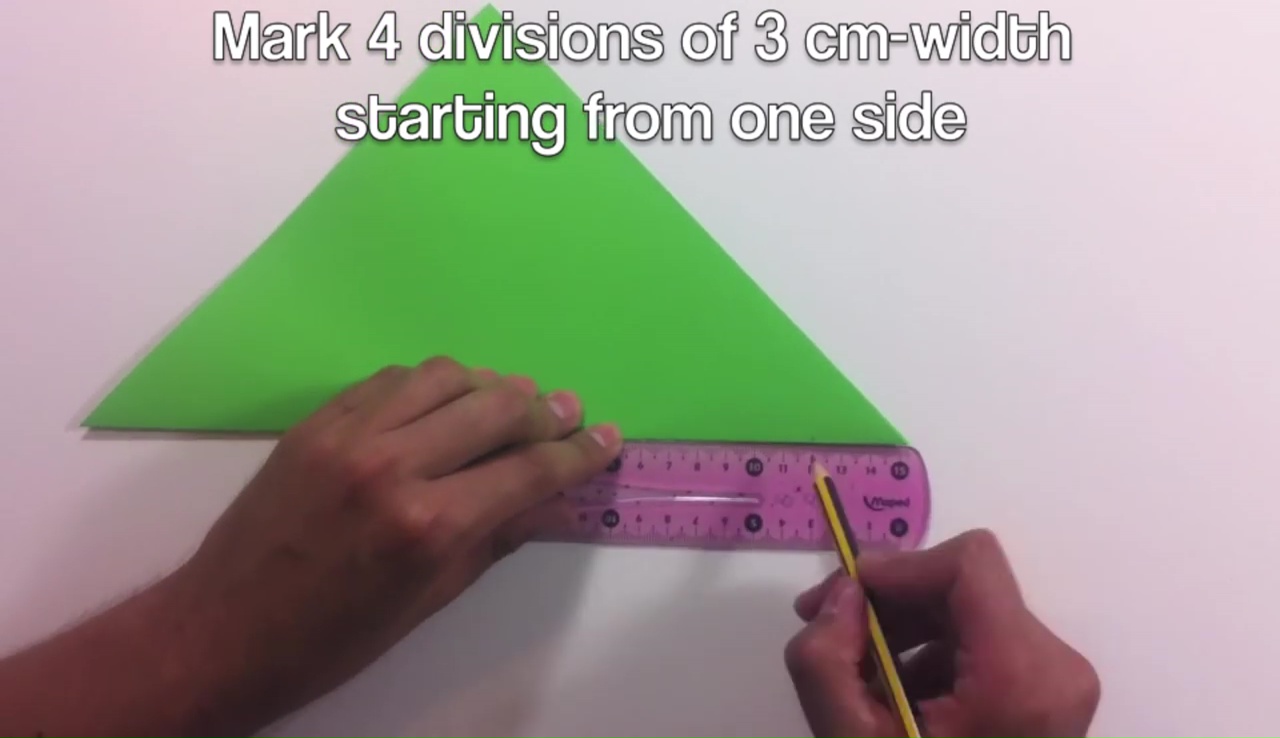


How to Make a 3D Star for Christmas :
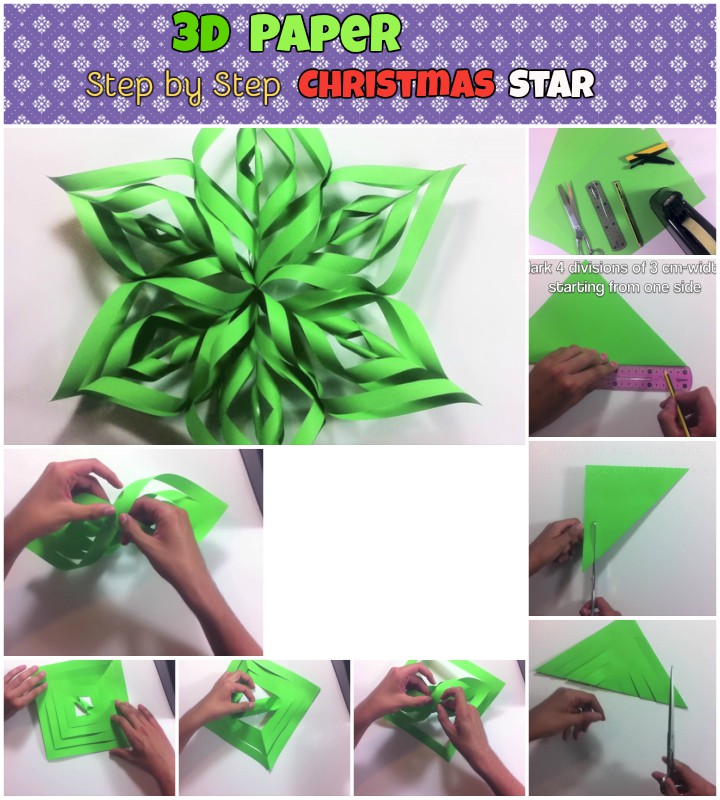
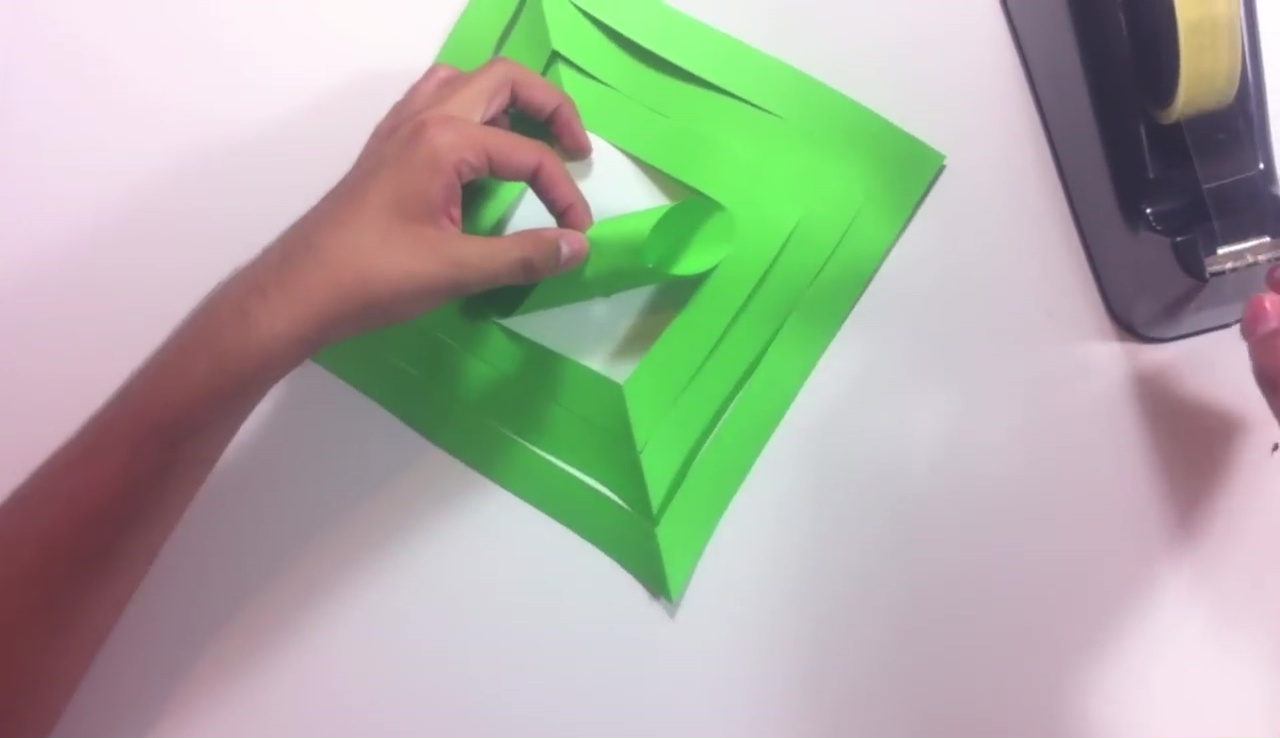
- At first, make one square from each paper by folding it from one side and cut that folded part out of the square.
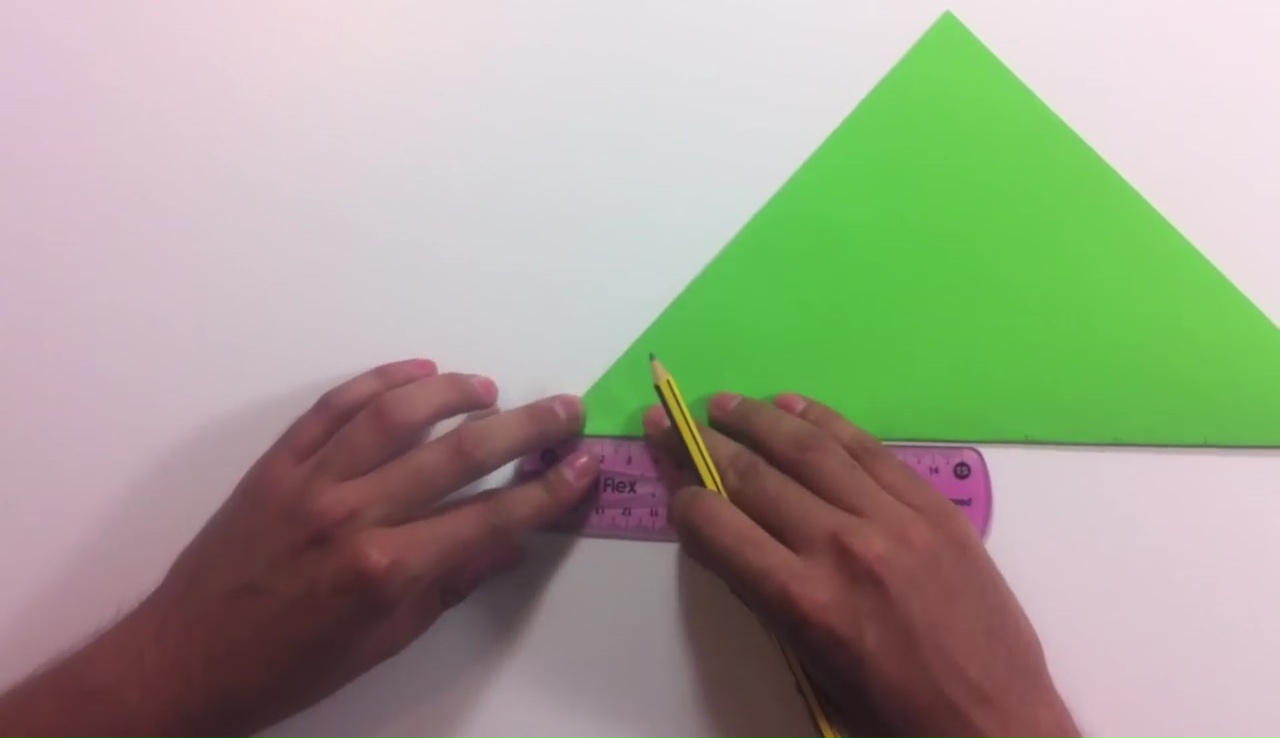
- When 6 equal squares have been made, mark 4 divisions of 3-cm width starting from one side with the help of your pencil and ruler.
- After that, mark 4 more separations more at the other sides.
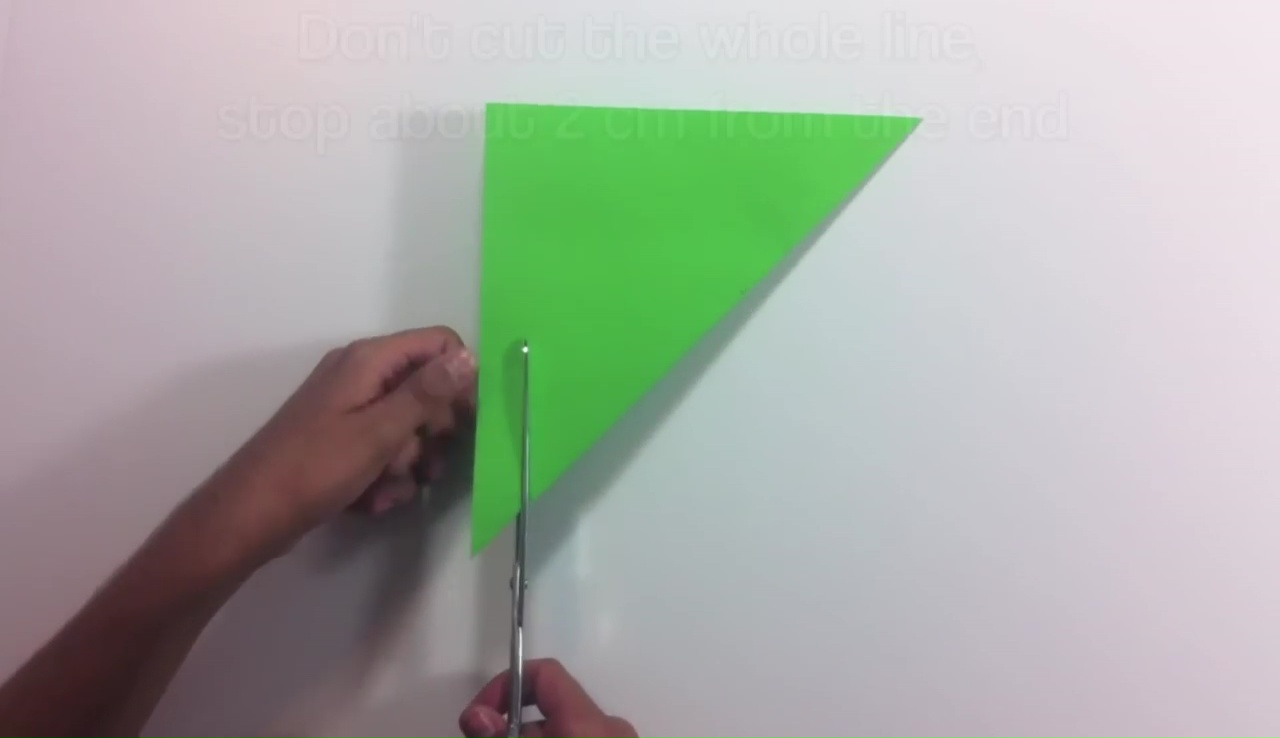
- Then, take the scissors and make parallel cuts following each mark. But, don’t cut the whole line and stop about 2-cm from the end.
- When you are cutting the page, after one cut, on the next mark stop a little bit earlier than the previous cut and keep doing the same thing for the rest of the marks.
- Turn the folded page in a reverse way and do the same for the other side as well.
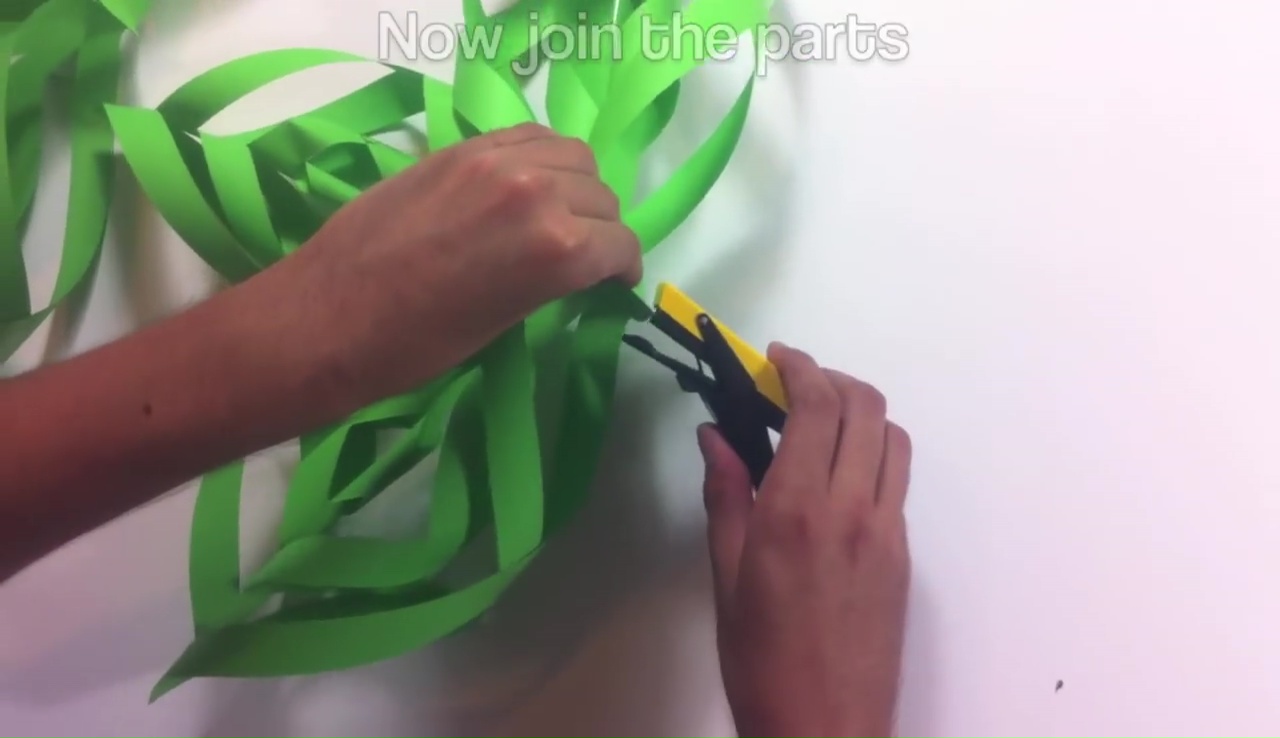
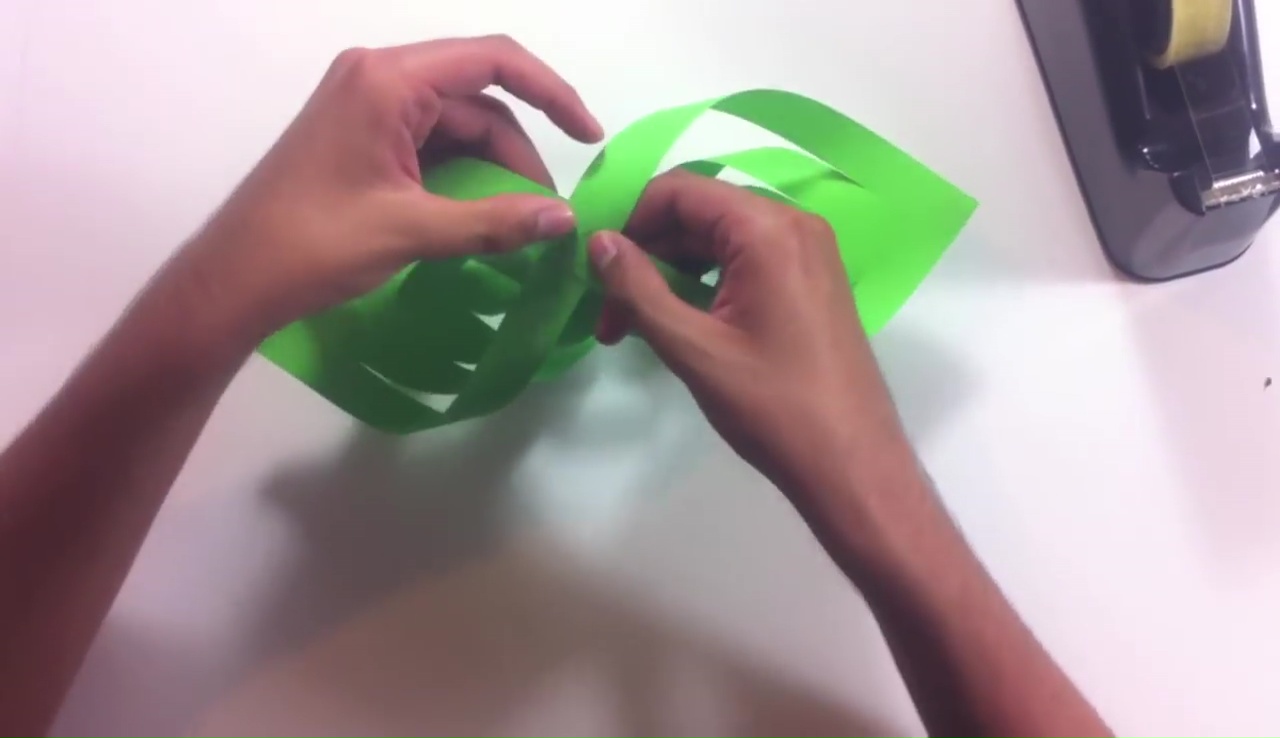
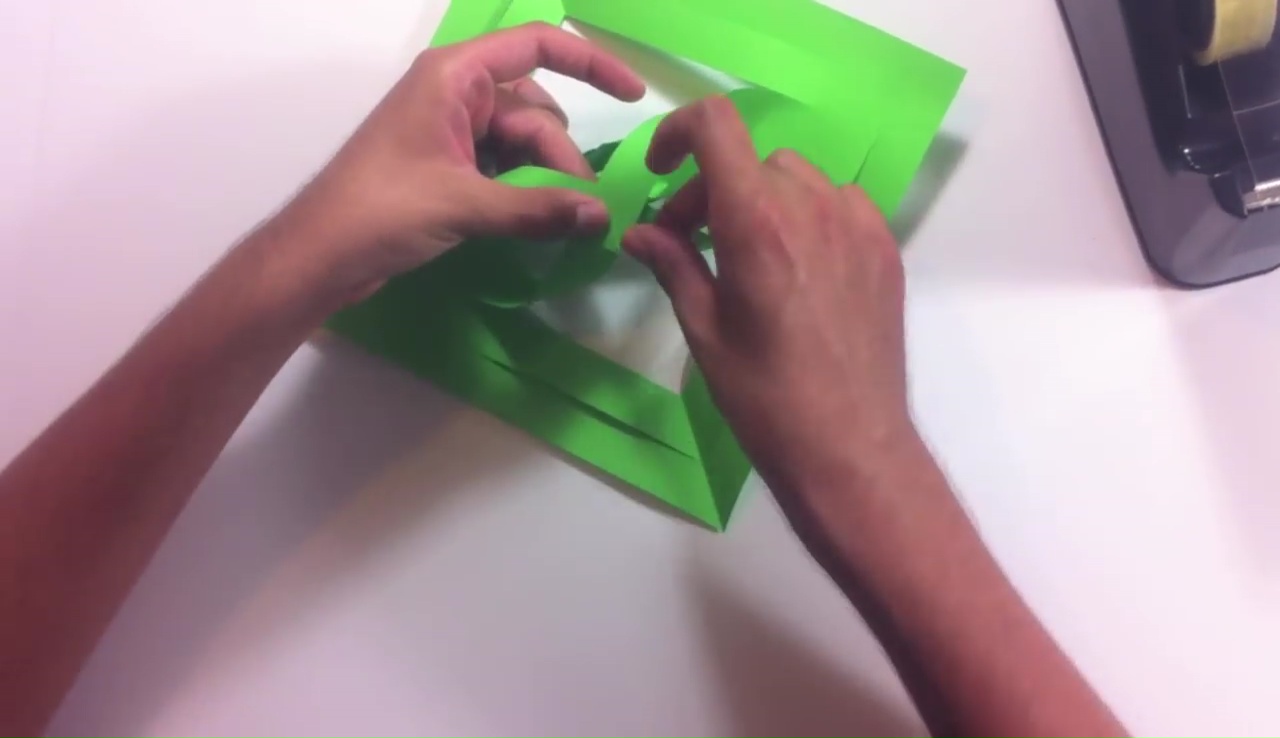
- While one square is ready, open the folded square and first join with the adhesive tape the end of the internal cut.
- Then, turn the square around and join the next cut’s end in a similar way.
- After that, keep preceding the same process like this until you join all the end of each square.
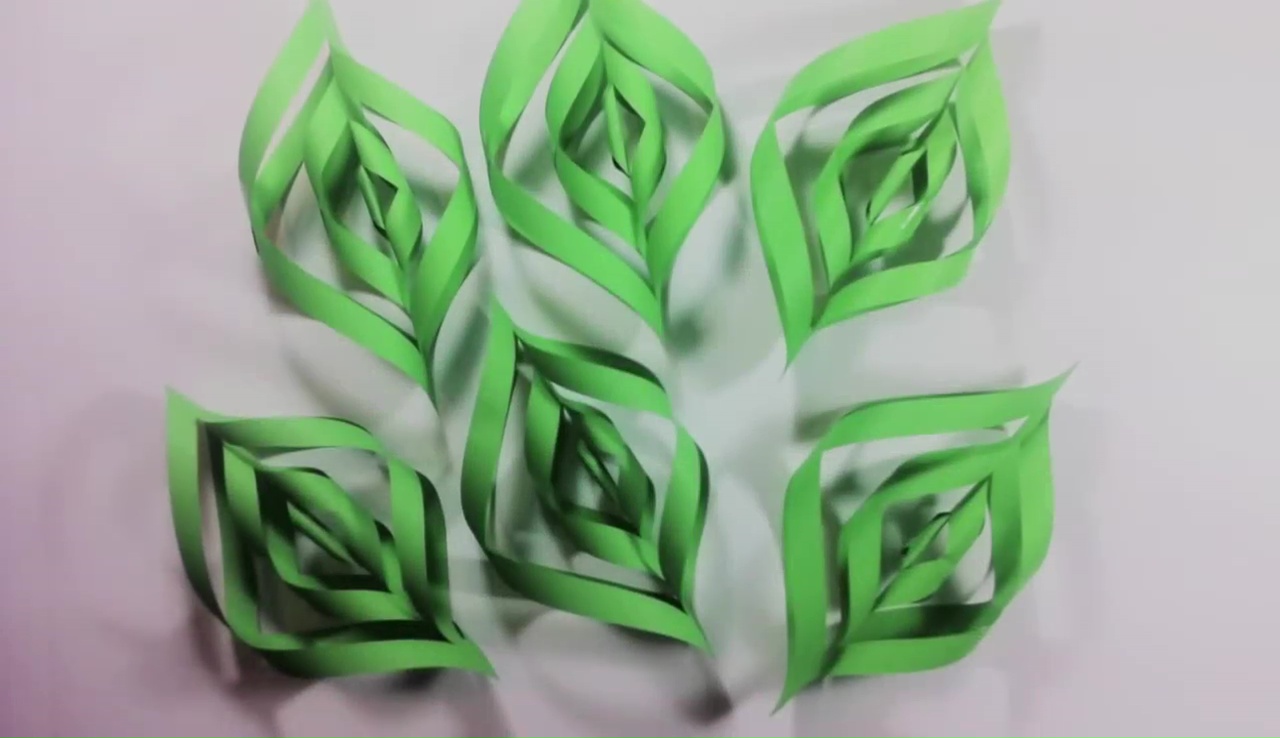
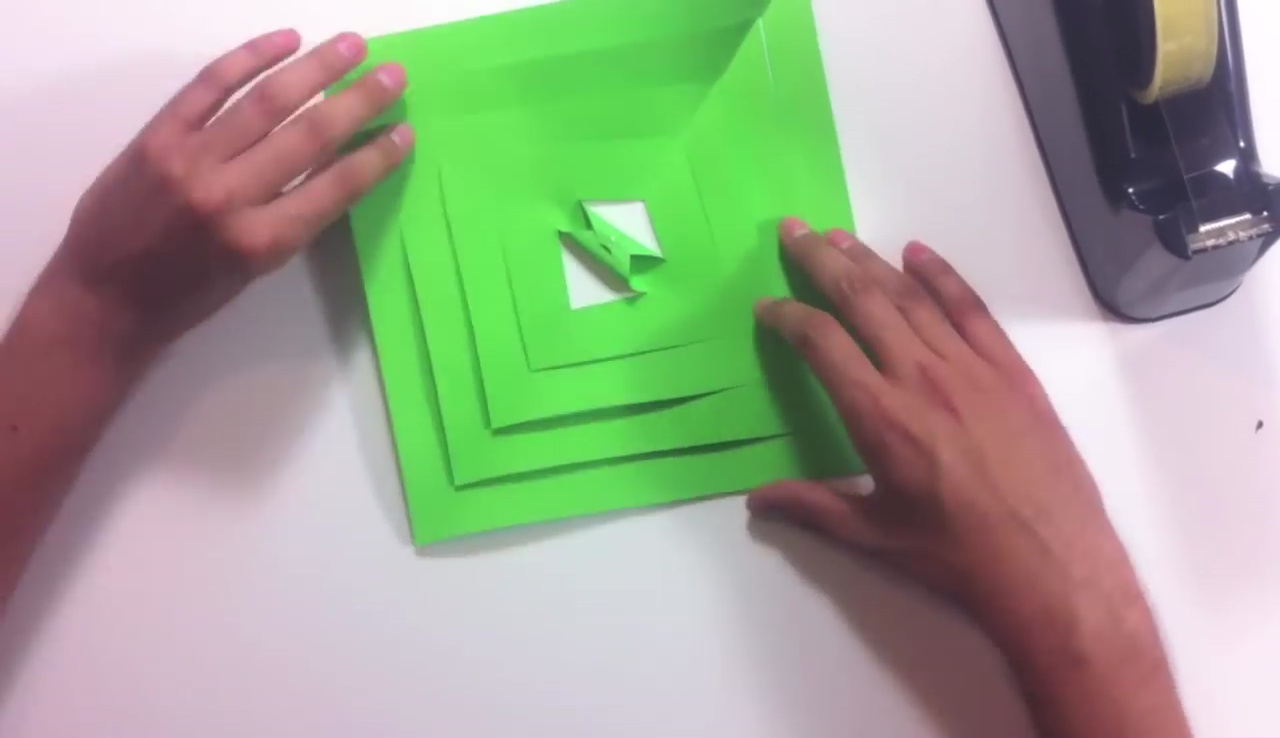
- After repeating these steps with all the rest squares, you will get 6 pieces of folded paper cutting as you can see in the video above.
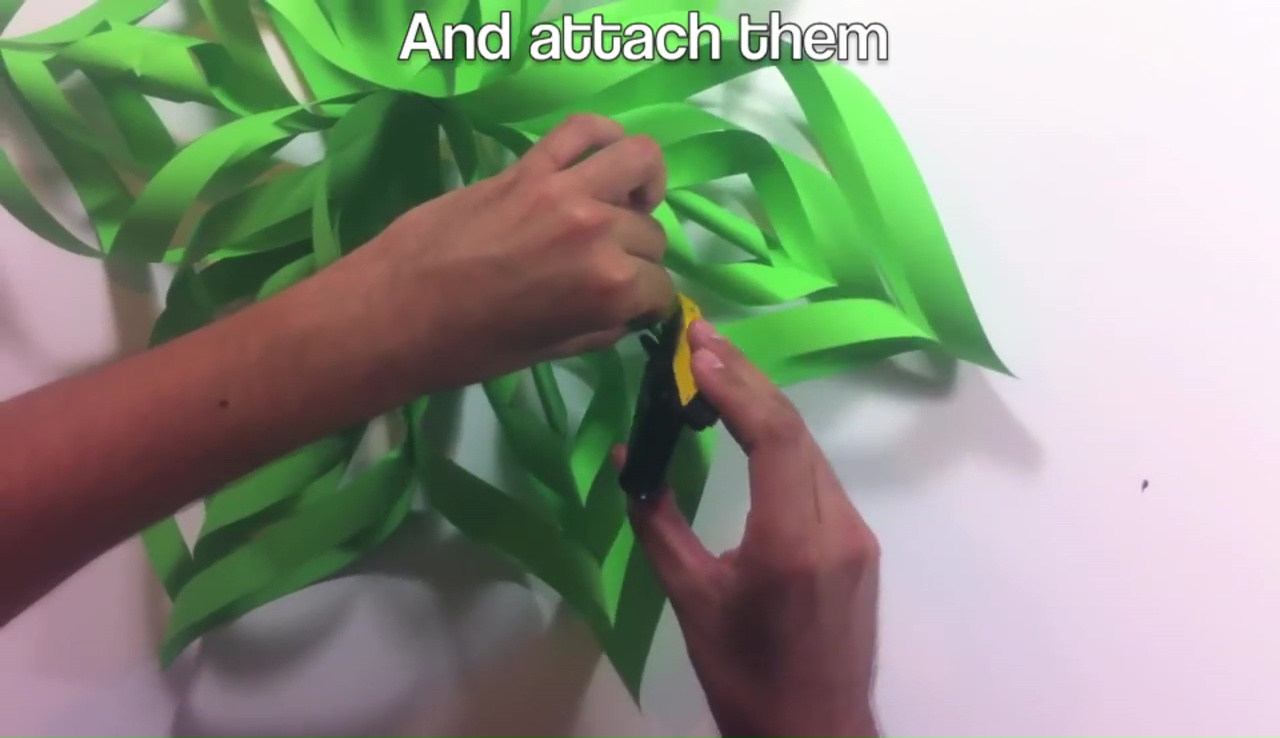
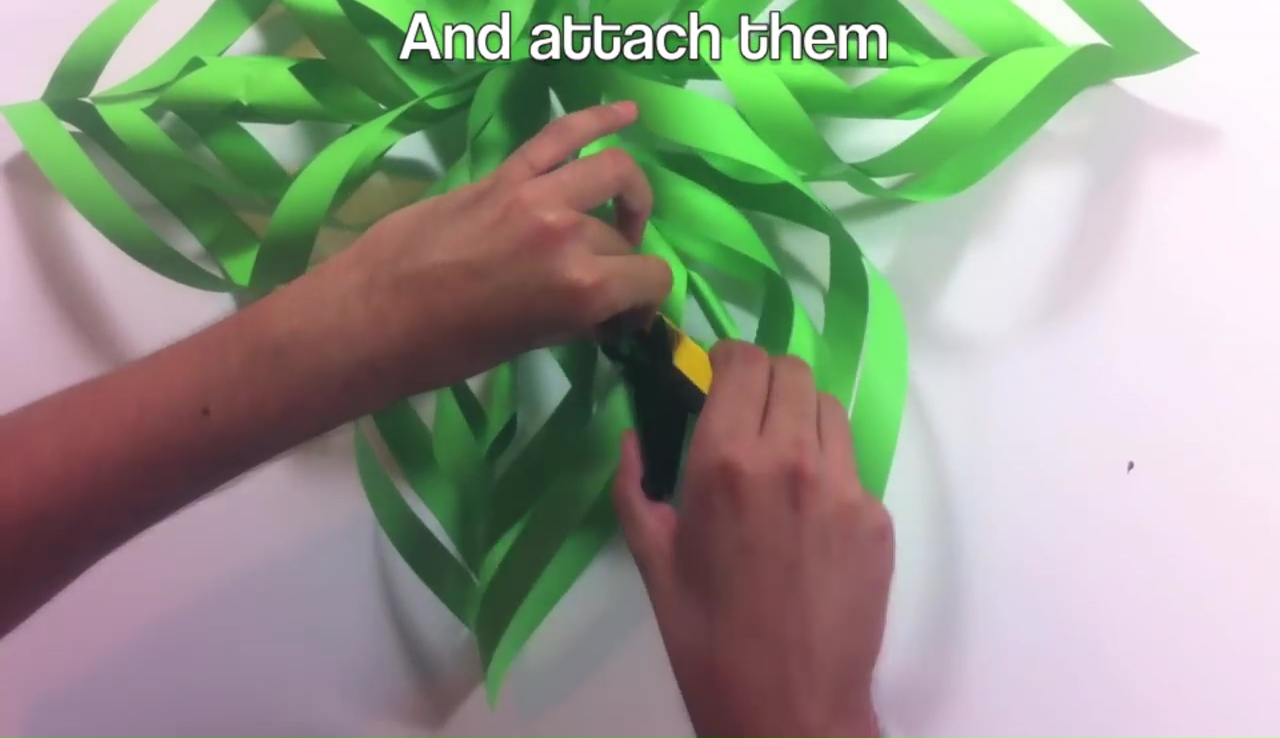
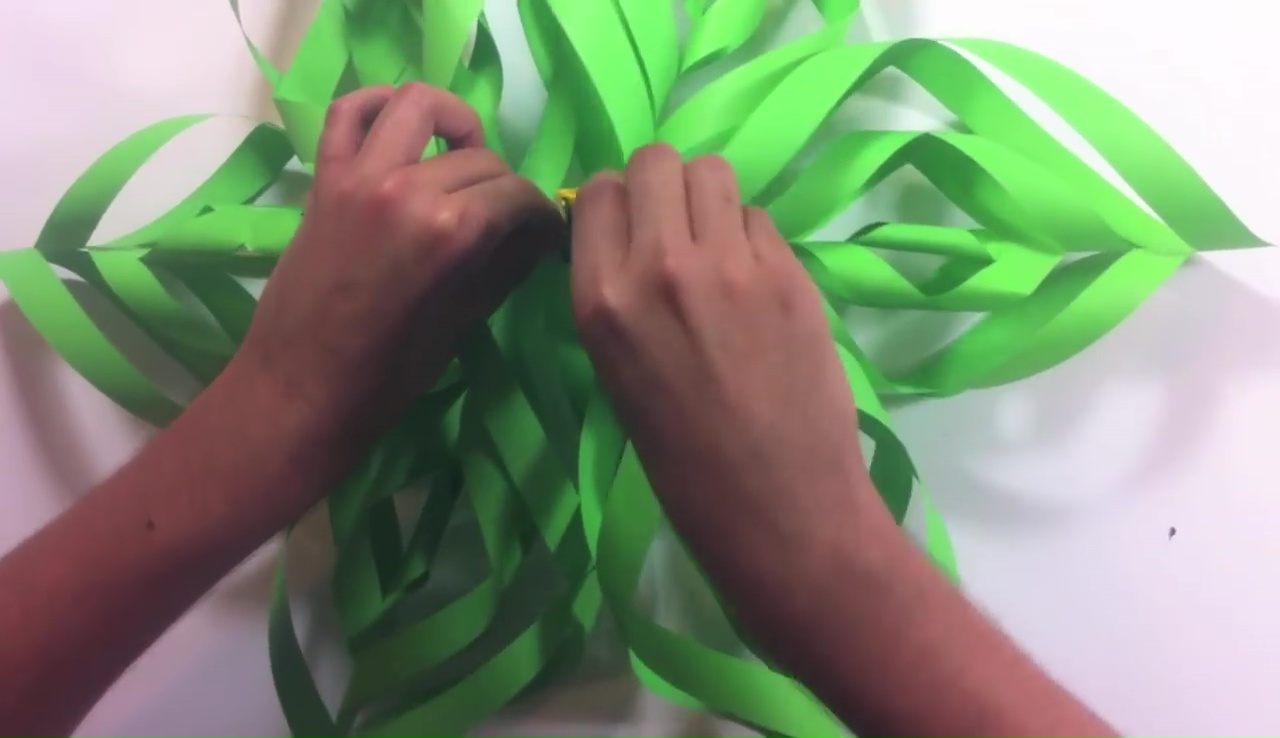
- Now, take a stapler and join the parts from their ends. Take 3 pieces together, make 2 different parts and then attach those 2 parts together.
- Finally, staple one portion with another securely on the big folds and when you’re all done; your 3D paper star is all ready to hang.
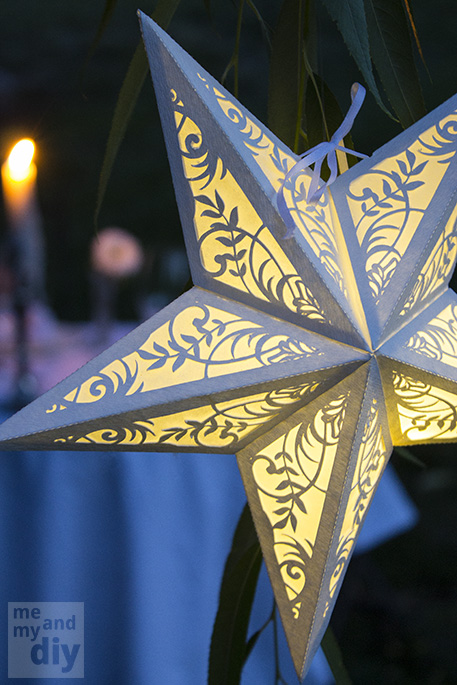
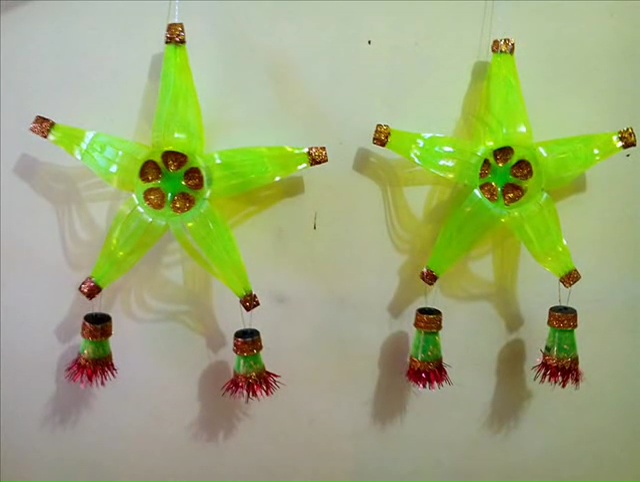
DIY Christmas Star Lantern
DIY Christmas Star Lantern:
Lantern is another wonderful thing to use in the commemoration of Christmas like stars, and it would be totally magnificent if we can merge these two essential ornaments together, isn’t it! Thus, star lantern is a splendid ornament to hang in the auspicious event of Christmas celebration. You must be well informed about the crafting process of the super easy star lantern, but today, we have come up with a new pattern of this project, let’s check it out-
Materials Needed:
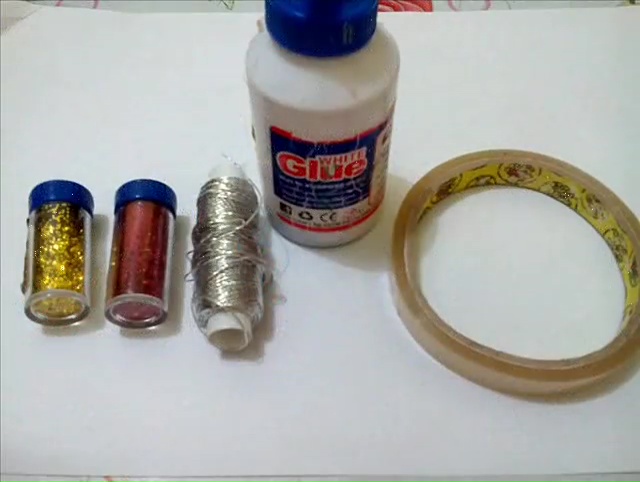
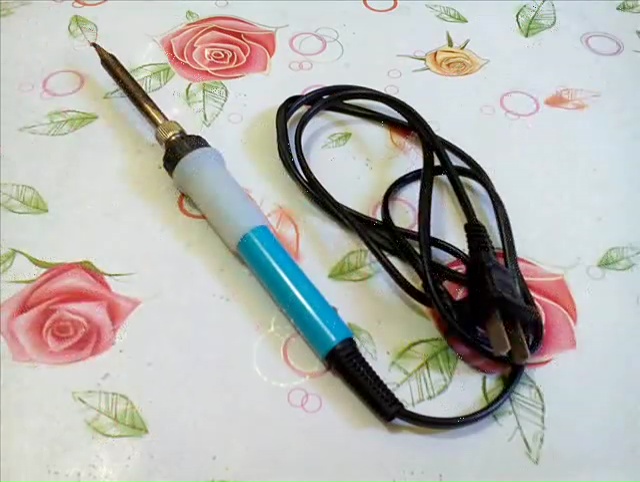
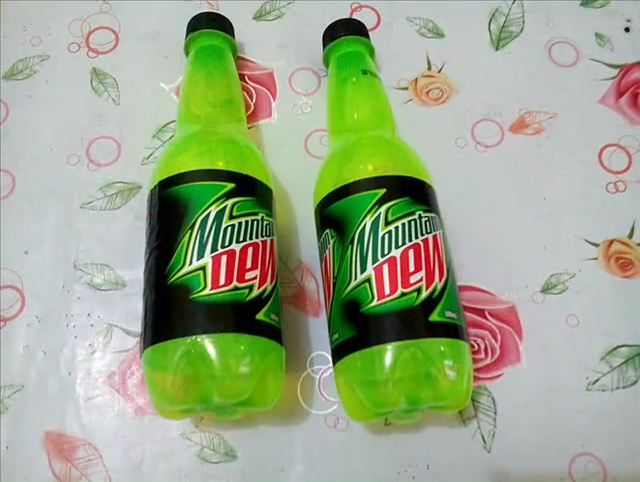
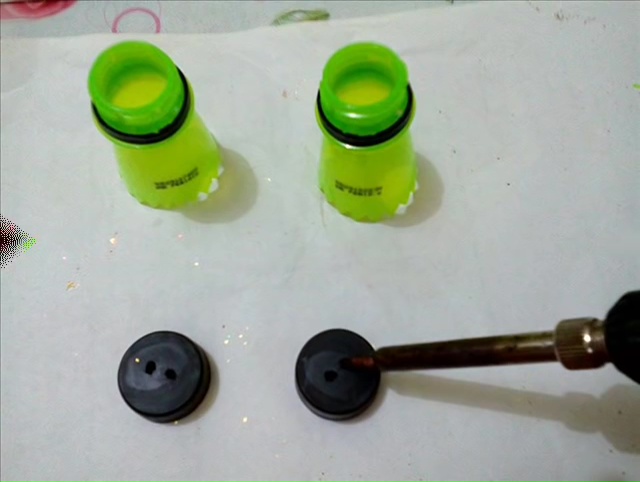
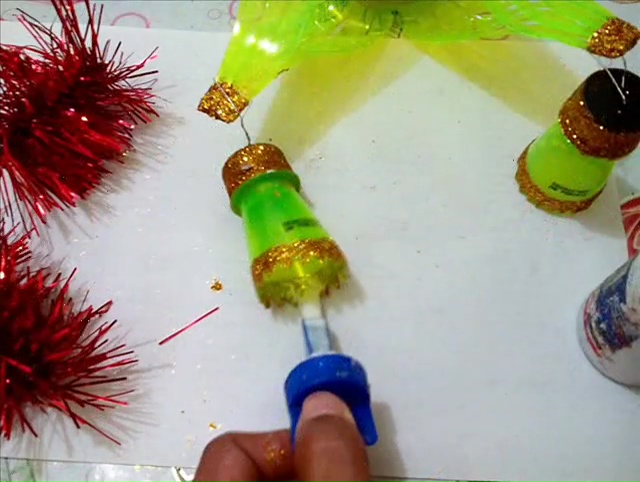
To make flawless star lantern you will need one sharp scissor, one cutter, one dark marker, ruler, soldering iron, some glitters in two different shades, metallic thread, white glue, scotch tape artificial garland, and 2 empty soda bottles.
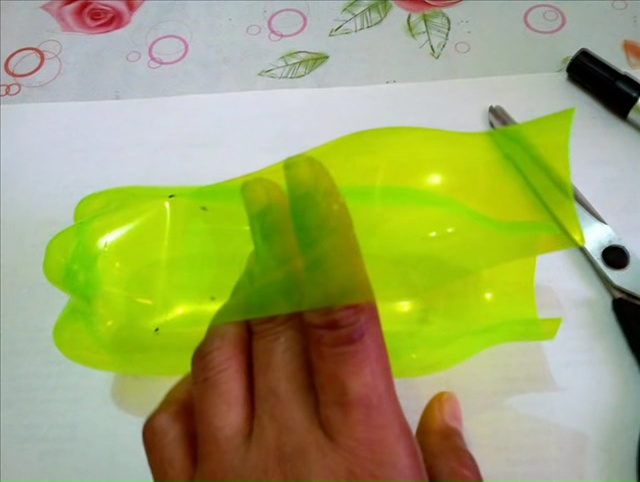
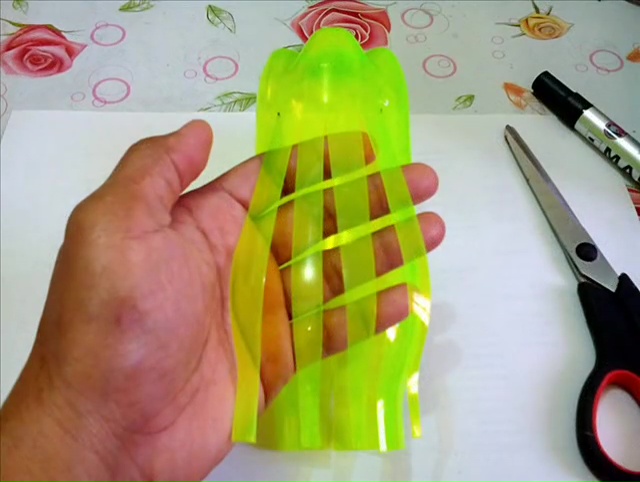
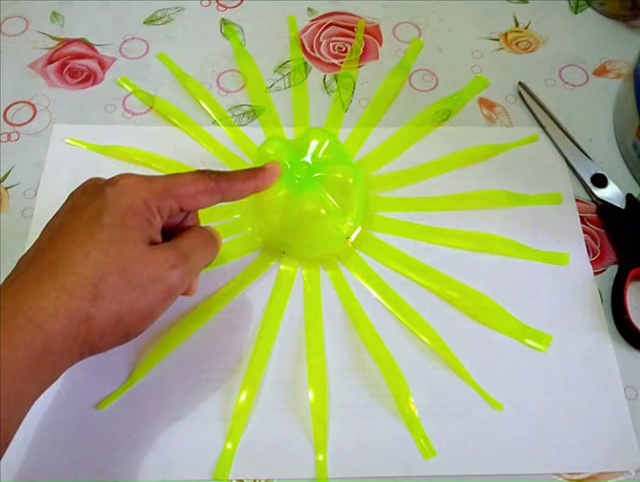
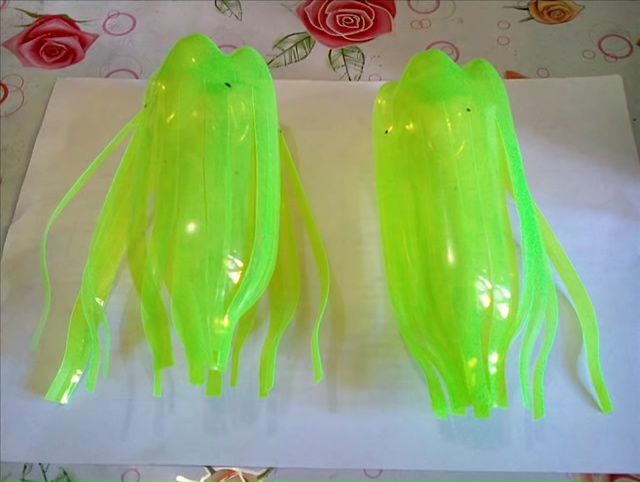
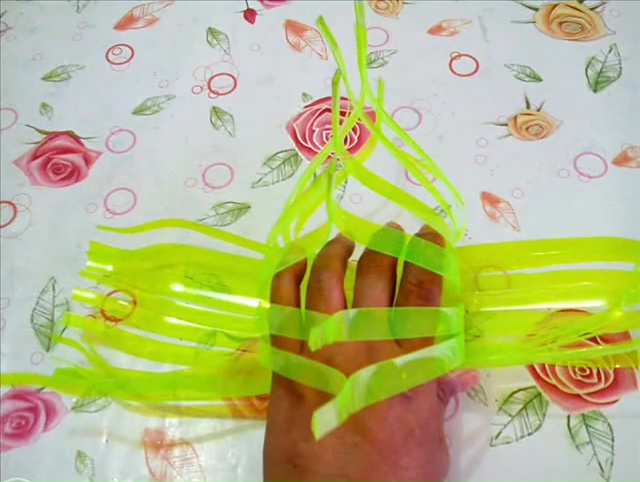
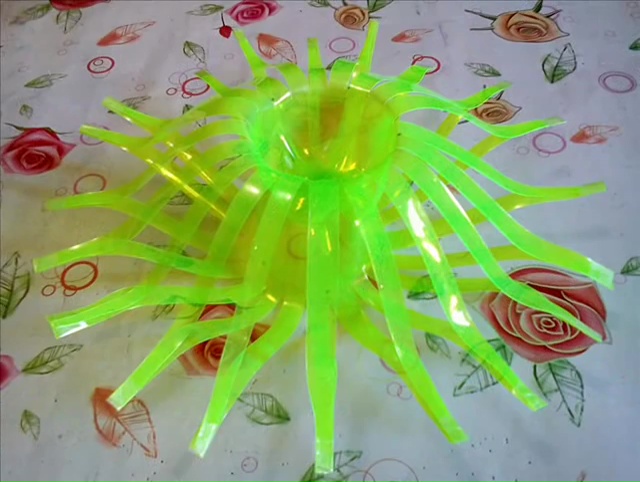
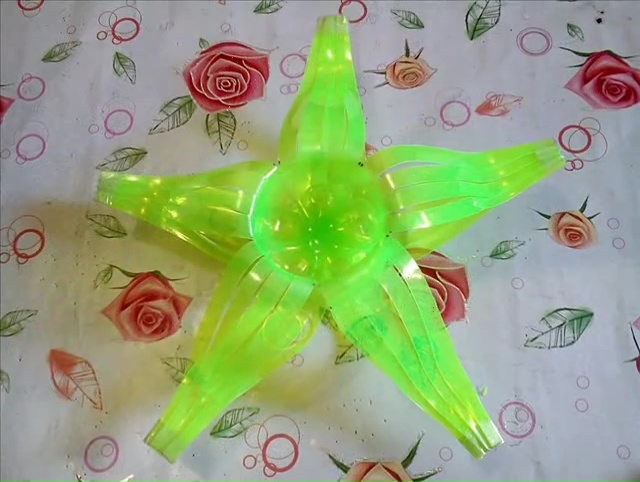
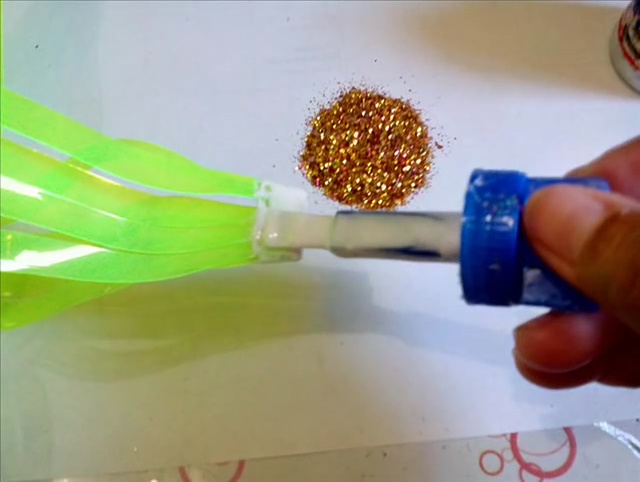
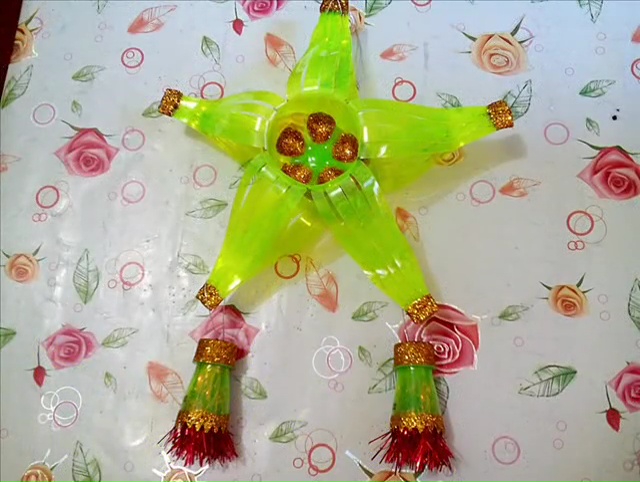
Step by Step Ideas for Recycled Christmas Stars


Method:
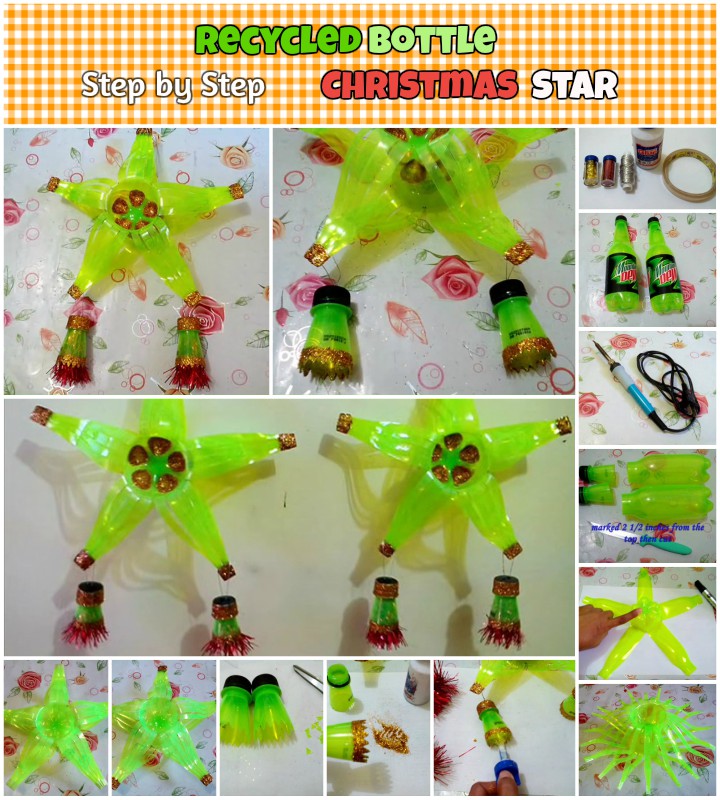
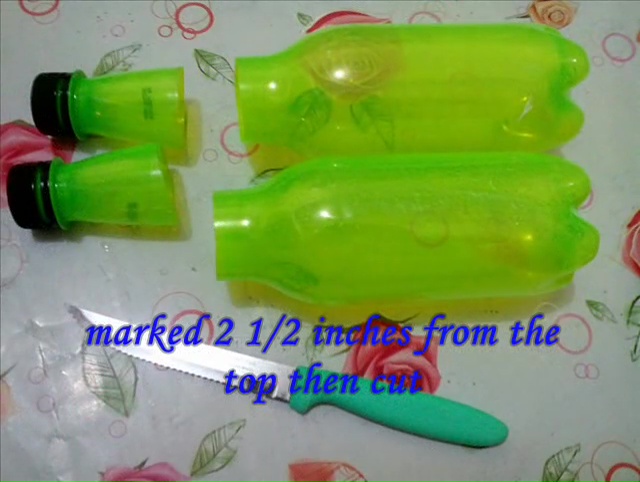
- At first, make on each bottle about 2.5 inches from the top and cut them away.
- At the bottom part, make the bottles about 1.5 inches with the help of that ruler and cut your bottle from the middle into 5 parts till that bottom marks.
- When you are done, you will get an object like a five-petal flower like you can see in the video above.
- Now, take one single part in your hand and divide it from the middle again.
- After that, make 2 pieces from each piece again and when you are done, you will get 20 small strips of bottle sides with a firm middle portion.
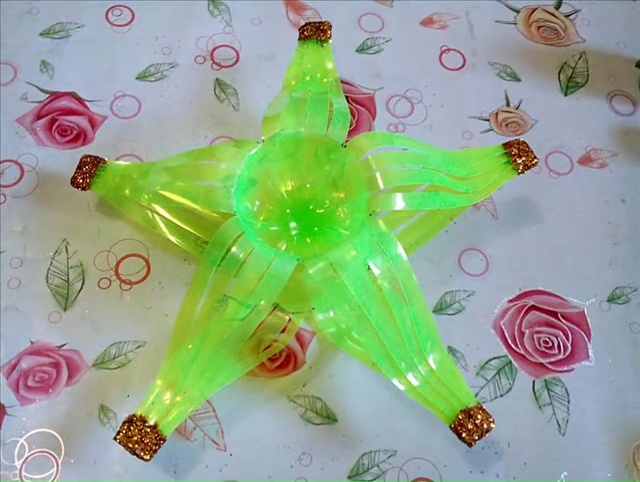
- Give the rest bottle similar look in the same process and start attaching their parts together with some tapes by placing one bottom above another.
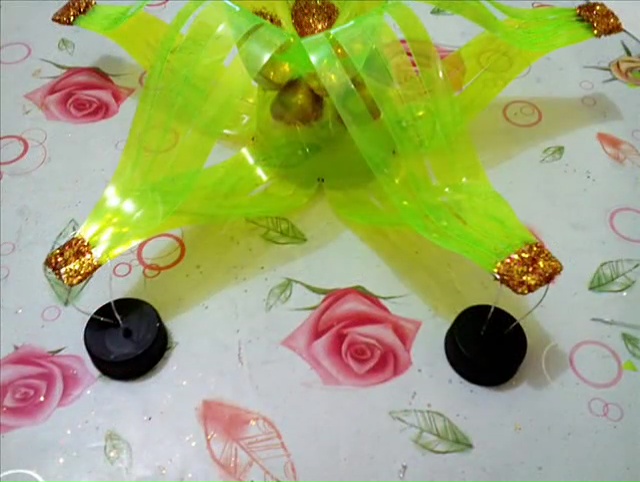
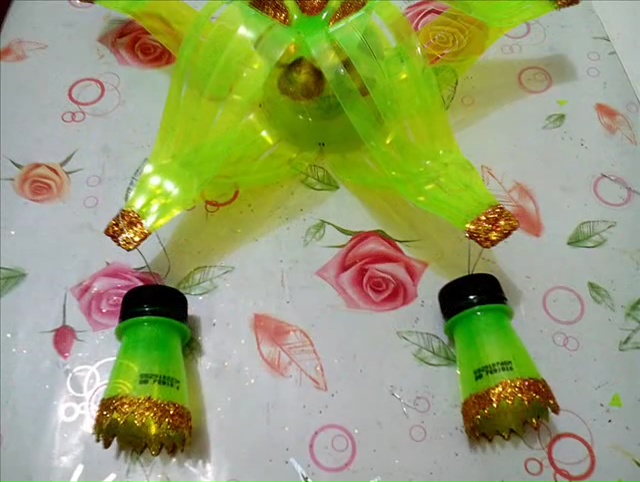
- When your attaching process is done, gather 4 pieces together and you will get a perfect star with 5 different cones which are slightly divided into 4 stripes!
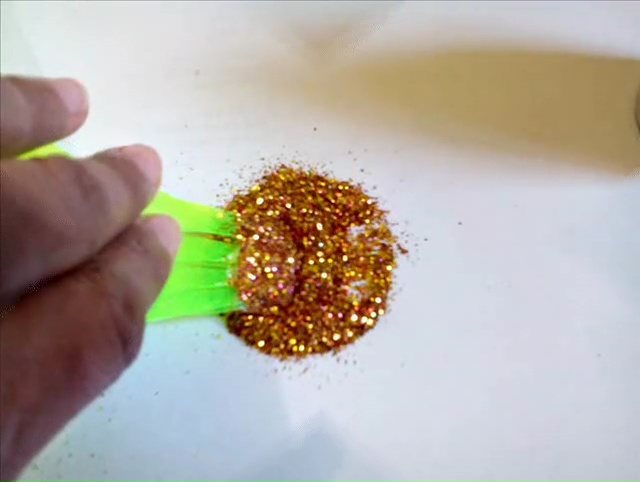
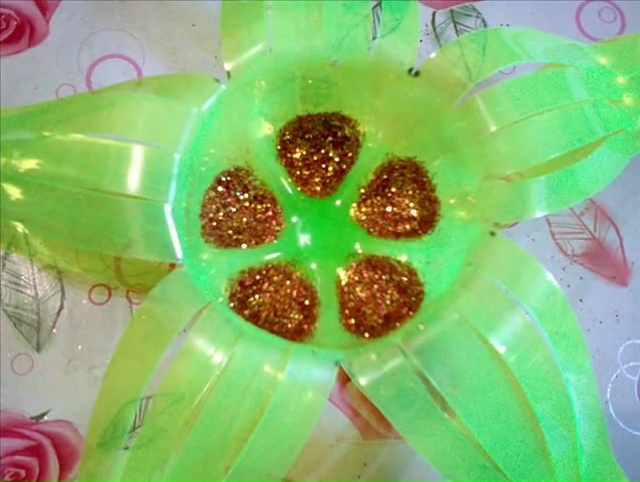
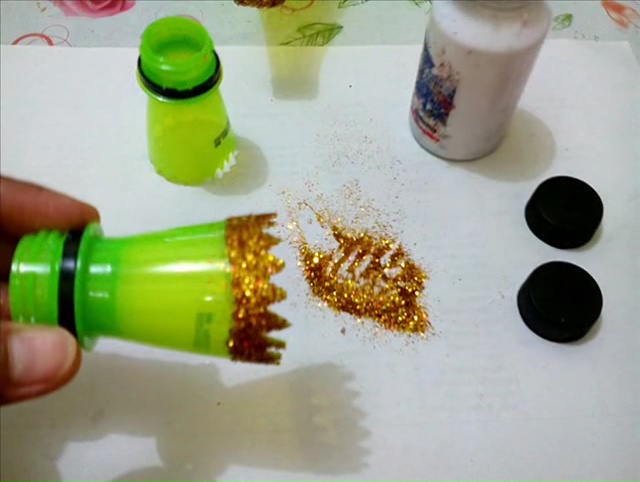
- After that, mix your glitters in a small bowl and highlight the end edges of each cone with these glitters. For doing this, you need to spread some glue on each borderline and dip it into that glitter bowl slightly.
- After covering the entire sides, brush some glue on the middle of your star and sprinkle a thick layer of glitters in 5 separated spaces.
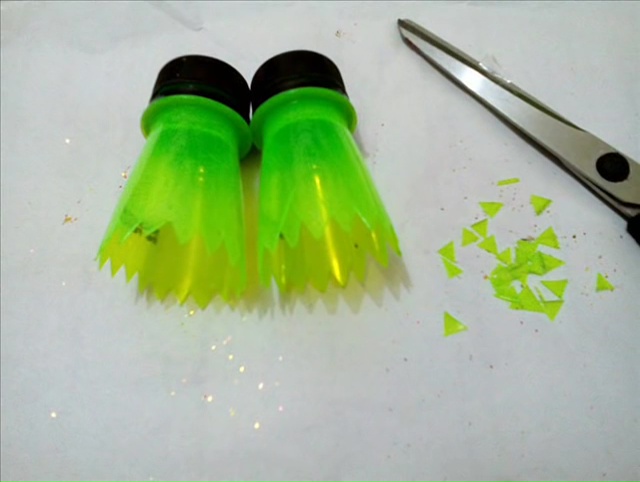
- Then, take those bottle tops, which you have cut out earlier, separate the lid, and make 2 holes on each cap.
- Cut the bottom of both pieces with a sharp knife and give them some sharp cones at the end panels.
- After that, attach a thin layer of glitters at those panels and let them dry properly.
- In this gap, take two pieces of metallic thread both in 4 inches measurements and set them inside those two holes which we have made earlier in both caps.
- Use that threaded piece as the hanging loop of the top portion and set them tightly with the top portion of soda bottles which you were drying out there.
- Finally, cover the lids with a layer of glitters, set those under two cones of your stars and attach one pom-pom under every single bottle-top with the help of that thread
- You can make those pom-poms from that artificial garland and when you are done, hang the star lantern in your balcony to get the glowing view of a star lantern!
DIY Paper Christmas Star Garland
DIY Star Garland:
If you are decorating your hall or fireplace area during the propitious event of Christmas, star garland is much better objected to using rather than one or two single stars! You know the most applauding part of these star garlands is that, once you have this element to decorate your house, you don’t need to bother for more ornamentation and yet get a brilliant flaunt for your Christmas celebration. Let’s take a look at the making procedure of one kind of star garland in this article below-
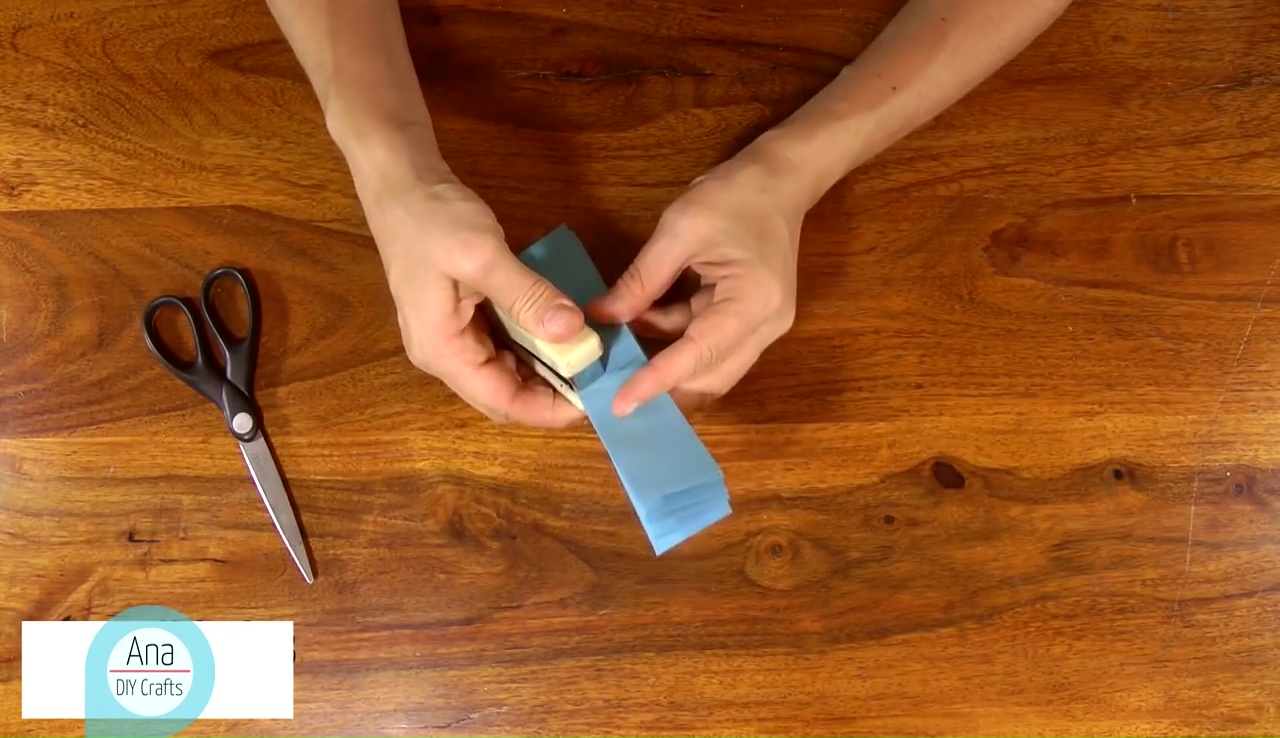
Materials Needed:
To make a colorful star garland you will need color cardboard A4, stapler, hole- punch, scissor, and a long pink ribbon.
Step by Step in Picture

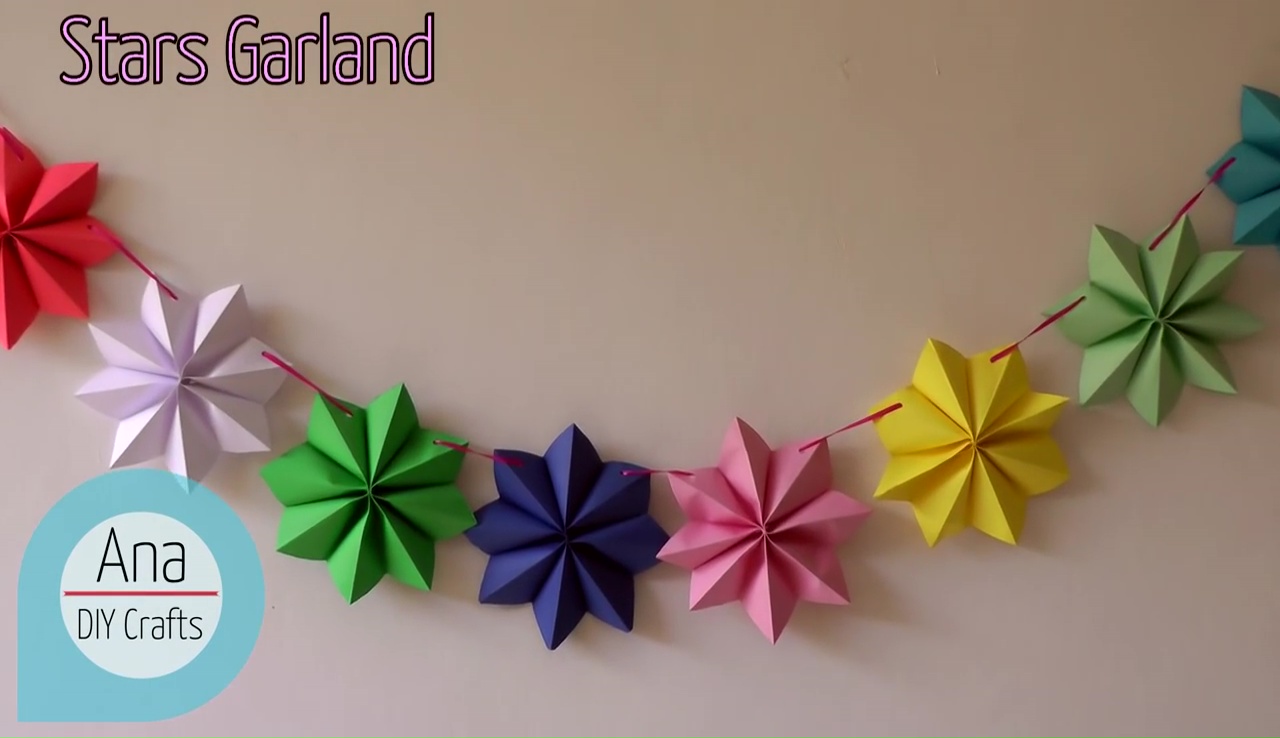


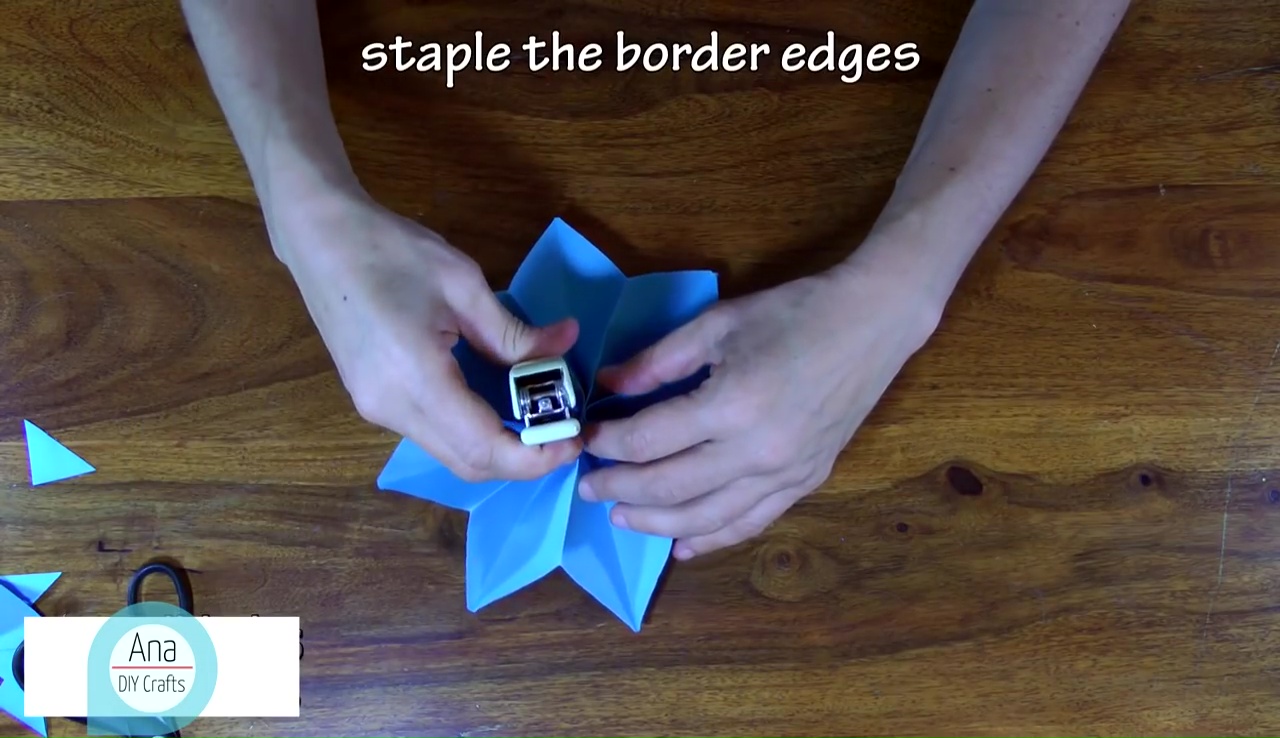
Steps for Christmas Stars Garland:
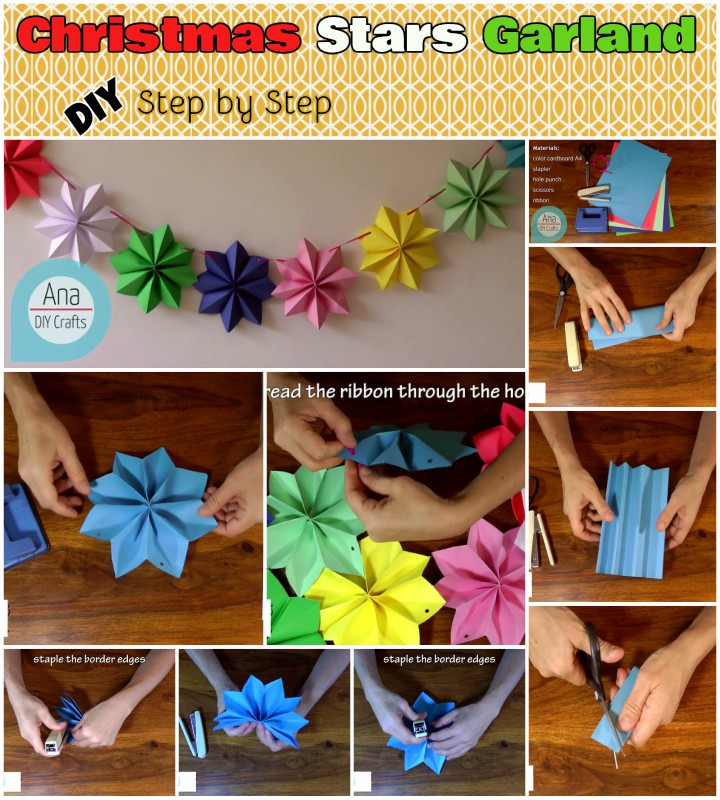
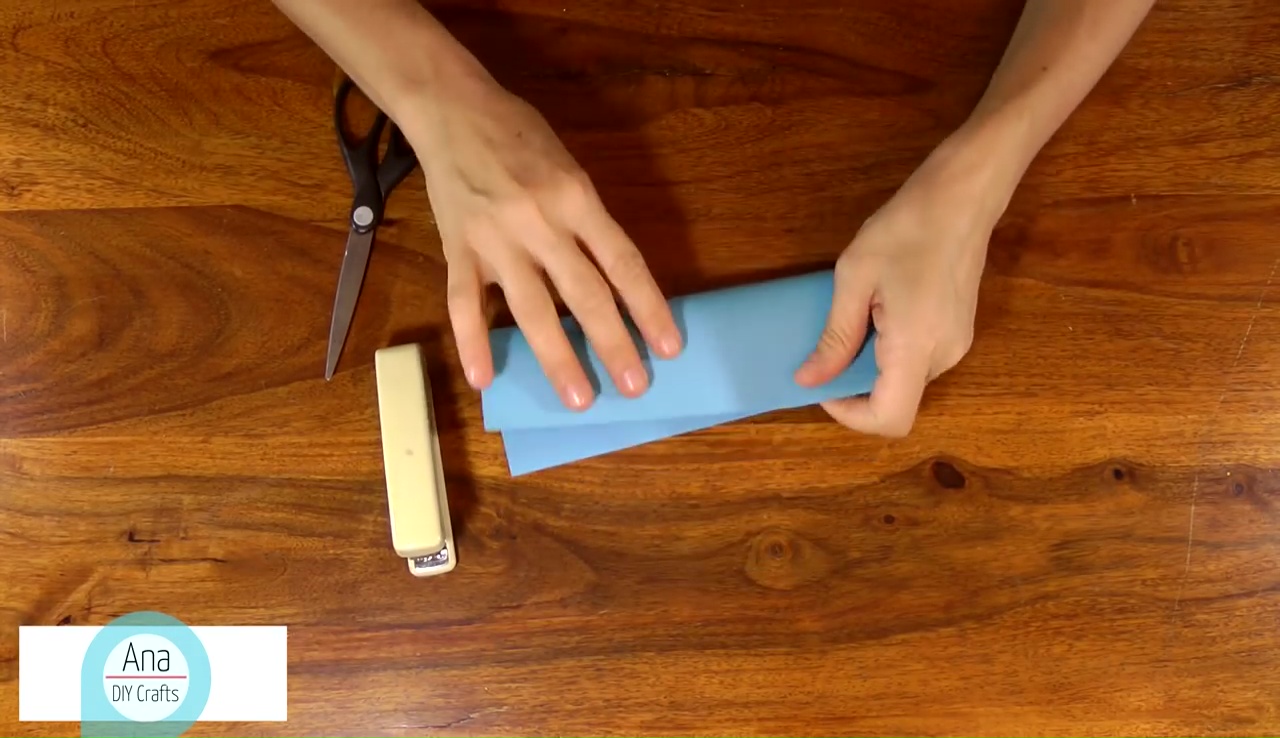
- At the initial stage, fold one A4 cardboard into the middle and fold one more time from the middle again.
- Then, fold every side one more time, after that open and fold those fold-stripes in an accordion
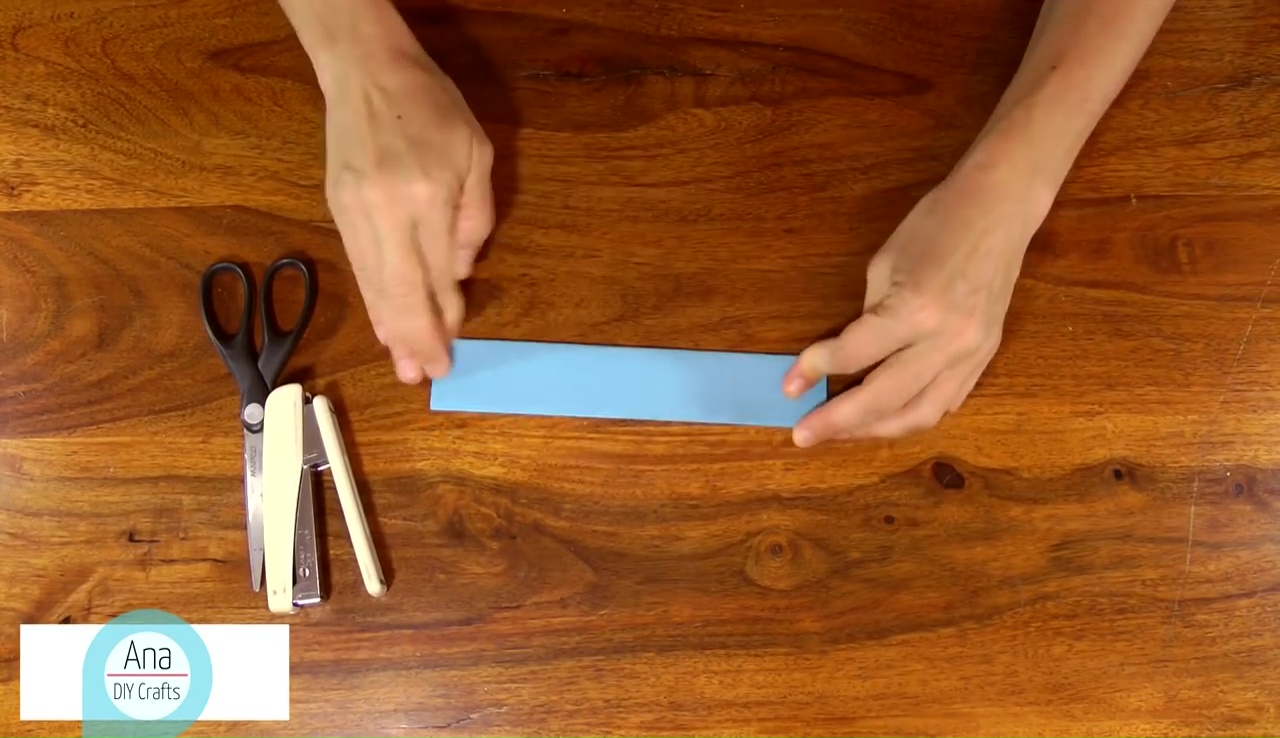
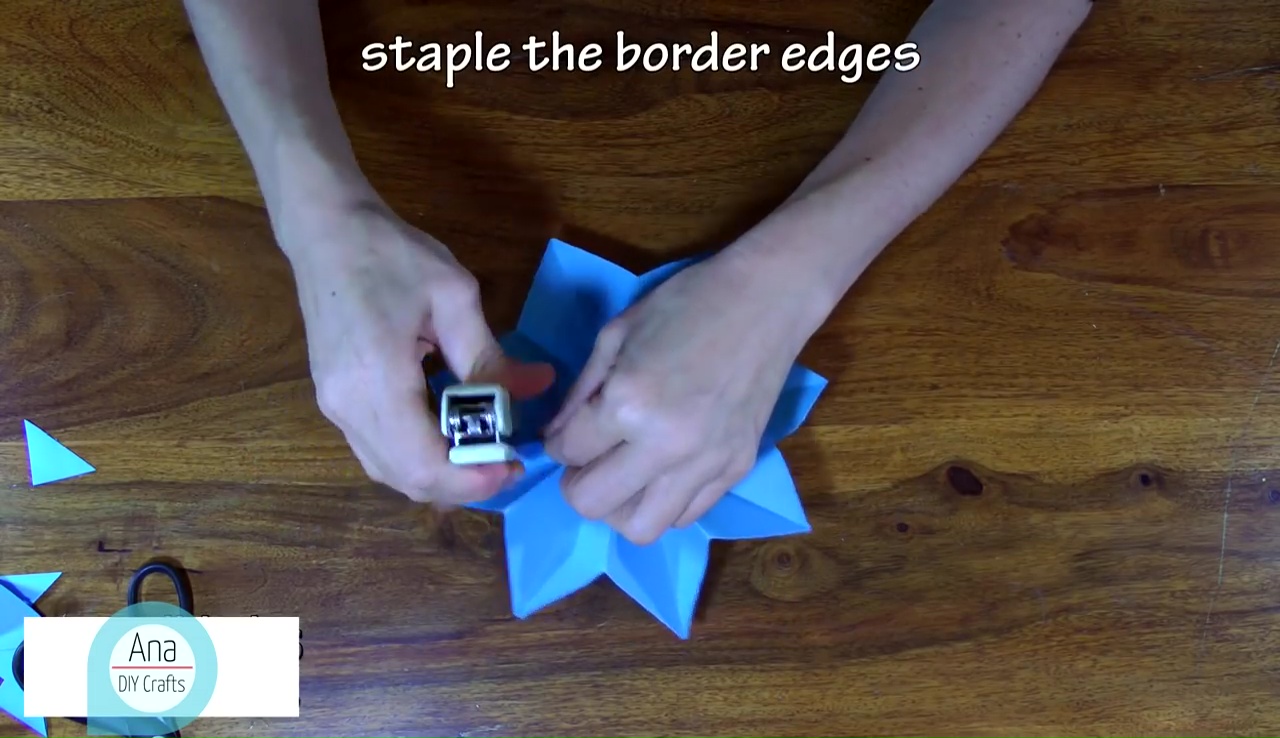
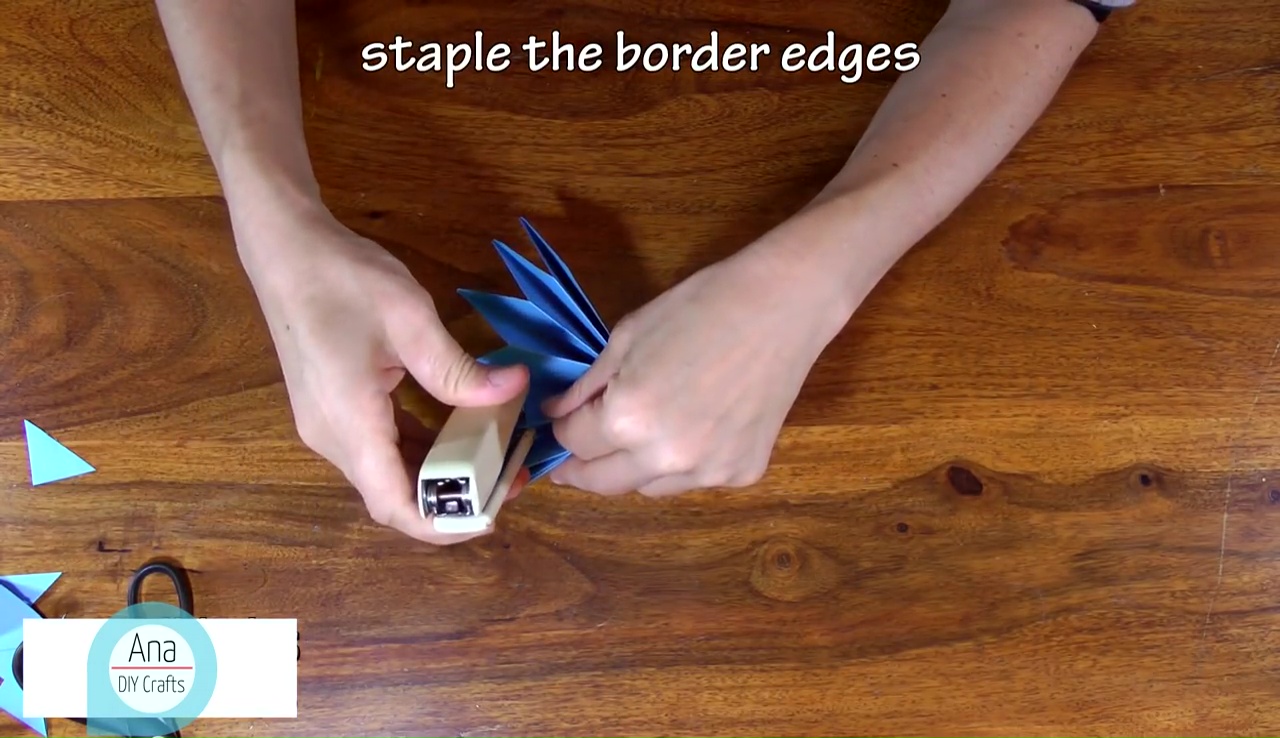
- Now fold the strips in half across the length to mark the middle and staple the centre with 2 staples.
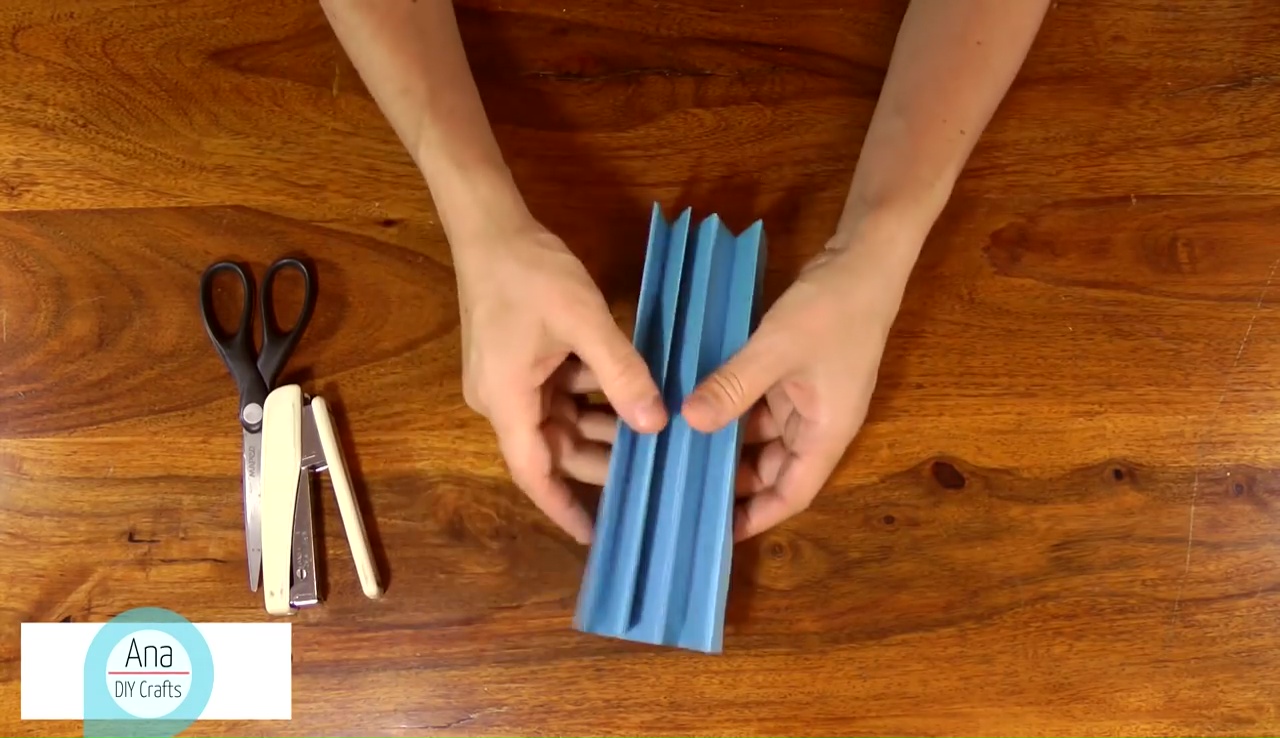
- After that, cut triangle shape in the extremes of both sides and staple the border edges together.
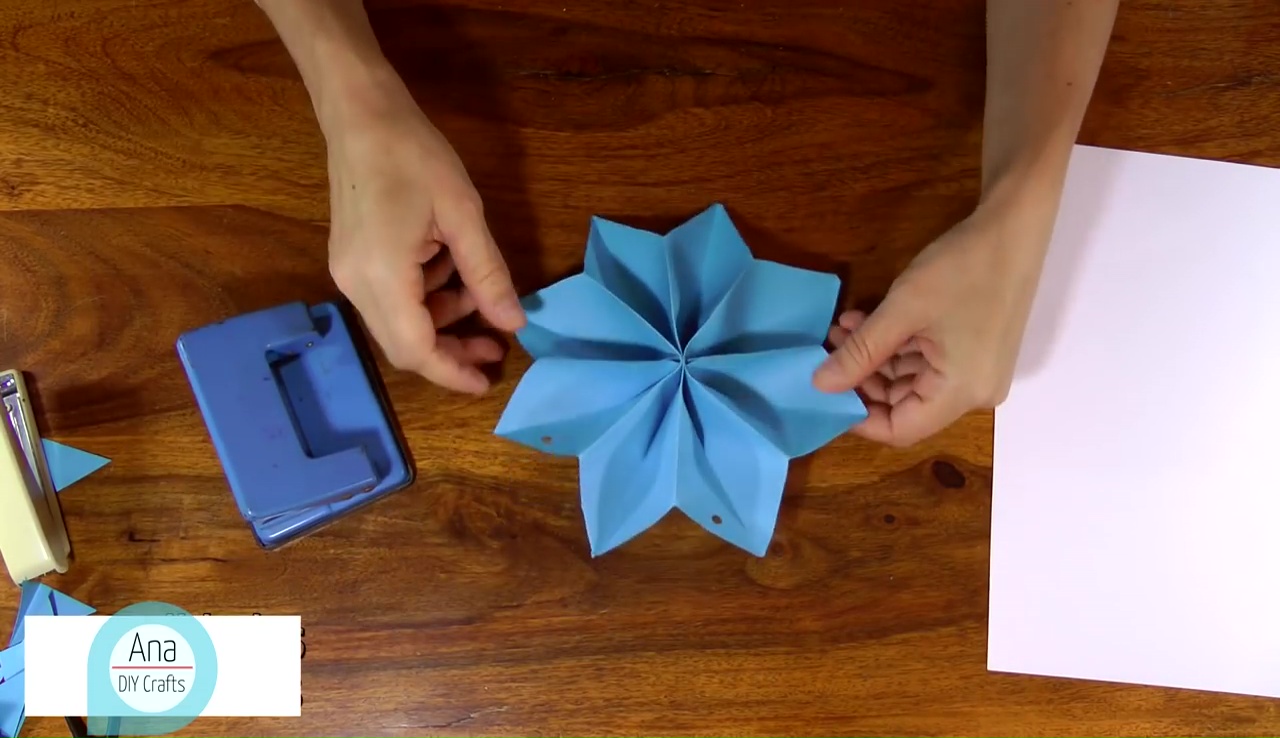
- Open folds carefully and again staple the other border edges similarly.
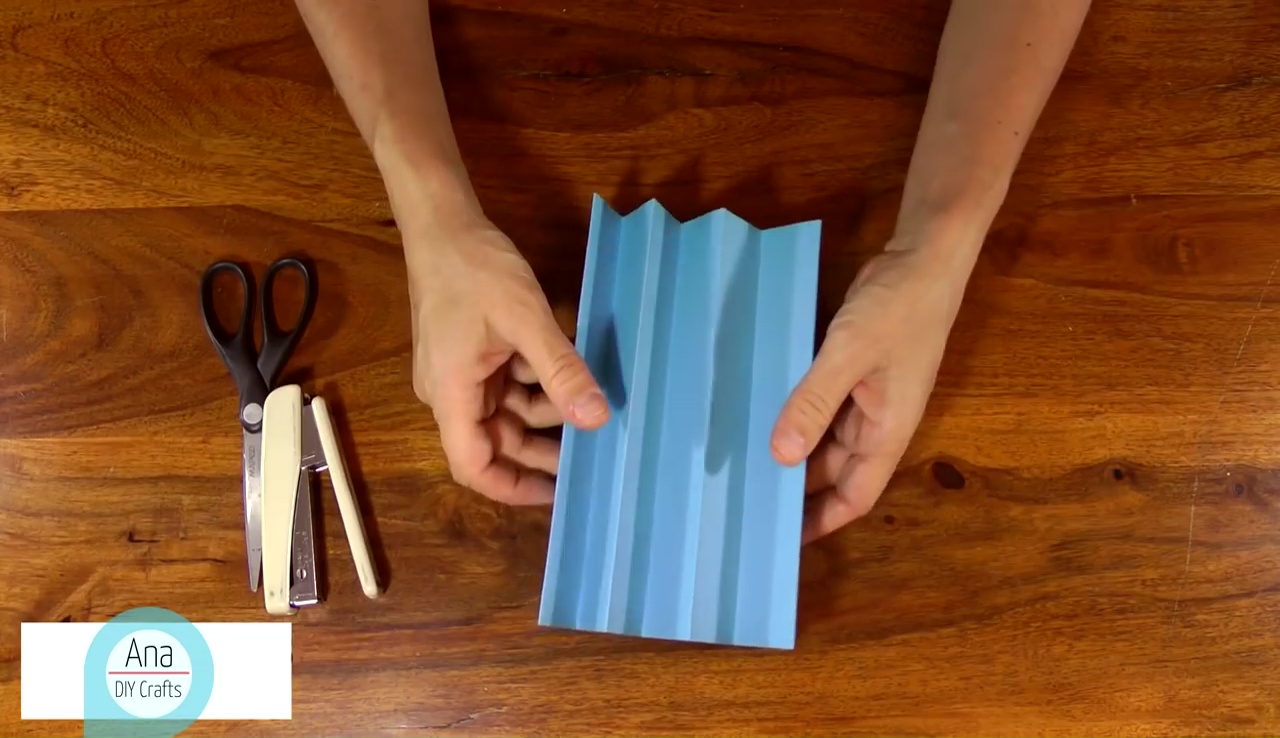
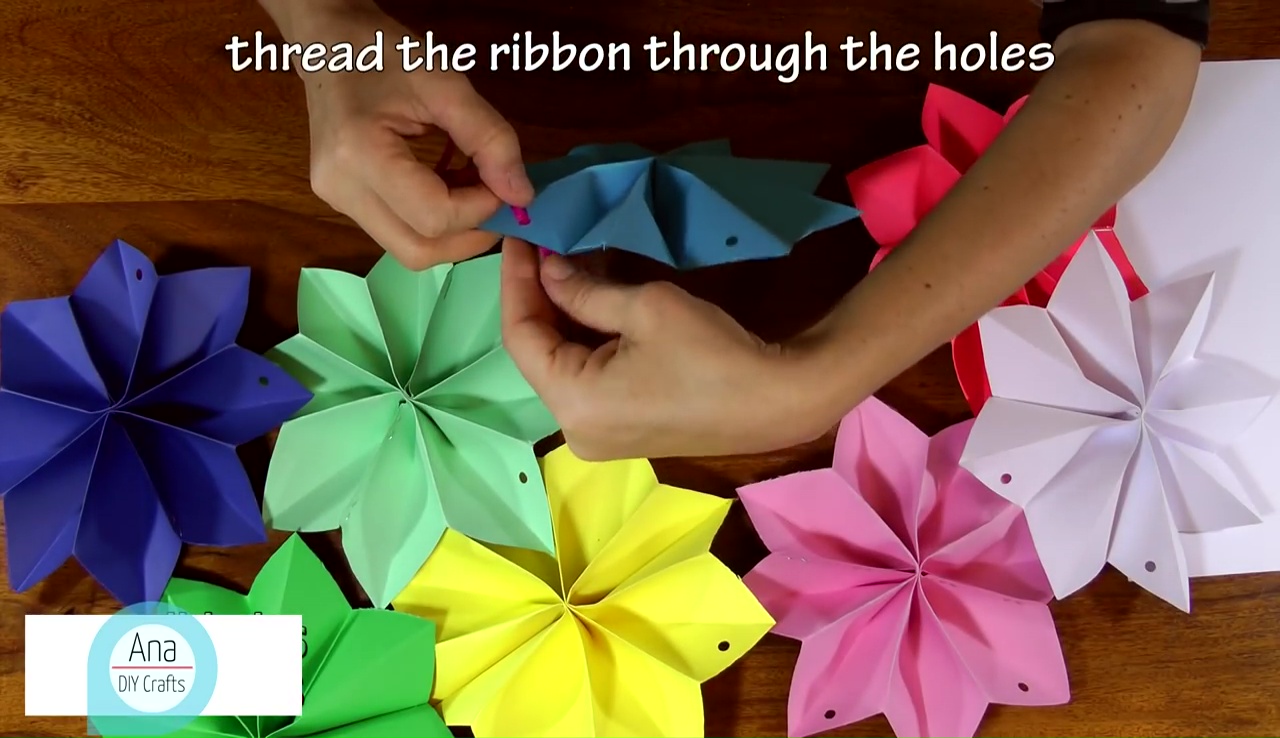
- Punch two holes in the two cones of a star make several stars in different shades.
- When you are done, thread the ribbon through the holes and set it on a wall or over the fireplace as a starry garland.
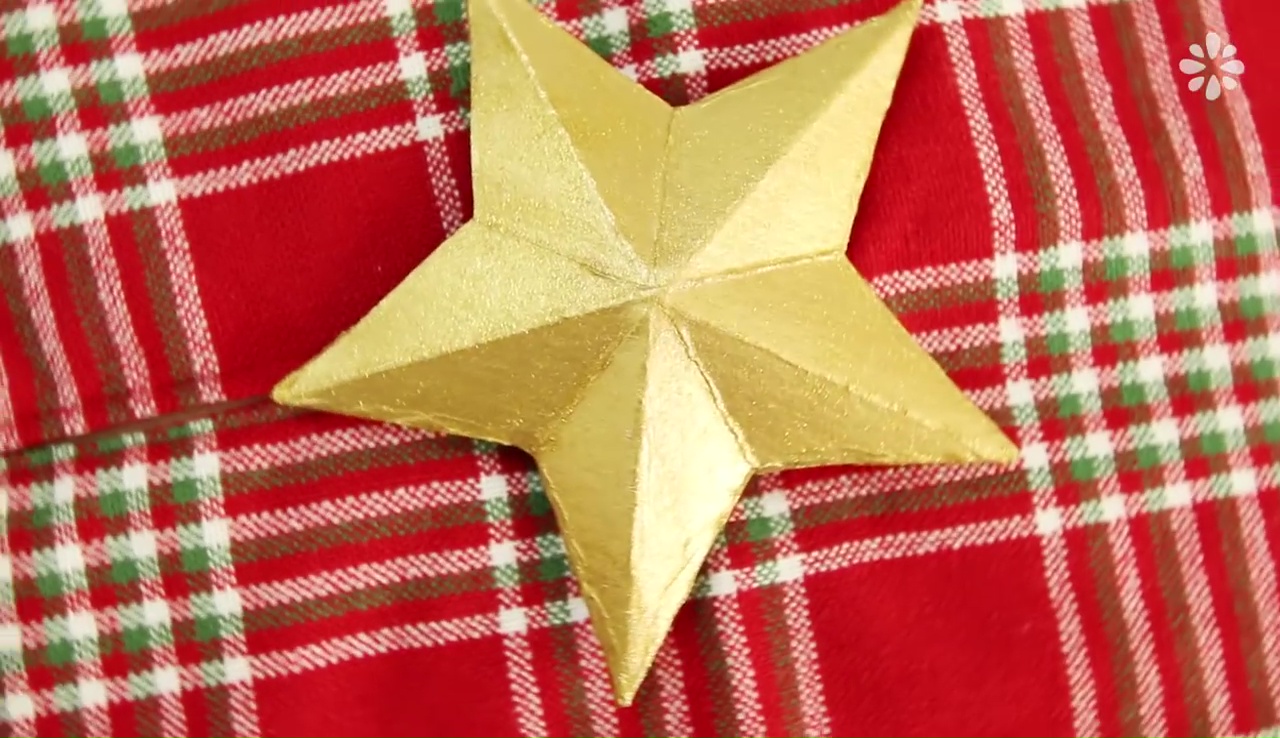
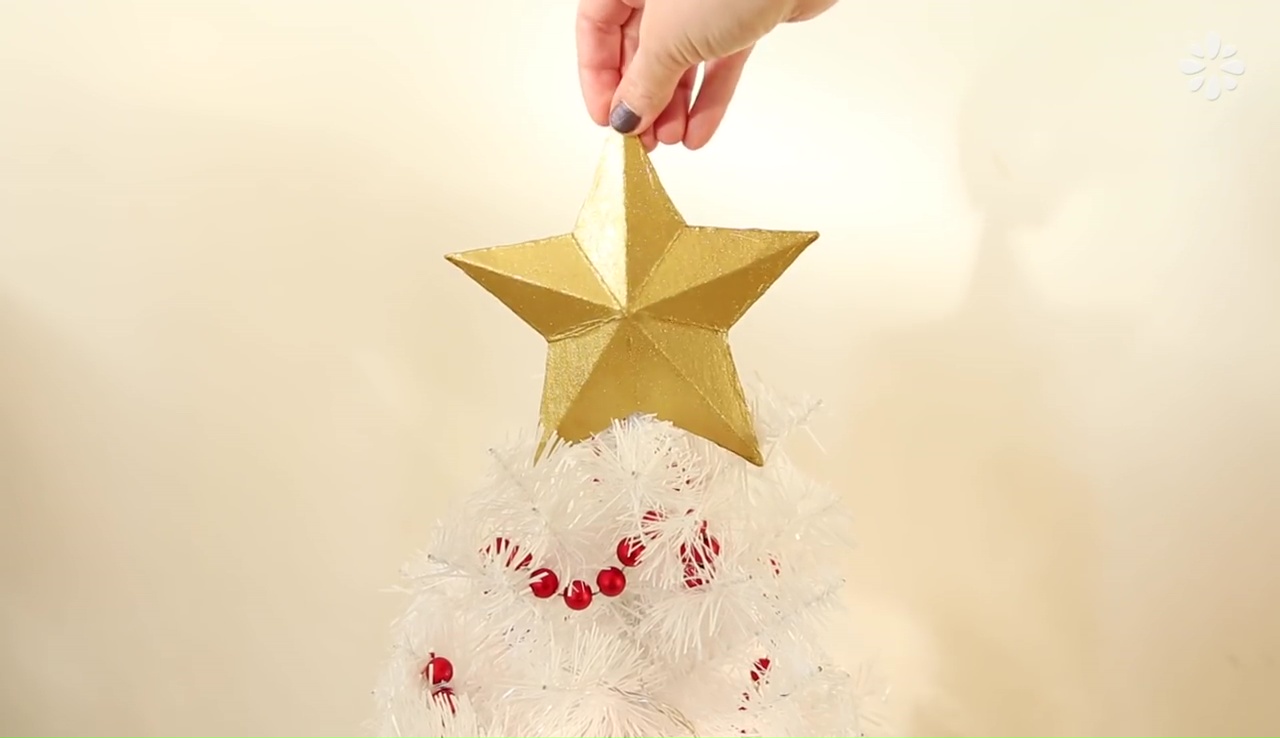
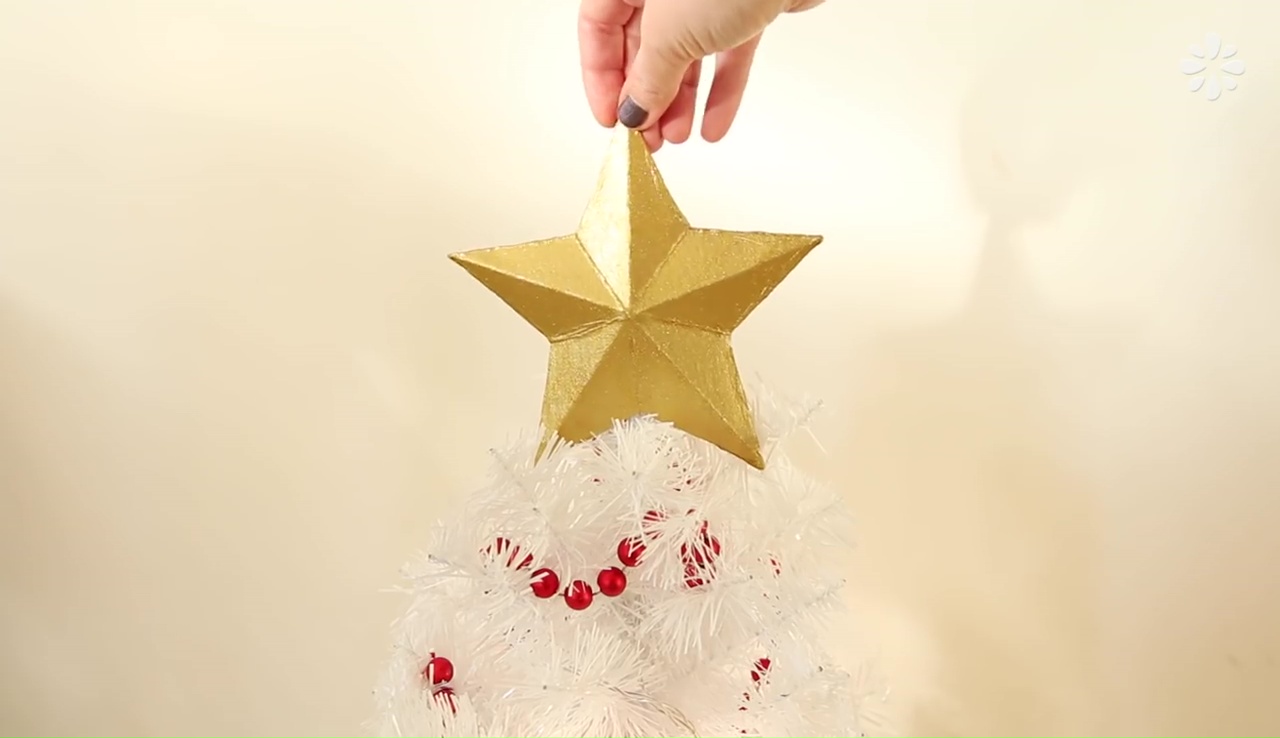
DIY Christmas Star topper
DIY Christmas Star Topper:
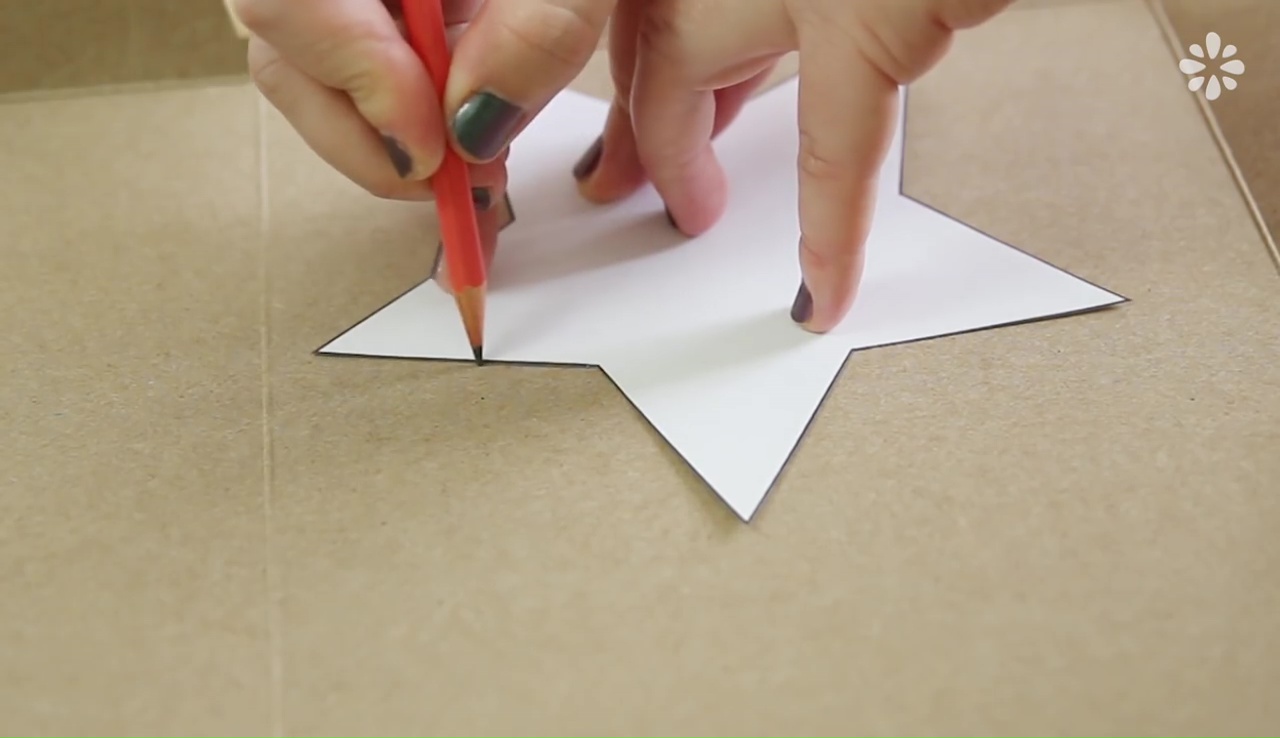
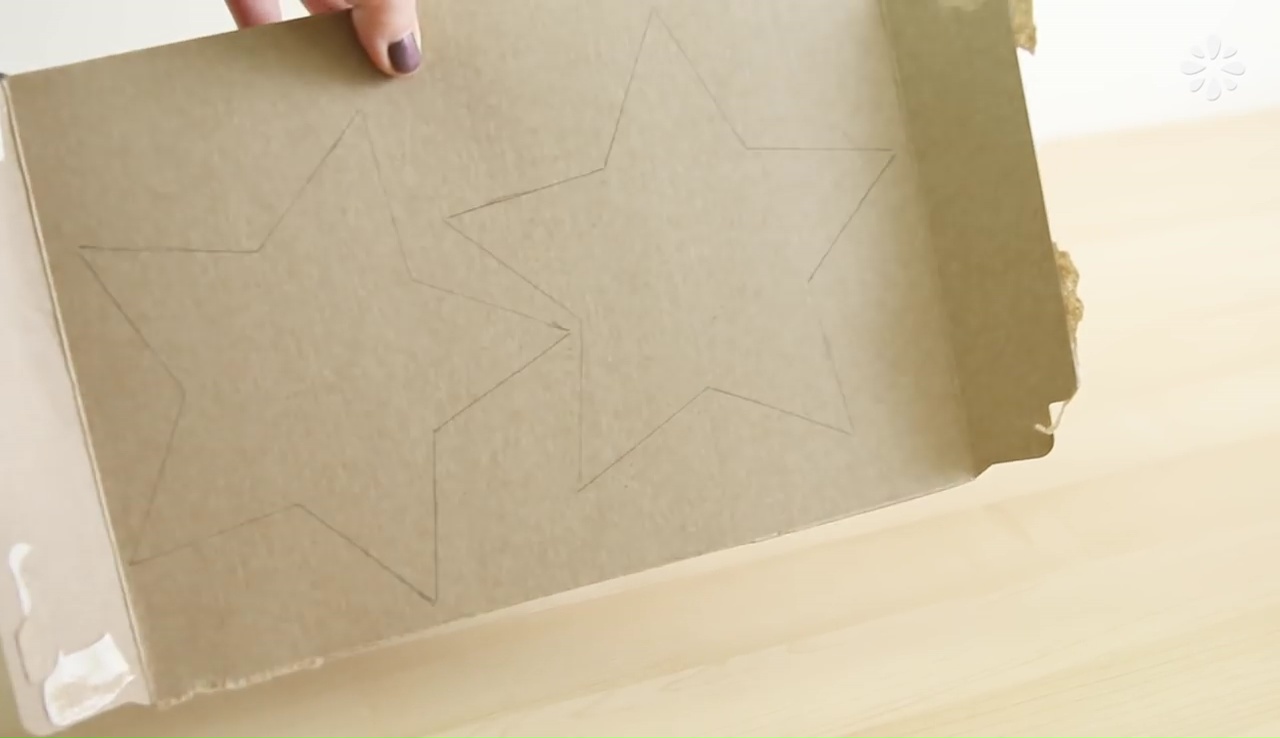
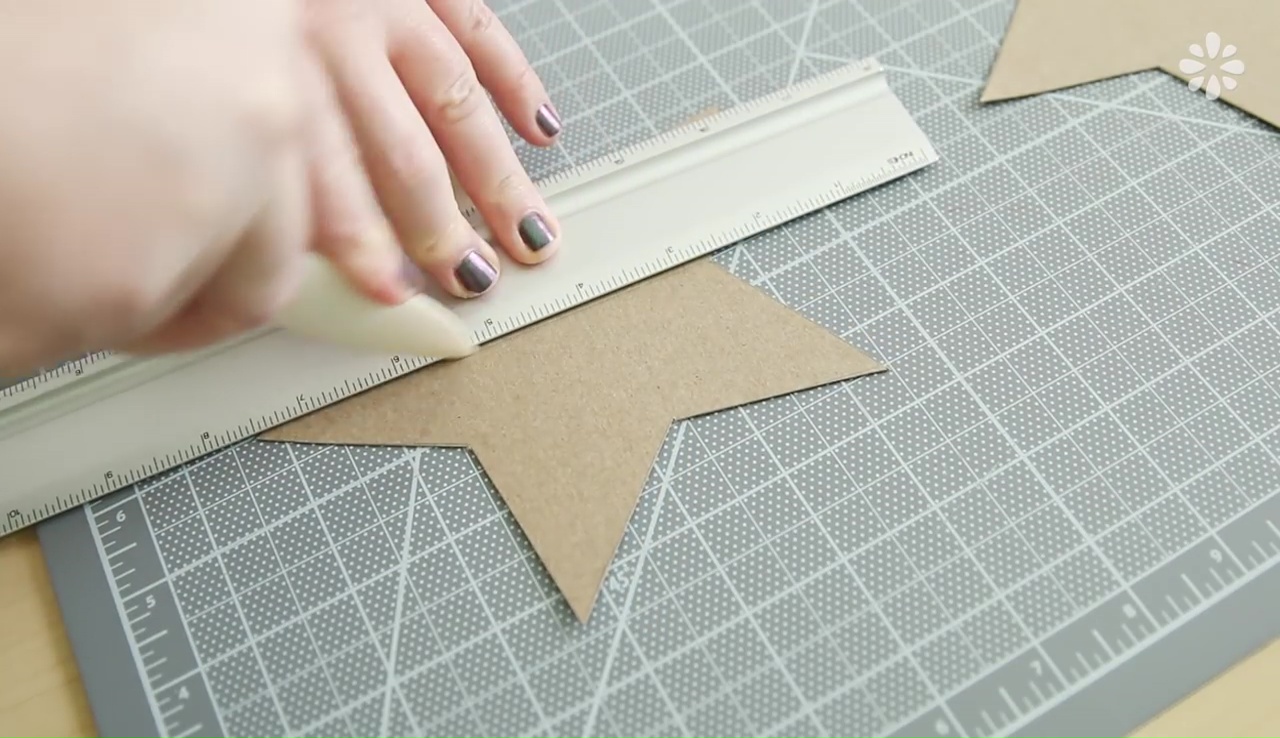
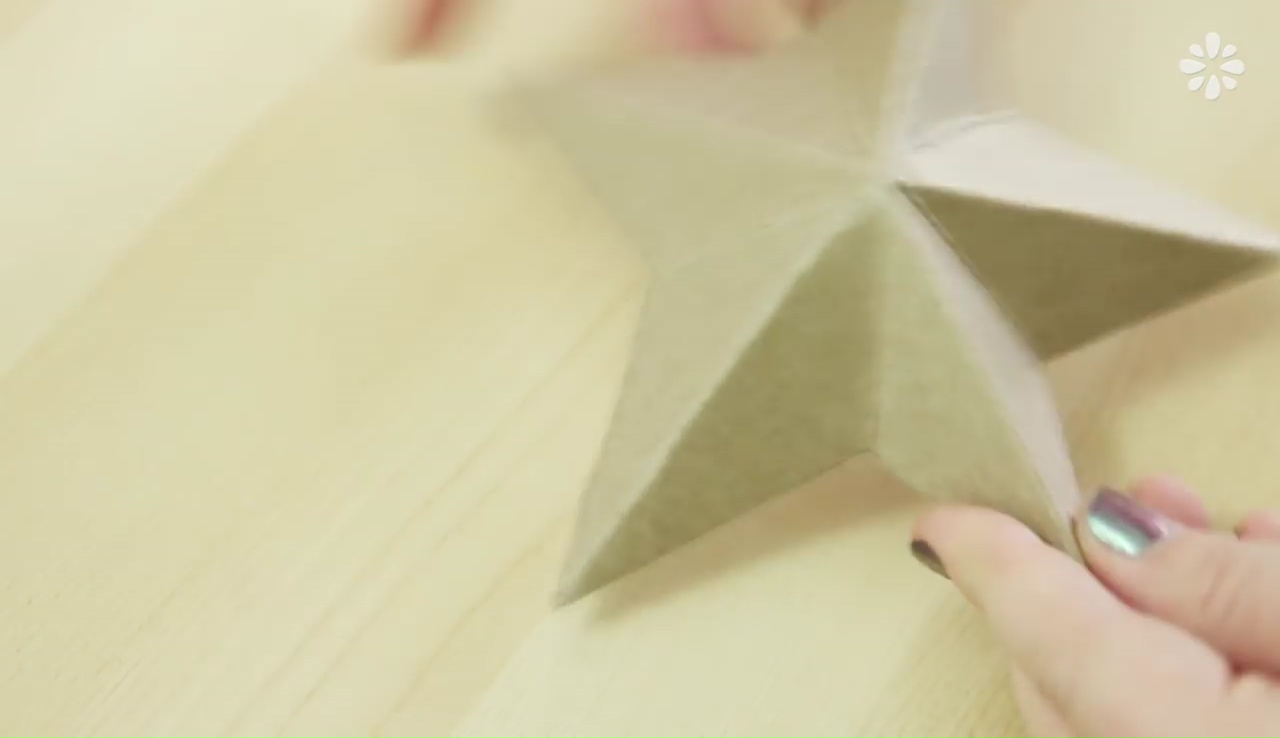
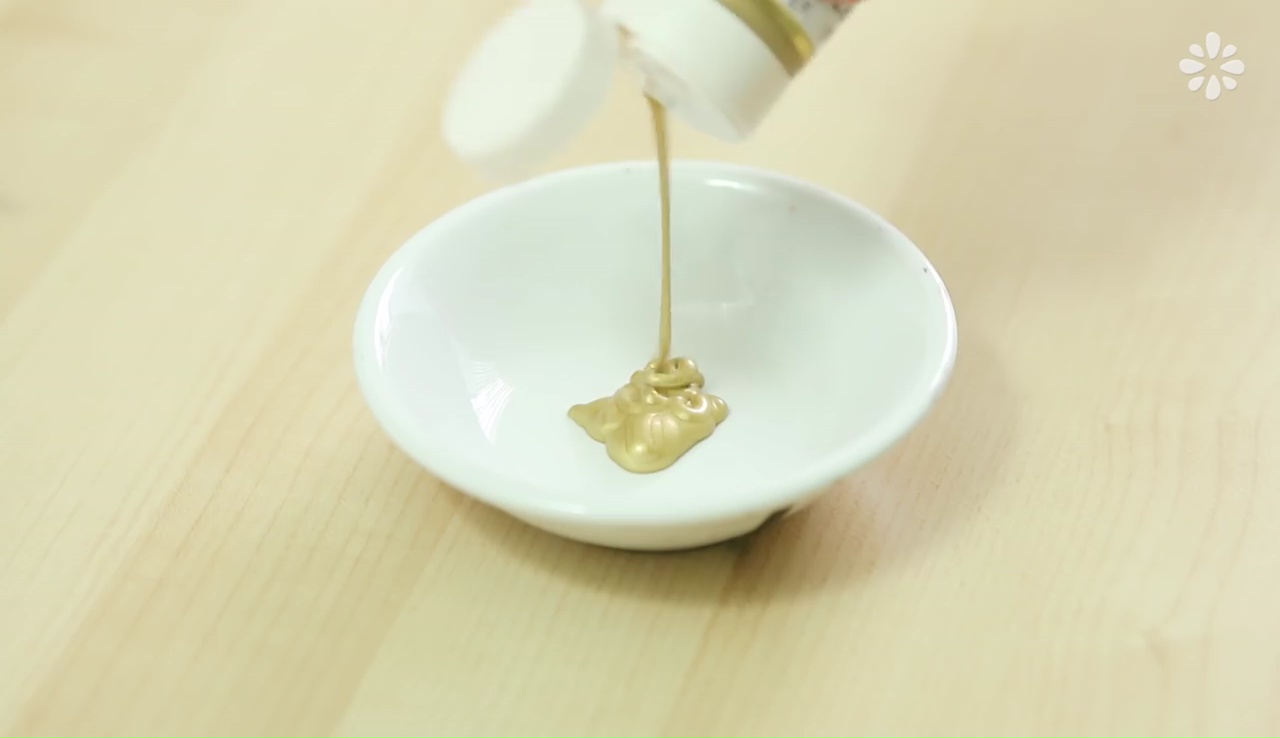
Star topper is an ornamentation charmer which usually used to set at the top of your Christmas tree. Any kind of Christmas ornamentation is quite incomplete without this star topper. As this star set on the top of all decoration thus, it has to be very gorgeous and must come in a wide shape than other Christmas ornaments. You can make this star from various types of element, only be sure that your material provides a classy outlook to your adornment! Let’s check out one of the easiest ways to craft a super chic Christmas star topper from a useless cardboard in this article below-
3D Star Materials Needed:
To make a wide star topper you need, any useless empty cardboard box, a piece of white paper, marker, scissor, acrylic golden paint, pencil, 3D book, bone folder, ruler, some glue with a glue gun and a paint brush.
3D Cardboard Star Step by Step Pictures


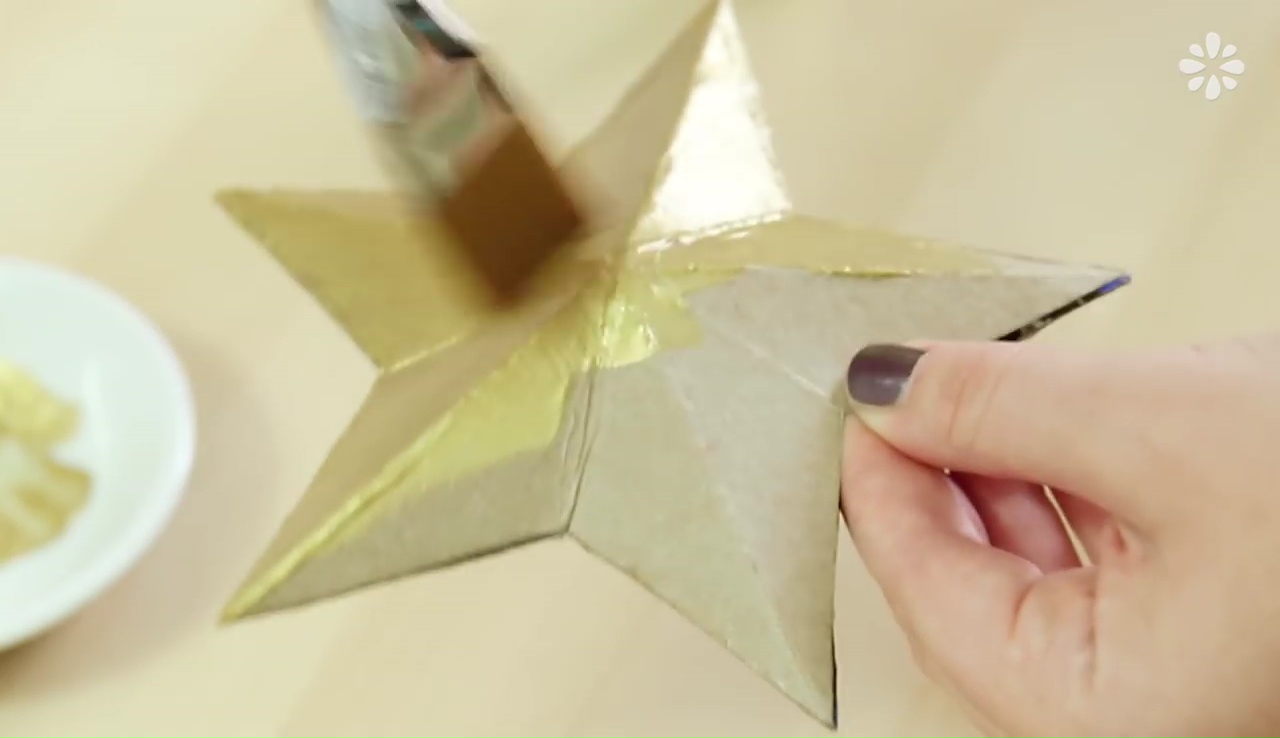
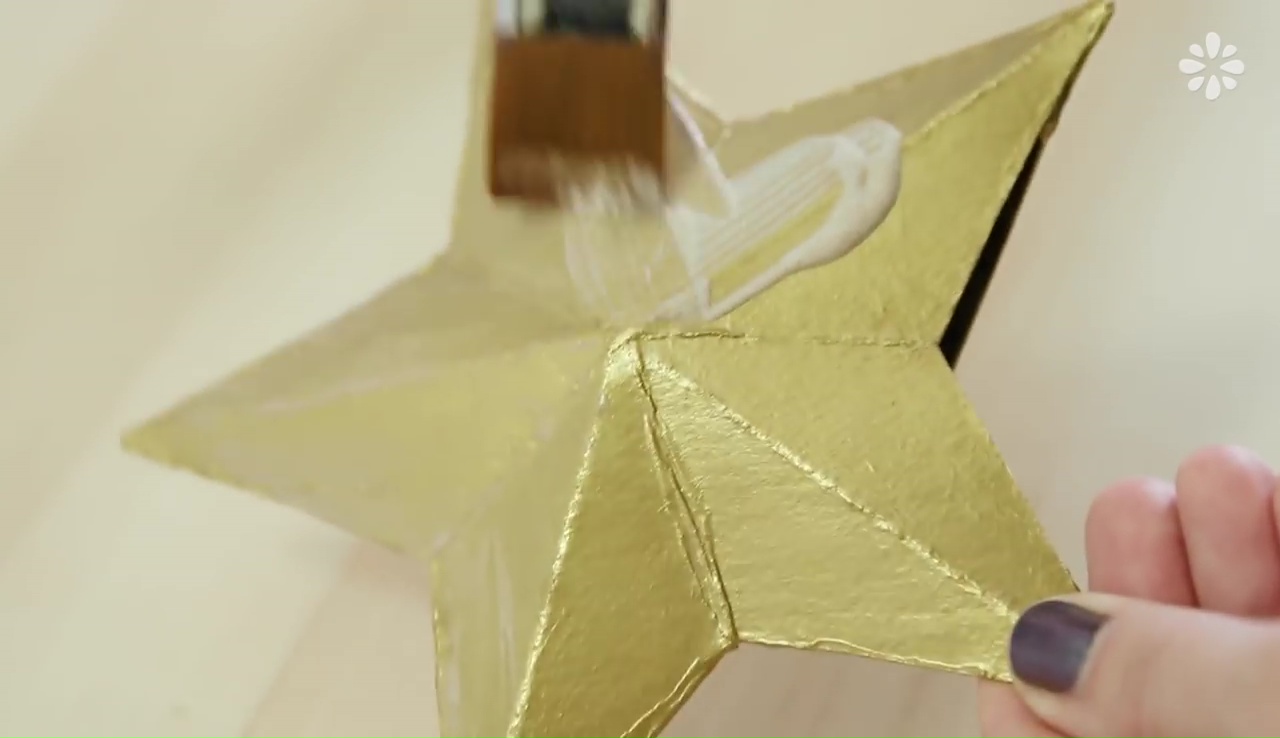
Methods:

- At first, draw a big sized star on the white piece of paper and cut it out from that paper.
- Then, set it over the cardboard piece and use as a template to take out two similar star shaped pieces from that cardboard.
- When you have sharply cut them out of the whole cardboard piece, set them on a 3D book to do the next step.
- Now, set the ruler of a cardboard made star and draw a straight line over it with the help of that bone folder. Mentionable here that you can use the dull side of a butter knife instead of this bone folder if you want!
- After that, draw a line from the each point of the star and unite those lines at the centre of the star.
- After drawing same amounts of line on both the stars, fold the stars along the line by pressing each one folding into the half, to get a 3D dimensional star.
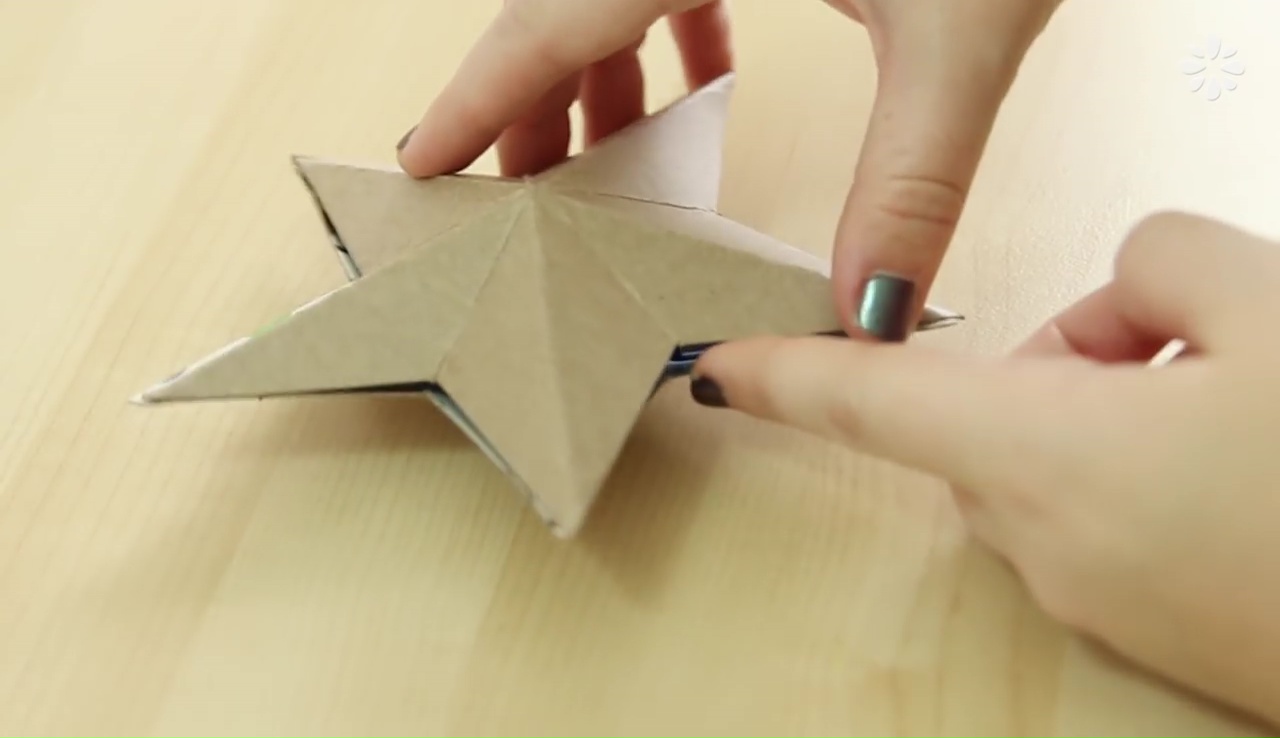
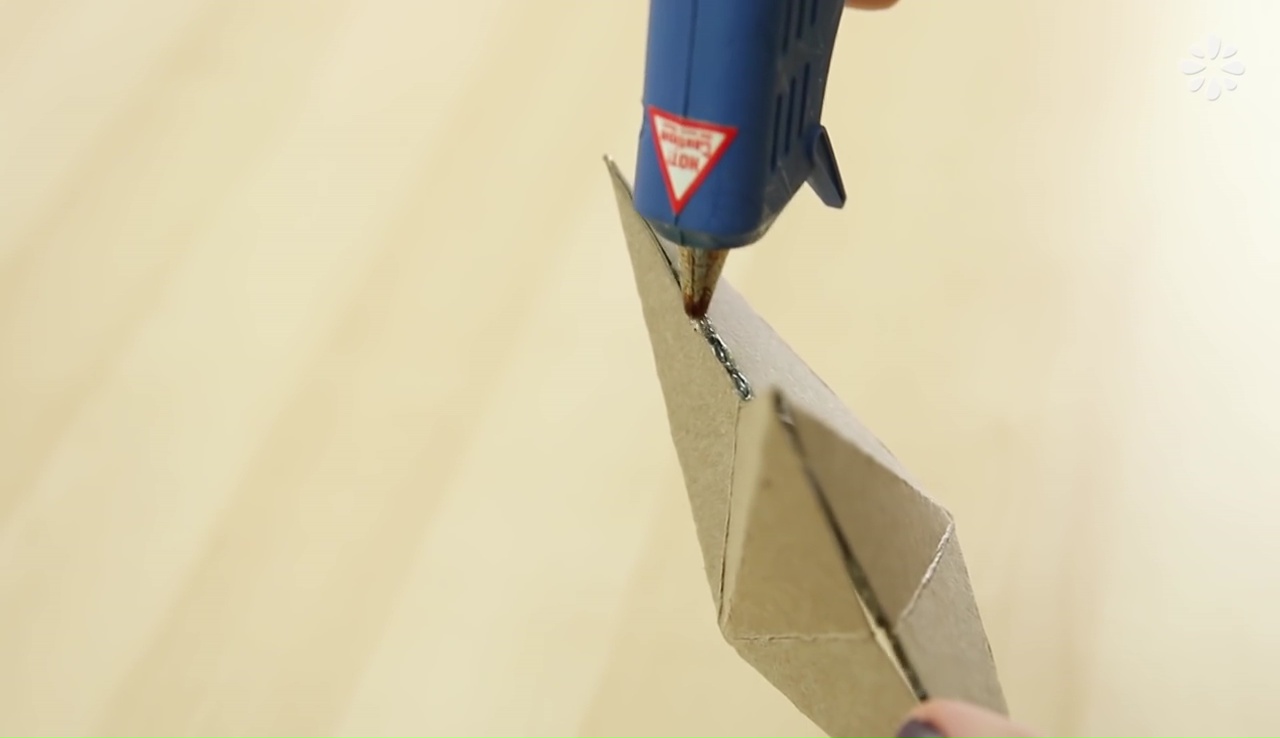
- Do this to both of the stars and then, set them together as one the back and one the front with the help of some glue.
- Don’t forget to leave an opening part at the bottom of your star while gluing them together.
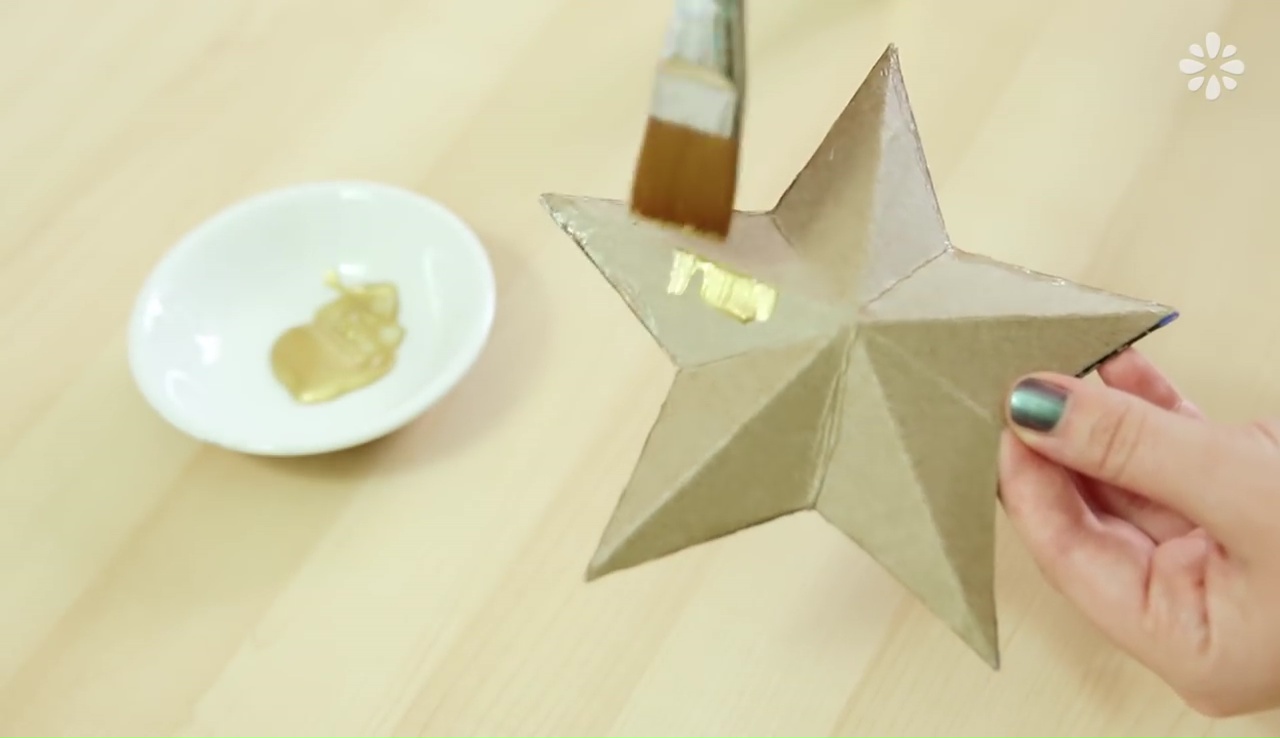
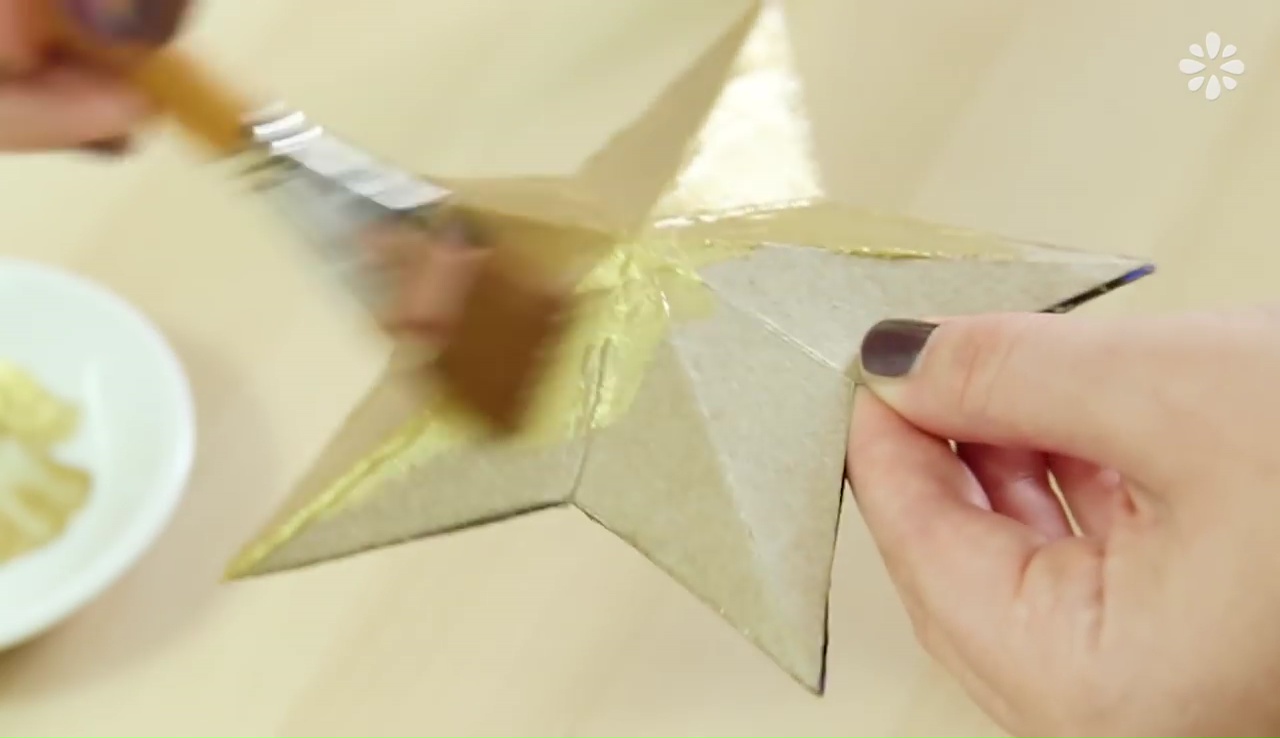
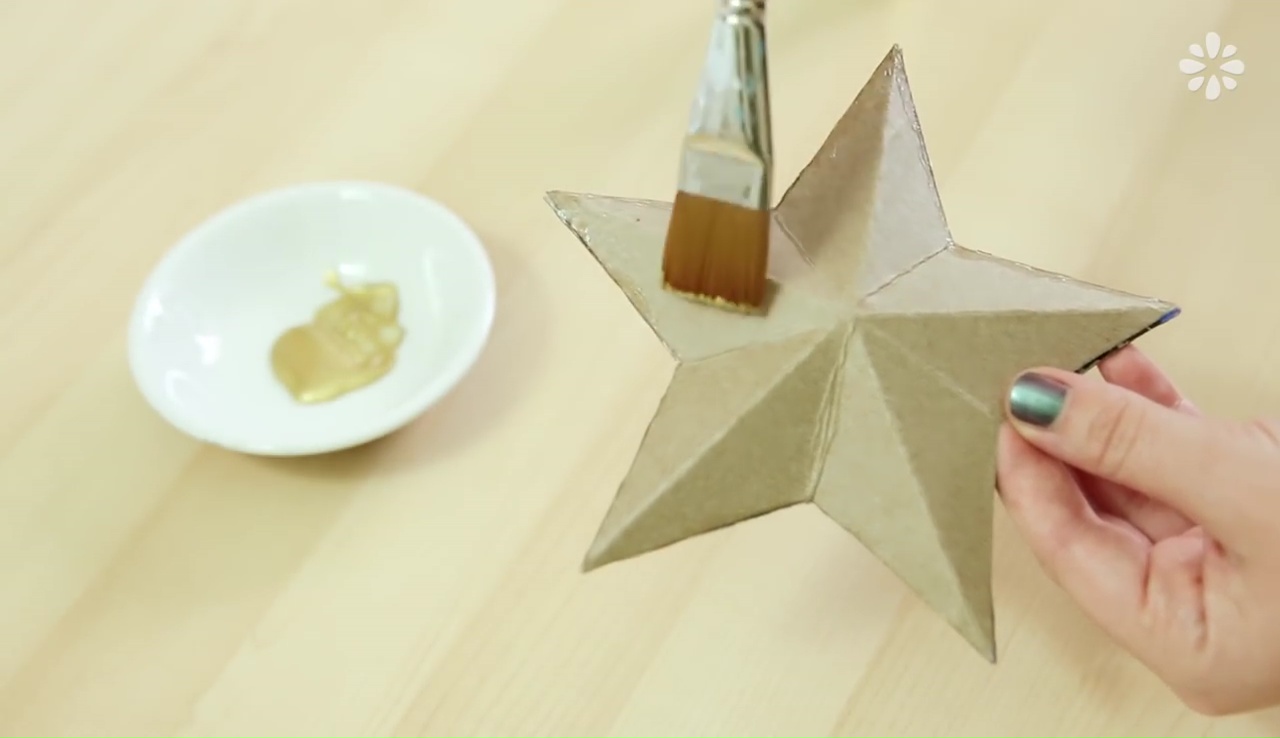
- Finally, take some acrylic paints n a bowl and color your star with that paint brush.
- Add another layer of glitter color from the top and set the star top of your Christmas tree when it is all dry up entirely.
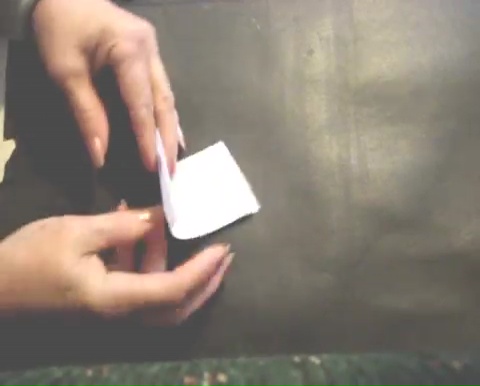
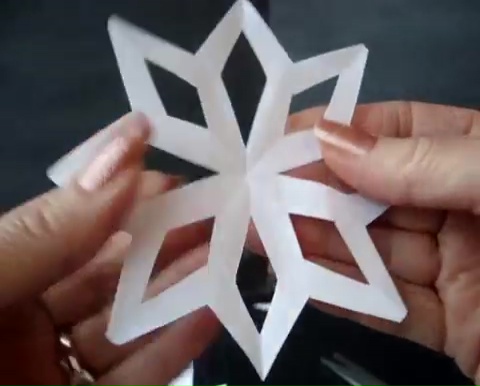
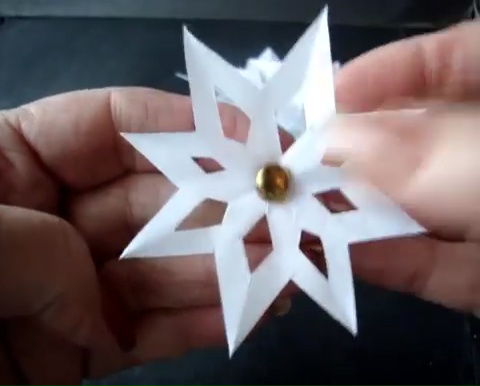
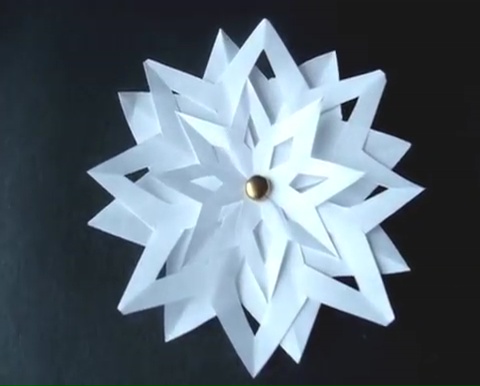
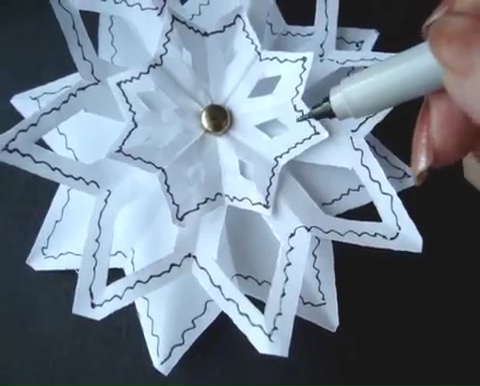
How to Make Christmas Snowflake Star Ornament
DIY Snowflake Star Ornament:
Snowflake star ornament, especially which are made of some paper pieces are the easiest and funniest craft to make during the Christmas celebration. This Christmas adornment looks spectacular when you hang them on your Christmas tree or in your balcony. The best part of these easy star snowflakes is that you can craft them from any kind of object near your hand and the crafting process is so effortless that a kid can try his hand on this attempt! If you don’t believe us then just, check one of the simplest procedures below in this video which is showing you how to craft a 3-layer snowflake star within just a few minutes! Take a look-
Craft Supplies:
To make these elements you will need a sheet of computer paper, a sharp scissor, some glue and golden bread.
Steps in Pictures
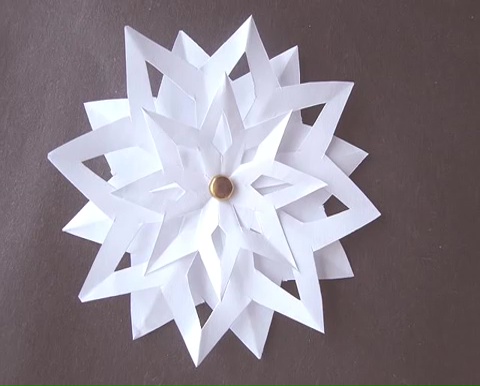


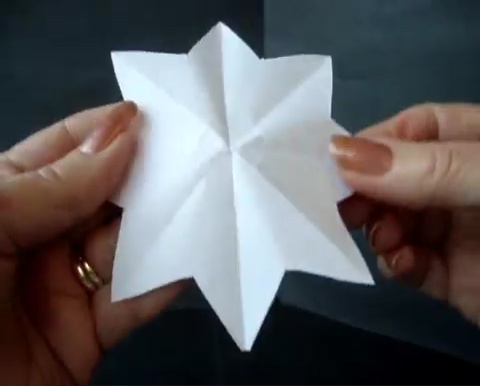

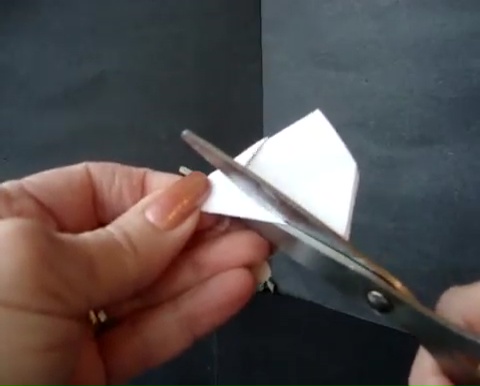
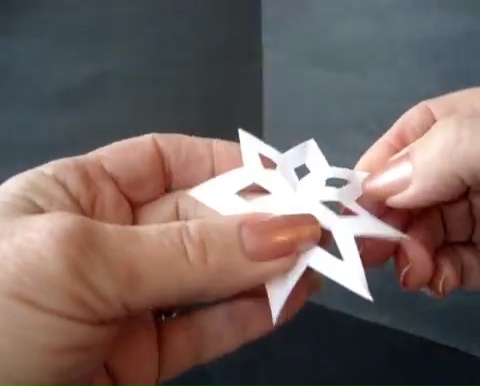


Snowflake Stars Method:
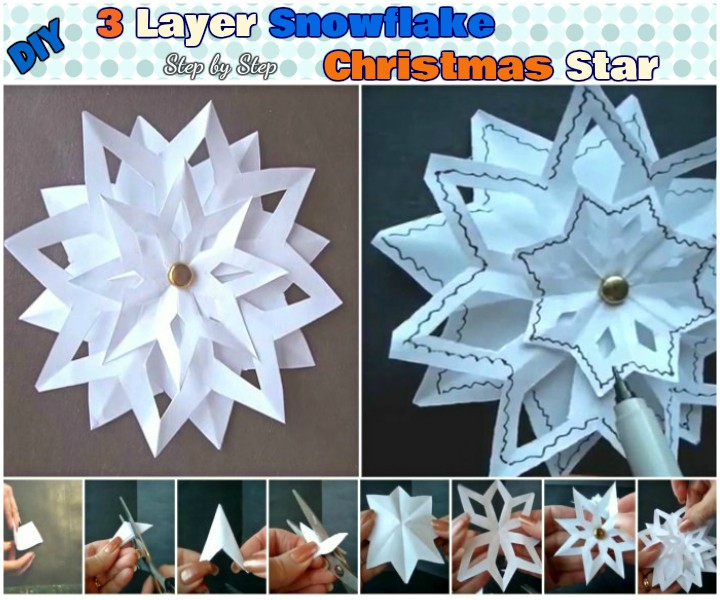
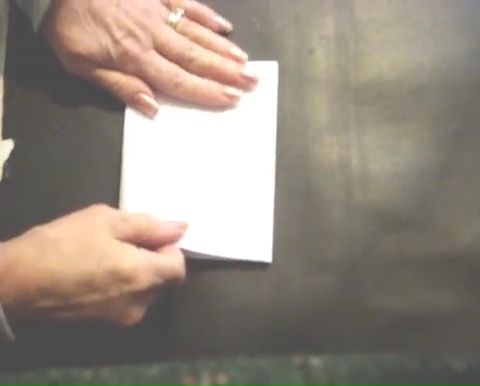
- At first, take the sheet and fold it 4 times from the middle.
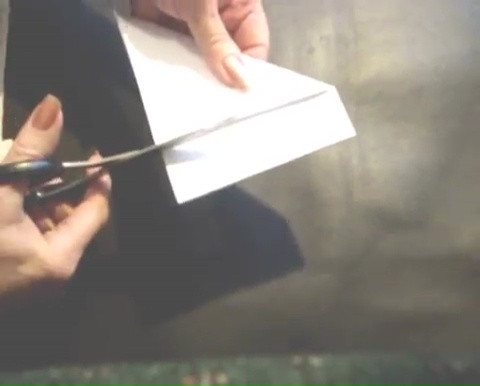
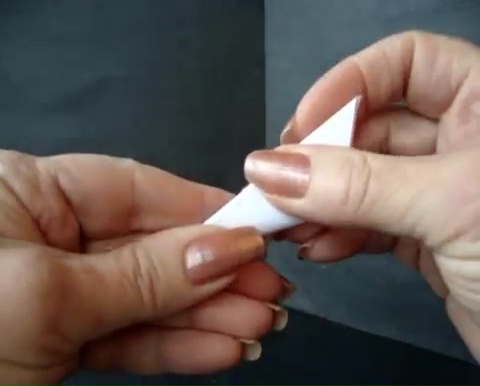
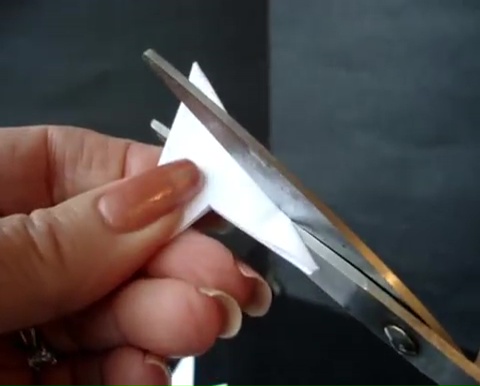
- To form a square, fold it in a triangle shape or diagonally and cut around the rest part from the paper.
- After that, cut along the folds and you will get then, 4 pieces of sheets at the end of your cutting.
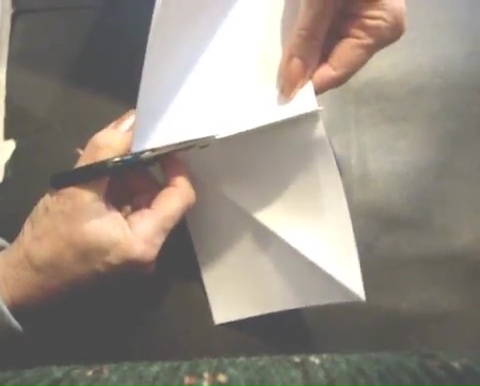
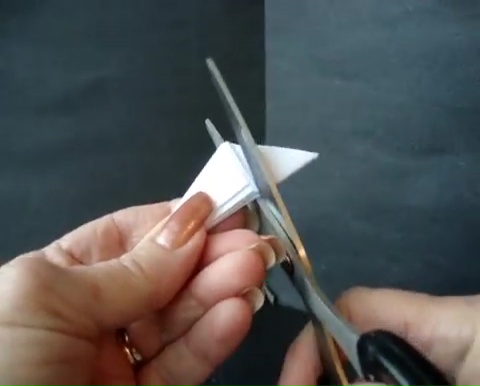
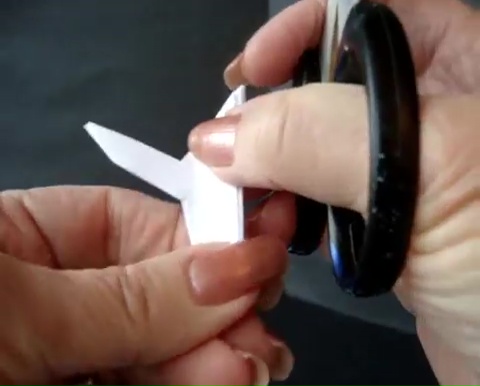
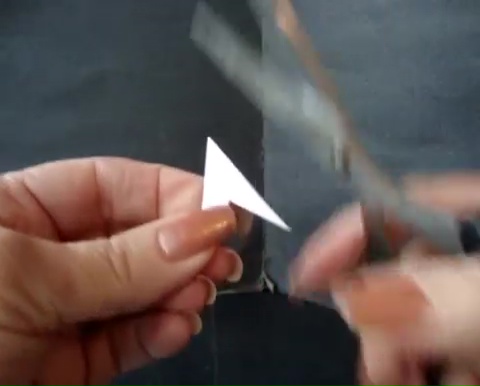
- Now, take one of those sheets, fold the paper in half for 2 times and finally fold it diagonally for 2 times again.
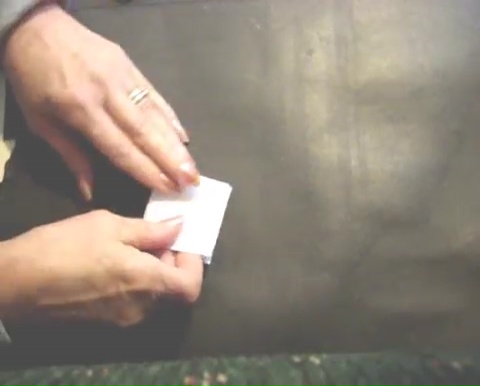
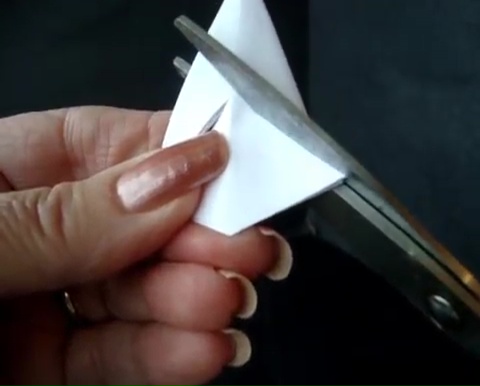
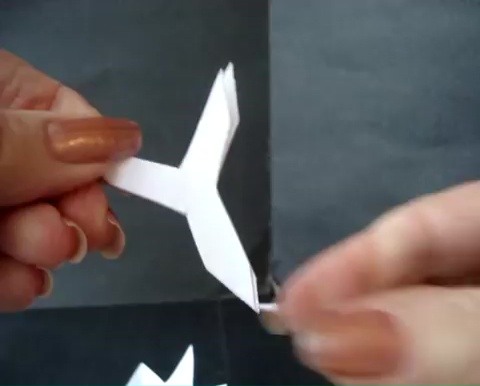
- Cut the extra part out, cut away a sharp ‘V’ shape from end loop and open the folds up.
- You will get a simple white star at the end of your course, now set it aside and take another square to craft the second layer.
- After taking the paper square, fold it a similar way, cut out some portions from both the sides and keep it aside after unfolding.
- Now, take the third piece of the square and cut out for the third layer. For the final layer, fold it again diagonally and cut out some portions similar way as the previous one, just do in comparatively shorter shape than other two layers.
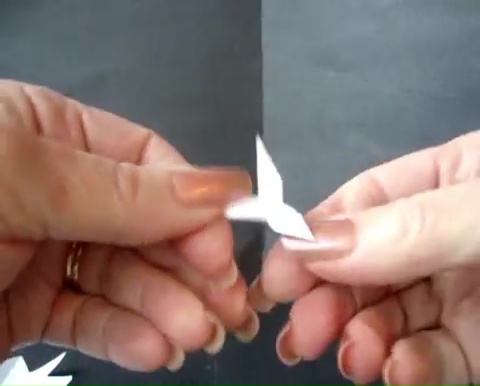
- Once you have completed all three layers, set them together by puncturing the centre of each layer so the brad pass through more easily.
- Finally, make a thin hole on each layer with the help of a pin and then, assemble them with that golden bread.