Beans are basically large edible seeds, which humans and animals used to eat because of their high nutrition value and unique taste. This product originally belongs to the family Fabaceae and comes from a flowering plant that is grown as a green vegetable. Beans plant is common species to cultivate at home because of its easy-to-grow attribute and low maintenance. You can start to grow this plant in your garden space or any selected indoor area with some typical apparatus if you know the right procedure. Hence, let’s check out the precise process of cultivating these seeds at your home, in this article ahead-
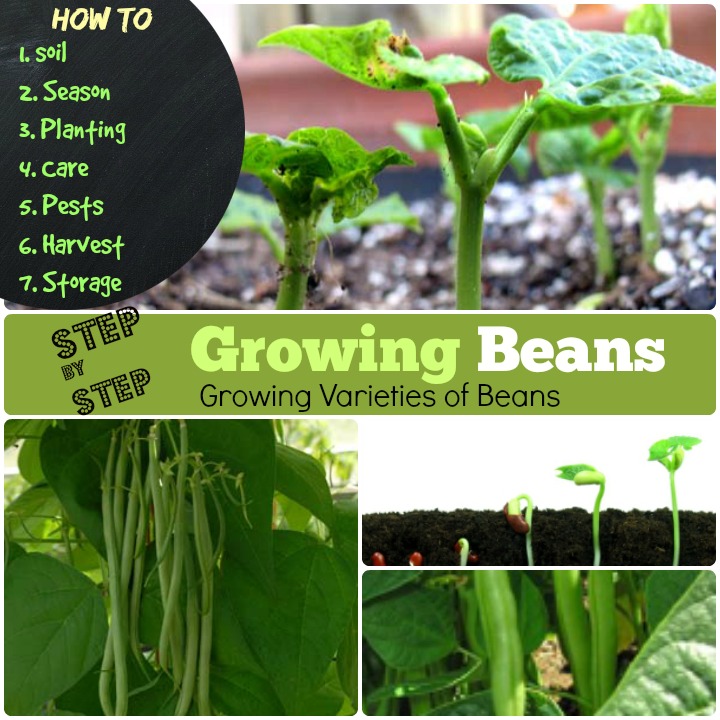
How to Grow Beans

1. Soil
- Beans plant has a flexible quality about soil, thus it could grow in any type of soil whether it is sandy, clay, loamy, rocky, rich or poor.
- You just need to check that the soil type is drained well and getting adequate sunlight for the perfect warmth.
- Though, this plant grows best in loose and rich soil with a good drainage system.
- Never let the temperature of soil down less than 50 ̊F for a single moment, especially during the germination period!
- Keep the pH level of your soil within 6.0 to 6.8 to get the perfect balance of acidity.
- Use lime or sulfur to adjust neutralizes acid or alkaline quality of your soil.
- Add these organic fertilizers to adjust the pH level into the top 6 to 8 inches layer of soil, before planting.
2.Season
- Beans are the crop of heat, so try to sow your plants in spring, so then the plants could get enough sunlight throughout the upcoming two hot seasons, entirely!
- Some gardeners love to begin their planting during the three-week intervals of midsummer, to provide the adequate sunny atmosphere all through the growing season.
- Generally, 50 ̊F to 85 ̊F temperatures would be the suitable dilemma for growing beans, but, you can keep the temperature 80 ̊F rights through the whole cultivation session, once the seeds are germinated.
- It would be perfect, if you can start your beans plant sowing anytime after the very last spring frost to keep the temperature ideal for cultivation.
Beans – Early july not too late.
Video Guide: Growing Green Beans
3. Planting
- To start the planting, you have to decide the variety of beans, which you want to cultivate, as the planning procedure is a little varied by the category!
- However, after deciding the variety, choose a bright or sunny location in your garden and prepare the soil there.
- Check the pH balance of the soil with the gardening kit tool and make sure that the soil is absolutely clod or puddle free to work the drainage system well.
- Now, push your finger into the soil to make a 1-inch hole, make some similar holes in a row, and put 2 to 3 seeds into each hole. Holes should 6-inch apart from each other to get the enough room to grow up.
- If you are going to plant seeds in several rows then leave almost 3 to 4 feet distance from one row to another.
- Then, cover the seeds up with a thin layer of composted soil and pat it down slightly.
- After that, pour some water in your hand and drizzle it over the soil; repeat the process until you make the soil completely wet but not overflowed!
- Then, water them daily and take proper care to get the best healthy outcome of your beans or peas plants.
4. Care
- After validating the soil, location, water and fertilization, there are still more things to watch out for the healthy bean plants and that is what we called the perfect care of the plant.
- As we put the seeds in a less deep condition under the soil, thus never water them directly with a water mug or pipe and always sprinkle water over them at the initial stage.
- Peas or beans’ plants basically belong from creeping plant category thus, they could not long or growing appropriately without any kind of proper support. Hence, when the young plants reach the height of 1-2 inches tall, provide them a strong support to twine on them.
- Bamboo-poles, fence or net strung would be the perfect support system for these kinds of plants.
- Remember that after a certain growing level, peas or the utmost bean plants need a direct watering process to get the ideal nourishment. So, it will be great if you can prepare a watering schedule for your plants.
- Clear all types of weeds near your planting area, as they could slow the growth or could cause less-nutrition problem of your beans-plants.
- Mulch the base of your plant to grab the sun heat after the sunset and this will also help to keep the weeds away near your plants.
- When the plants reach 6 inches tall, you can harvest the top two levels of the plant, if you desire.
- These tender shoots are delicious to taste, and this process will allow the rest plant to produce even more fruits as well!
- Now you just have to protect your plants from any kind of pests, worms or diseases to get a handful of fresh and healthy crops.
5. Pest and Diseases
The tasty and tender seed of beans or peas, the young and juicy stems and thriving leaves of these plants easily lure pests and worms towards its every segment; while the diseases mostly occur because of the improper climate. Let’s check out some common troubles of these plants and their possibly remedies-
- Alternaria leaf spot is a common fungus of beans’ plants which comes as small and brown lesions on leaves in an irregular manner. These may cause of shot holes later if you don’t tackle them earlier. To get rid of this crisis you need to fertilize the soil with a foliar
- Aphids like cowpea or pea aphid are another familiar problem of beans plant that frequently hampers the stem or leaves of the plant and drives towards an unhealthy direction. These are some disgusting insects which cause the unwanted necrotic spots on leaves and instigate some filthy dirty mold on the stems. To get rid of these troubles, use reflective mulches like silver colored plastic. You can apply insecticide sprays if the infestation reaches a quite high level!
- Bacterial blight is another mentionable trouble of beans plant which generally occurs for the bag drainage system and leaves discoloration on the foliages. To get remedy from this crisis, use only certified fresh seeds to plant and select a bright location with full sunlight to prevent any kind of humid atmosphere to the plants.
- Mosaic is a very common virus of bean plants that causes dusky or light green patterns on leaves along with some unwanted dots and unhealthy growth. Using completely virus-free seeds is the best way to get rid of this trouble.
- Spider Mites are one kind of arachnid that causes stippled discolored leaves and webbing cover on the stems and foliages. This sort of crisis usually occurs because of the dusty circumstance on water-stressed bean plants. Spraying the infected area with a heavy jet of water or with insecticide soapy water would be a great process to get rid of this type of trouble.
Apart from these typical troubles, beans-plants could also infect by several other typical insects, fungus or bacterium like Mexican bean beetles, Loopers, leafminers, cutworms, black root rot, anthracnose, Fusarium root rot, bacterial brown spot, white mold, halo blight, etc.
Video Guide: Growing pinto beans
Beans Harvest and Storage
6. Harvest
- Two harvest the fruits from beans plants; you have to wait for the right harvesting time which generally comes after two to 3 weeks of blooming.
- You should start your harvesting when the seeds form bumps on the pod and the each piece looks mature.
- Generally, you can start to pinch them off the plant once they pump up to get the tender taste of pods.
- Remember that the pods must resemble firm and snap when they are bent, if you find your green veggie like this way, begin to pluck them up immediately.
- Keep picking the beans or peas after every 2 to 3 days, until you reach the last fruit of the plant.
- But remember to pinch the fruit out of the plant rather than pulling them out to avoid any kind of damage.
- You can cut the beans out of the stems by using a sharp scissor too, to shun any kind of harshness to the plants.
7. Storage
- After harvesting the beans from our own garden, we need to store them in a proper place first and for that, choose the fresh and undamaged pieces only.
- Now, place the reusable bottle, container or plastic bag and then keep it in your refrigerator crisper.
- You can keep the beans fresh for more than 7 to 10 days in this way.
- You can even freeze the beans too, for preserving them for very long periods of 3 to 6 months!
- To frozen beans steam them for 2 minutes and let them cool after removing from the heat. Then, place them in a heavy-duty freezer bag and store them in your freezer.
- If you are going to use your harvested beans or peas soon and like to have them in the fresh form, then we will recommend you not to place them in your refrigerator for a single day! Try to keep them unwrapped in the dark and cool place of your room.
Growing bush and pole beans
Beans Varieties:
Beans or common beans, which mostly come in green shades, are basically divided into two major varieties and they are Bush and Pole Beans. These two categories also subdivided by various different varieties. The foremost beans are available in both groups, whether it is broad beans fava or small beans like kidney, black cranberry, pinto, etc. Let check out some popular species of beans from both the categories-
Bush Beans:
Bush beans are the tastiest beans among their all equivalents and produce in two different patterns of green-podded and yellow-podded fruits. These types of beans can grow in various shapes and by far the most accepted homegrown beans ever. Half-runner, blue-lake, provider, tendergreen, dragon tongue, rolande, contender, maxibel, jade, etc. are famous types from this category. Most of the beans come with stringless pods and with several sizes within 4 to 8 inches!
Pole Beans:
Pole beans are much distinctive and nuttier to taste than the bush beans. Basically, these types of beans are called ‘pole’ beans because of their growing process, as pole beans could not grow without a trellis or teepees. Pole beans cultivate with more quantity than the rest category and grow in bending or squatting forms for the utmost times. Kentucky wonder and Romano Italian are two main types of pole beans. Spanish musica, trionfo Violetta, rattlesnake, fortex, Kentucky wonder, etc. are noted types of this criterion.
Check for Variety of beans, Planting and beans harvest ideas
Growing Beans in Pots:
- To sow the beans in a container or garden pot take the wide-faced pot with at least 12 ̎ depth and well-drainage system.
- Now make a perfect potting soil with the equal parts of sphagnum moss or organic compost, pasteurized soil and vermiculite fertilizer or manure.
- Keep the pH level absolutely faultless, while preparing the potting soil.
- Now, sow the seeds an inch deep in the soil and cover them up with some more potting mixture.
- You can plant 4 to 6 seeds separately two or three places in one normal sized garden container.
- After that, water the seeds with a sprayer and keep the soil moisture until the germination.
- Then, place the container near a sunny windowsill to provide 6 to 8 hours of direct sunlight to the plants.
- Once the seeds start germinating, water more frequently and remove any kind of shade or shadow from your or near your
- Fertilize monthly and use time-released fertilizer to feed your beans plants.
- Mulch the soil with natural products like grass or bay, and arrange an artificial led light over the window, if you found that the plants could not get enough sunlight to grow!
- Support each growing stems with a proper support and wait for the ideal harvesting time to get the best of your crops.
- Usually, beans take 45 to 655 days to reach the ripe form, while the plant in a container.
Growing beans: Beans are easy to grow.
Growing Bush Beans:
- Bus beans claim less time and fewer utensils to cultivate than other bean varieties. Thus several gardeners feel affectionate to grow this beans plant in your garden select a proper area in your garden first.
- Now, arrange some well-drained rich soil with organic material to sow the seeds.
- Try to find the sunniest place in your garden to plant this variety, as bush beans require full sun to produce the best of crops.
- Plant seeds about 1 to 1.5-inch deep and 3 inches apart from each other and keep almost 20 to 24-inches distance between one row to the other.
- Give 2 to 3 inches of water to your bush bean plants on every single week and feed them with compost of organic fertilizer after the beans have sprouted.
- You don’t need to provide any kind of support to the bush beans like pole beans, but you can arrange a barrier with fences if you want to protect the plants from animals or birds.
- Now all you need is just take proper care of your plants as we have mentioned above in our various topics and wait for the harvesting time with full patience.
Beans recipes for inspiration
Green beans with lemon and garlic : Foodnetwork.
Buttery garlic green beans : All recipes.
21 Delicious green beans recipes : delish.
How to cook green beans step by step idea: bhg.
Lemony green beans recipe with virgin oil and black pepper: jamieoliver.
Diet Conscious : Check for beans nutrition – nutritionfacts and calories in beans .